As an affiliate, we may earn a commission from qualifying purchases. We get commissions for purchases made through links on this website from Amazon and other third parties.
Your 12-inch cast iron skillet is more than just a cooking tool; it's a culinary powerhouse that can enhance a variety of dishes. From breakfast to dessert, it's capable of transforming simple ingredients into flavorful meals. You might be surprised at how versatile it really is. Curious about how to make the most of this kitchen staple? Let's explore some delicious recipes that showcase its true potential.
Key Takeaways
- Perfectly Fluffy Cast Iron Skillet Pancakes offer an easy breakfast option with a fluffy texture and minimal cleanup.
- One-Pan Skillet Breakfast Hash combines potatoes, sausage, and eggs for a hearty morning dish cooked entirely in one skillet.
- Enjoy a Crispy Skillet Fried Chicken with a golden-brown crust, perfect for a comforting and satisfying dinner.
- Create a Decadent Chocolate Chip Skillet Cookie that's warm and gooey, ideal for dessert lovers sharing a sweet treat.
- Explore a Sizzling Skillet Nachos recipe, layering your favorite toppings for a fun and easy game-day snack.
Perfectly Fluffy Cast Iron Skillet Pancakes
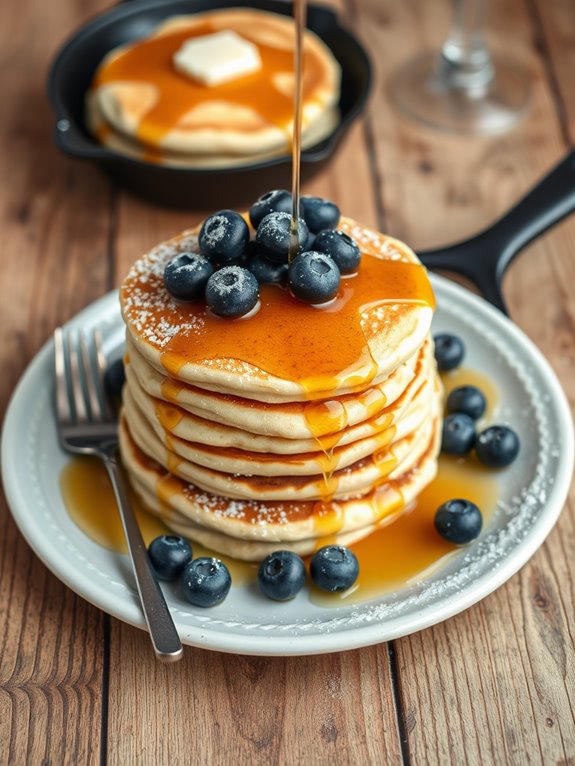
The beauty of cooking pancakes in a cast iron skillet is that it retains heat exceptionally well, ensuring that each pancake cooks evenly without any hot spots.
Plus, the skillet can go from stovetop to oven, making it versatile for various pancake styles or even for keeping your pancakes warm while you finish cooking the rest.
Get ready to impress your taste buds with these perfectly fluffy pancakes!
Ingredients:
- 1 cup all-purpose flour
- 2 tablespoons sugar
- 1 teaspoon baking powder
- 1/2 teaspoon baking soda
- 1/4 teaspoon salt
- 1 cup buttermilk
- 1 large egg
- 2 tablespoons melted butter
- 1 teaspoon vanilla extract
- Additional butter or oil for greasing the skillet
Cooking Instructions:
1. Begin by preheating your cast iron skillet over medium heat.
While the skillet is heating, whisk together the flour, sugar, baking powder, baking soda, and salt in a mixing bowl.
In a separate bowl, combine the buttermilk, egg, melted butter, and vanilla extract.
Pour the wet ingredients into the dry ingredients and gently mix until just combined – be careful not to overmix; a few lumps are fine.
2. Once the skillet is hot, add a little butter or oil to lightly grease the surface.
Pour about 1/4 cup of pancake batter onto the skillet for each pancake.
Cook until bubbles form on the surface, about 2-3 minutes, then flip and cook for an additional 1-2 minutes until golden brown.
Repeat with the remaining batter, adjusting the heat as necessary to prevent burning, and serve warm with your favorite toppings.
Extra Tips:
For even fluffier pancakes, let the batter rest for about 5-10 minutes before cooking.
This allows the gluten to relax and the baking powder to activate.
Additionally, if you want to mix things up, feel free to add blueberries, chocolate chips, or nuts to the batter before cooking.
Don't forget to keep your pancakes warm in a low oven while you finish cooking the rest!
One-Pan Skillet Breakfast Hash
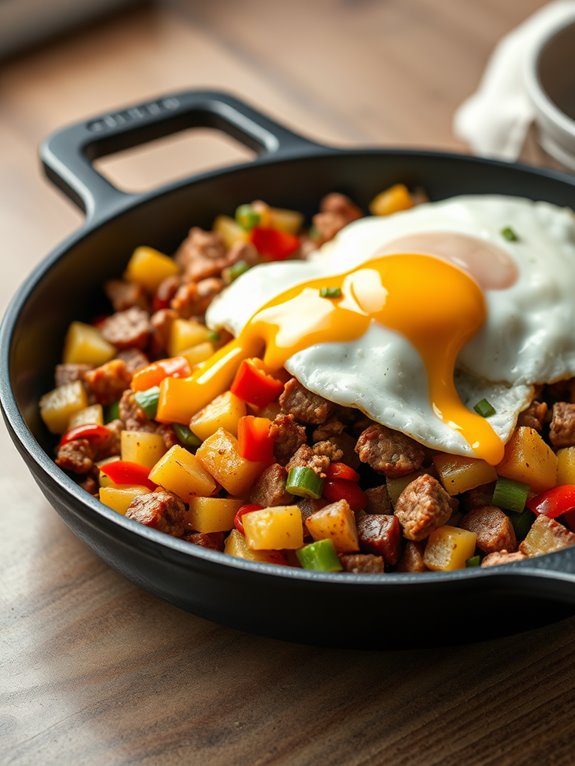
Cooking everything in a cast iron skillet not only saves on cleanup but also enhances the dish with a lovely depth of flavor.
As the ingredients meld together in the skillet, each bite delivers a delightful mix of textures and tastes. Top it off with a runny fried egg for the ultimate breakfast experience!
Ingredients:
- 2 large potatoes, diced
- 1 onion, chopped
- 1 bell pepper, diced
- 1 cup cooked sausage, crumbled or diced
- 2 tablespoons olive oil
- 1 teaspoon paprika
- Salt and pepper, to taste
- 4 eggs
- Fresh parsley, chopped (for garnish)
Cooking Instructions:
In a preheated cast iron skillet, add the olive oil and sauté the diced potatoes over medium heat.
Cook for about 10-15 minutes or until they start to brown and become tender. Stir in the chopped onion and bell pepper, cooking for an additional 5 minutes until the vegetables are softened.
Add the cooked sausage, paprika, salt, and pepper, mixing everything together thoroughly.
Create four small wells in the hash and crack an egg into each well. Cover the skillet and cook for about 5-7 minutes, or until the eggs are cooked to your desired doneness.
Once ready, remove from heat, garnish with fresh parsley, and serve warm.
Extra Tips:
For added flavor, experiment with different types of sausage, such as chorizo or turkey sausage.
You can also customize your hash by adding other vegetables like zucchini or spinach.
If you prefer your eggs cooked differently, you can scramble them and mix them into the hash just before serving.
Enjoy your skillet breakfast hash with a side of toast or fresh fruit for a complete meal!
Savory Spinach and Feta Frittata
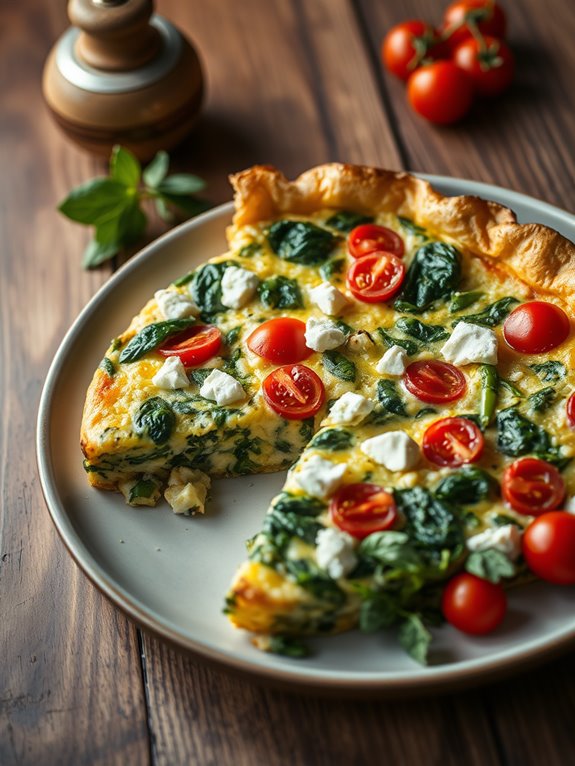
This recipe is versatile; you can customize it by adding your favorite vegetables or herbs.
Pair it with a simple green salad or crusty bread for a complete meal. Whether you're cooking for yourself or entertaining guests, this frittata is sure to impress!
Ingredients:
- 6 large eggs
- 1 cup fresh spinach, chopped
- 1/2 cup feta cheese, crumbled
- 1/2 cup cherry tomatoes, halved
- 1 small onion, diced
- 2 cloves garlic, minced
- 1/4 cup milk
- Salt and pepper, to taste
- 2 tablespoons olive oil
- Fresh herbs (like parsley or dill) for garnish (optional)
Cooking Instructions:
- Preheat your oven to 375°F (190°C). In a large cast iron skillet, heat the olive oil over medium heat. Add the diced onion and sauté until translucent, about 3-4 minutes.
- Stir in the minced garlic and cook for another minute until fragrant. Add the chopped spinach to the skillet, stirring until wilted.
- In a bowl, whisk together the eggs, milk, salt, and pepper. Pour the egg mixture into the skillet, making sure it evenly covers the spinach and onion.
- Sprinkle the crumbled feta and halved cherry tomatoes on top. Cook on the stovetop for about 2-3 minutes until the edges start to set.
- Transfer the skillet to the preheated oven and bake for an additional 15-20 minutes, or until the frittata is puffed and golden brown. Allow it to cool for a few minutes before slicing.
Extra Tips:
To enhance the flavor of your frittata, try adding herbs like fresh basil or oregano.
You can also substitute the spinach with other greens like kale or swiss chard. If you prefer a firmer texture, cook it a bit longer in the oven, but keep an eye on it to avoid overcooking.
Enjoy your delicious frittata warm, but it's also great served at room temperature!
Crispy Skillet Fried Chicken

Crispy Skillet Fried Chicken is a true comfort food classic that never fails to impress. Cooking chicken in a cast iron skillet not only guarantees a golden-brown crust but also locks in moisture, resulting in juicy and flavorful meat. With the right seasoning and technique, you can achieve that perfect crispy exterior while keeping the inside tender and succulent.
This dish is great for family dinners, gatherings, or simply as a satisfying treat for yourself. The beauty of skillet fried chicken lies in its simplicity. By using a few staple ingredients and a cast iron skillet, you can create a meal that's both delicious and satisfying.
Pair it with sides like mashed potatoes, coleslaw, or cornbread for a complete Southern-inspired feast. Get your apron on, and let's get started on making this mouthwatering dish!
Ingredients:
- 4 chicken thighs
- 4 chicken drumsticks
- 1 cup buttermilk
- 2 cups all-purpose flour
- 1 teaspoon garlic powder
- 1 teaspoon onion powder
- 1 teaspoon paprika
- 1 teaspoon cayenne pepper
- Salt and pepper, to taste
- Vegetable oil, for frying
Cooking Instructions:
Begin by marinating the chicken in buttermilk for at least 2 hours, or preferably overnight in the refrigerator. This step is essential for tenderizing the meat and enhancing its flavor.
Once marinated, remove the chicken from the buttermilk and allow any excess liquid to drip off. In a large bowl, mix together the flour, garlic powder, onion powder, paprika, cayenne pepper, salt, and pepper. Dredge each piece of chicken in the flour mixture, making sure it's evenly coated.
Heat about 1 inch of vegetable oil in a cast iron skillet over medium heat until it reaches 350°F (175°C). Carefully add the chicken pieces to the hot oil, making sure not to overcrowd the skillet. Fry the chicken for about 12-15 minutes on each side, or until the internal temperature reaches 165°F (75°C) and the chicken is golden brown and crispy.
Once cooked, transfer the chicken to a wire rack to drain excess oil.
Extra Tips:
For extra crispy chicken, consider double-dipping the chicken in the buttermilk and flour mixture. Additionally, allow your oil to return to temperature between batches to maximize crispiness.
If you prefer a healthier version, you can bake the chicken in the oven after coating it, but be sure to add a bit of oil to achieve that desired crunch. Enjoy your homemade crispy skillet fried chicken!
Hearty Beef and Vegetable Stir-Fry
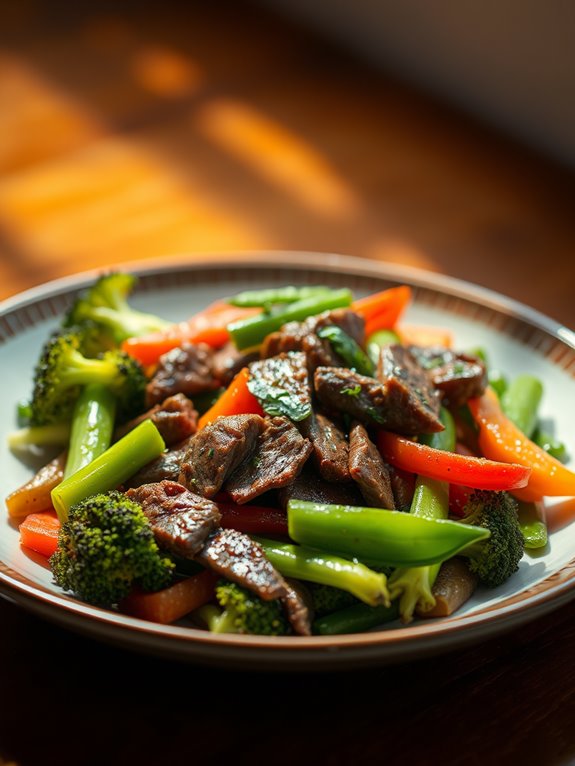
Using a cast iron skillet not only enhances the flavors but also gives you that coveted sear on the beef. The combination of fresh vegetables adds a delightful crunch and loads of vitamins. Serve this stir-fry over rice or noodles for a complete meal that everyone will enjoy.
Ingredients:
- 1 pound flank steak, thinly sliced against the grain
- 2 tablespoons soy sauce
- 1 tablespoon cornstarch
- 2 tablespoons vegetable oil
- 1 bell pepper, sliced (any color)
- 1 cup broccoli florets
- 1 carrot, julienned
- 1 cup snap peas
- 3 cloves garlic, minced
- 1 tablespoon fresh ginger, minced
- 3 tablespoons oyster sauce
- Salt and pepper to taste
- Cooked rice or noodles for serving
Cooking Instructions:
In a bowl, combine the sliced flank steak with soy sauce and cornstarch, tossing to coat the beef evenly. Let it marinate for about 15 minutes while you prepare your vegetables.
Heat the cast iron skillet over medium-high heat and add 1 tablespoon of vegetable oil. Once the oil is hot, add the marinated beef in a single layer and cook for about 2-3 minutes on each side until browned. Remove the beef from the skillet and set it aside.
In the same skillet, add the remaining tablespoon of oil and add the minced garlic and ginger, sautéing for about 30 seconds until fragrant.
Add the bell pepper, broccoli, carrot, and snap peas, cooking for about 5-7 minutes until the vegetables are tender-crisp. Return the beef to the skillet, add the oyster sauce, and stir everything together.
Cook for an additional 2 minutes to combine the flavors. Season with salt and pepper to taste, and serve over rice or noodles.
Extra Tips:
For a more personalized touch, feel free to mix and match your favorite vegetables! You can also adjust the level of spice by adding red pepper flakes or a splash of chili sauce to the stir-fry sauce.
Confirm that you have all your ingredients prepped before you start cooking, as stir-frying is a quick process that requires your full attention. Enjoy your delicious and hearty meal!
Classic Cast Iron Skillet Cornbread
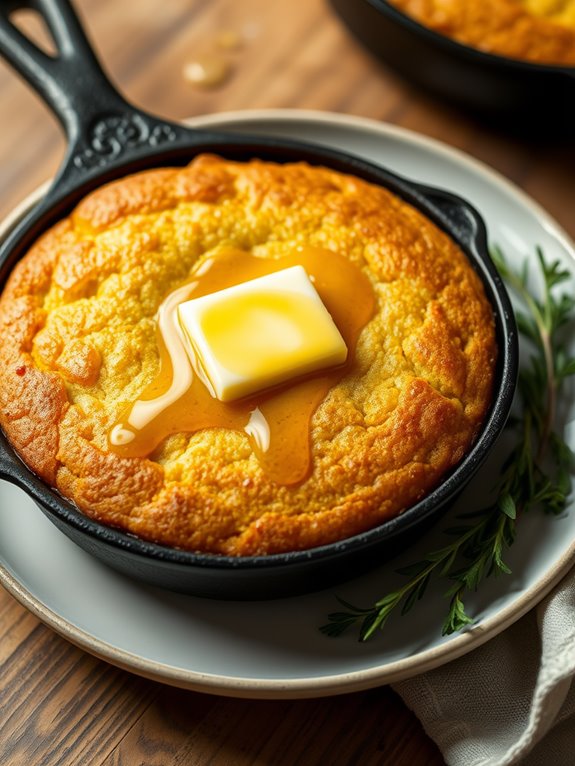
Classic Cast Iron Skillet Cornbread is a timeless dish that brings warmth and comfort to any table. Its golden-brown crust and tender crumb make it the perfect accompaniment to hearty stews, chili, or even enjoyed on its own with a pat of butter and a drizzle of honey.
The cast iron skillet guarantees even heat distribution, giving you that irresistible crispy edge that everyone loves.
Making cornbread from scratch is surprisingly simple, and it requires just a few staple ingredients you likely have on hand. This recipe will guide you through creating a deliciously moist and flavorful cornbread that can be enjoyed fresh from the oven or reheated later for breakfast or a snack.
Ingredients:
- 1 cup cornmeal
- 1 cup all-purpose flour
- 1 tablespoon baking powder
- 1/2 teaspoon salt
- 1/4 cup sugar (optional)
- 1 cup milk
- 2 large eggs
- 1/4 cup unsalted butter, melted
- 1 tablespoon vegetable oil (for the skillet)
Instructions:
- Preheat your oven to 425°F (220°C). Place your cast iron skillet in the oven while it preheats to guarantee it gets nice and hot.
- In a mixing bowl, combine the cornmeal, flour, baking powder, salt, and sugar (if using). Whisk these dry ingredients together until well blended.
- In another bowl, whisk together the milk, eggs, and melted butter. Pour the wet ingredients into the dry mixture and stir until just combined. Be careful not to overmix; a few lumps are perfectly fine.
- Once the skillet is hot, carefully remove it from the oven and add the vegetable oil, swirling to coat the bottom. Immediately pour in the batter and return the skillet to the oven.
- Bake for 20-25 minutes, or until the top is golden brown and a toothpick inserted in the center comes out clean.
For best results, let your cornbread cool in the skillet for a few minutes before slicing.
To enhance the flavor, consider adding ingredients like jalapeños, cheddar cheese, or fresh herbs to the batter. Also, if you prefer a sweeter cornbread, feel free to increase the sugar according to your taste.
Enjoy your warm cornbread with butter or as a side for your favorite dishes!
Creamy Garlic Parmesan Risotto
Creamy Garlic Parmesan Risotto is a comforting and rich dish that showcases the beauty of simple ingredients elevated by technique. Cooking risotto requires patience and care, but the end result is well worth the effort. The creamy texture combined with the savory notes of garlic and the sharpness of Parmesan creates a delightful experience for your taste buds.
Plus, using a cast iron skillet guarantees even heat distribution, which is essential for achieving the perfect texture. This dish is perfect for a cozy dinner at home or as a side for a special occasion. Pair it with a crisp salad or grilled vegetables for a complete meal.
With just a few basic ingredients, you can create a restaurant-quality risotto that will impress your family and friends. Follow this recipe to bring the comforting flavors of Italy right to your kitchen.
Ingredients:
- 1 cup Arborio rice
- 4 cups chicken or vegetable broth
- 1 cup dry white wine
- 1 medium onion, finely chopped
- 3 cloves garlic, minced
- 1 cup grated Parmesan cheese
- 2 tablespoons olive oil
- 2 tablespoons unsalted butter
- Salt and pepper to taste
- Fresh parsley for garnish (optional)
Cooking Instructions:
- In your cast iron skillet, heat the olive oil and 1 tablespoon of butter over medium heat. Add the chopped onion and sauté until translucent, about 3-5 minutes. Stir in the minced garlic and cook for an additional minute, being careful not to burn it.
- Add the Arborio rice to the skillet, stirring to coat the grains with the oil and butter. Toast the rice for about 2 minutes until it becomes slightly translucent. Pour in the white wine and let it simmer, stirring frequently until most of the liquid is absorbed.
- Gradually add the warm broth, one ladle at a time, stirring continuously. Allow the rice to absorb the liquid before adding more broth. This process should take about 18-20 minutes until the rice is creamy and al dente.
Once done, remove the skillet from heat and stir in the remaining tablespoon of butter and the grated Parmesan cheese. Season with salt and pepper to taste.
Extra Tips:
For the best results, always use warm broth to maintain the cooking temperature of the risotto. You can customize the recipe by adding your favorite vegetables, such as peas or mushrooms, during the cooking process.
If you're feeling adventurous, a squeeze of lemon juice or a sprinkle of nutmeg can elevate the flavors even further. Remember to stir frequently and be patient — the creamy consistency of risotto comes from the slow absorption of liquids, so take your time to enjoy the cooking process!
Skillet Ratatouille
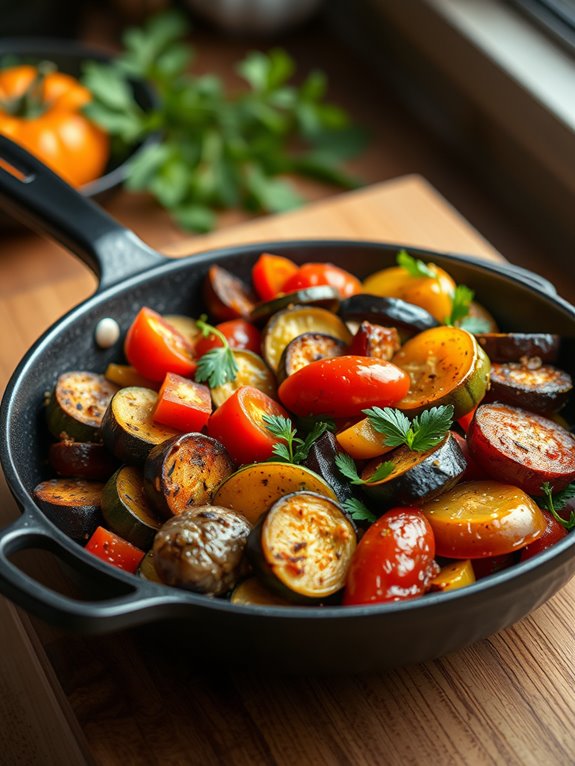
This recipe combines eggplant, zucchini, bell peppers, and tomatoes, simmered together with aromatic herbs and spices. The result is a hearty, comforting dish that can be served as a main course or a side. Perfect for a cozy dinner or a gathering with friends, skillet ratatouille is an excellent way to showcase the best of seasonal produce.
Ingredients:
- 1 medium eggplant, diced
- 2 medium zucchinis, sliced
- 1 bell pepper (red or yellow), chopped
- 1 onion, diced
- 3 cloves garlic, minced
- 3 medium tomatoes, chopped (or 1 can of diced tomatoes)
- 2 tablespoons olive oil
- 1 teaspoon dried thyme
- 1 teaspoon dried basil
- Salt and pepper to taste
- Fresh basil leaves for garnish (optional)
Cooking Instructions:
Heat the olive oil in a cast iron skillet over medium heat. Add the diced onion and minced garlic, sautéing until they become translucent and fragrant.
Next, add the diced eggplant and bell peppers to the skillet, stirring occasionally, until they soften, about 5-7 minutes. Then, incorporate the sliced zucchini and chopped tomatoes, along with the dried thyme and basil. Season with salt and pepper to taste.
Reduce the heat to low, cover the skillet, and let the mixture simmer for about 20-25 minutes, allowing the flavors to meld together. Stir occasionally, ensuring that the vegetables don't stick to the bottom of the skillet.
Once the vegetables are tender and the ratatouille is thickened, remove it from heat and garnish with fresh basil leaves if desired.
Extra Tips:
For an added depth of flavor, consider roasting the vegetables in the oven before adding them to the skillet. This can enhance their natural sweetness and create a delightful char.
Additionally, feel free to customize the recipe by adding other vegetables like squash, mushrooms, or even chickpeas for added protein. Ratatouille can be served hot, at room temperature, or even cold, making it a versatile dish that can be enjoyed any time of the year.
Sweet and Spicy Pineapple Shrimp
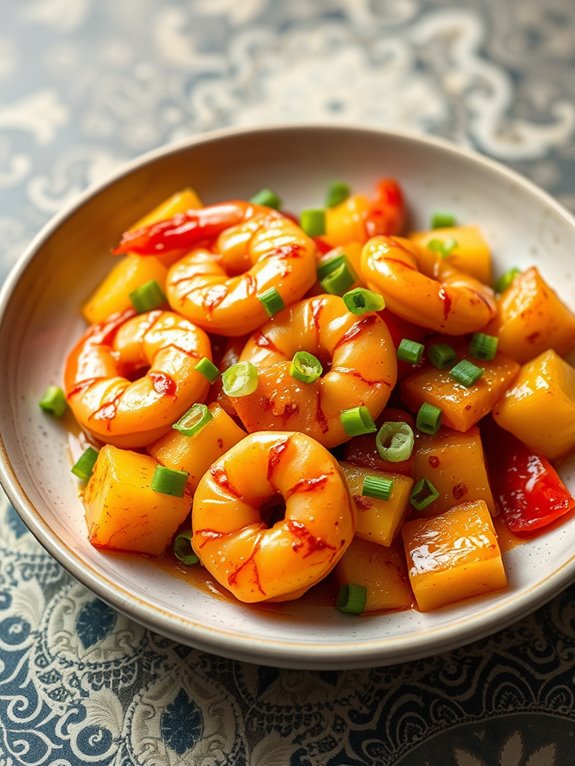
Sweet and Spicy Pineapple Shrimp is a delightful dish that brings together the tropical sweetness of pineapple with the heat of spices, creating a vibrant explosion of flavors in your mouth. This recipe is perfect for a quick weeknight dinner or a fun gathering with friends. The cast iron skillet guarantees even cooking and a beautiful sear on the shrimp, enhancing their natural sweetness and leaving you with a dish that's as pleasing to the eyes as it's to the palate.
Using fresh ingredients, this Sweet and Spicy Pineapple Shrimp recipe is both simple and satisfying. The combination of shrimp, pineapple, and spices creates a balance that's sure to impress. Serve it over rice or with a side of crispy vegetables for a complete meal that will transport you straight to a tropical paradise.
Ingredients:
- 1 lb large shrimp, peeled and deveined
- 1 cup fresh pineapple chunks
- 2 tablespoons olive oil
- 2 tablespoons soy sauce
- 1 tablespoon honey
- 1 teaspoon chili powder
- 1/2 teaspoon garlic powder
- 1/2 teaspoon ginger powder
- Salt and pepper to taste
- Chopped green onions for garnish
- Lime wedges for serving
To cook the Sweet and Spicy Pineapple Shrimp, start by heating the olive oil in a cast iron skillet over medium-high heat. In a bowl, combine the shrimp, soy sauce, honey, chili powder, garlic powder, ginger powder, salt, and pepper. Toss the shrimp to coat them evenly in the marinade.
Once the oil is hot, add the marinated shrimp to the skillet and cook for about 2-3 minutes on each side until they turn pink and opaque. Add the pineapple chunks to the skillet during the final minute of cooking to allow them to caramelize slightly and mingle with the shrimp.
Once cooked, remove the skillet from the heat and garnish with chopped green onions. Serve immediately with lime wedges on the side for an added zesty kick. This dish pairs wonderfully with jasmine rice or a fresh green salad.
Extra Tips:
For a bit more heat, feel free to add a dash of crushed red pepper flakes or sriracha to the marinade. Also, if you have time, let the shrimp marinate for about 30 minutes before cooking to deepen the flavors.
Finally, be sure to not overcrowd the skillet; cook the shrimp in batches if necessary to achieve that perfect sear. Enjoy your tropical culinary adventure!
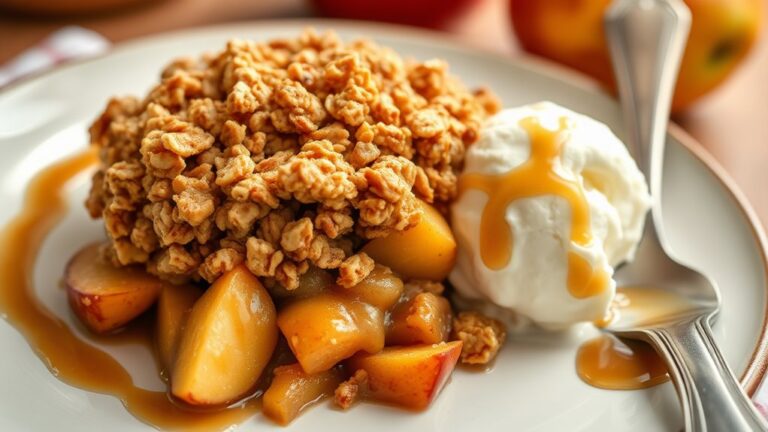
Rustic Apple Crisp
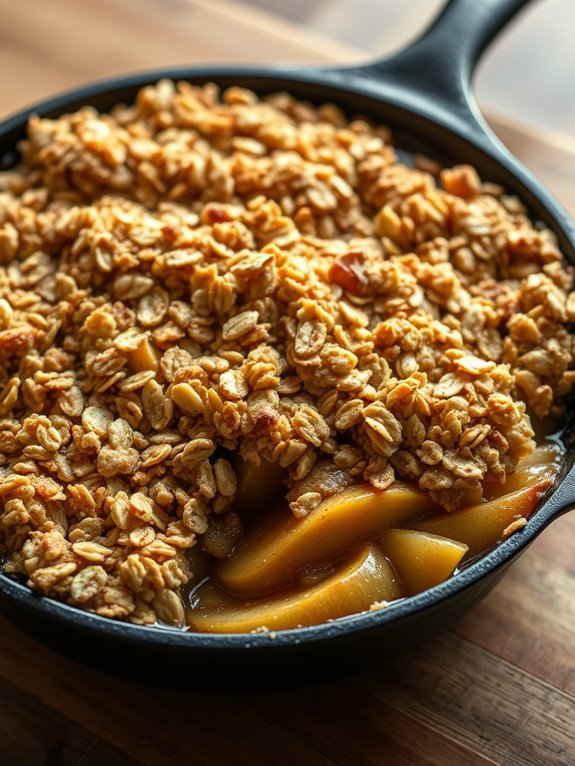
The beauty of this dish lies in its simplicity; with just a few key ingredients, you can create a dessert that feels homemade and heartfelt.
Serve it warm, perhaps with a scoop of vanilla ice cream or a dollop of whipped cream, and watch as it disappears within moments. This Rustic Apple Crisp is sure to become a favorite in your household!
Ingredients:
- 4-5 medium apples (such as Granny Smith or Honeycrisp), peeled, cored, and sliced
- 1/2 cup granulated sugar
- 1 tablespoon lemon juice
- 1 teaspoon ground cinnamon
- 1 cup rolled oats
- 1/2 cup all-purpose flour
- 1/2 cup packed brown sugar
- 1/2 teaspoon salt
- 1/2 cup cold unsalted butter, cubed
Instructions:
Preheat your oven to 350°F (175°C). In a large mixing bowl, toss the sliced apples with granulated sugar, lemon juice, and cinnamon until they're well coated.
Spread the apple mixture evenly in your preheated cast iron skillet.
In a separate bowl, combine the rolled oats, flour, brown sugar, and salt. Add the cold, cubed butter and use a pastry cutter or your fingers to mix until the mixture resembles coarse crumbs.
Evenly distribute the oat topping over the apples in the skillet. Bake for 30-35 minutes, or until the apples are tender and the topping is golden brown and crisp.
Extra Tips:
For an added depth of flavor, consider mixing in a handful of chopped nuts or dried fruit into the topping.
You can also experiment with different spices, such as nutmeg or allspice, to enhance the apple flavor. If you like a sweeter dessert, feel free to adjust the sugar to your taste.
Enjoy your Rustic Apple Crisp fresh out of the oven, but it also tastes delicious the next day!
Decadent Chocolate Chip Skillet Cookie

There's nothing quite like the warm, gooey delight of a chocolate chip skillet cookie, especially when it's baked to perfection in a cast iron skillet. This decadent dessert is perfect for sharing with friends and family or enjoying all by yourself.
With its crispy edges and soft, melty center, this skillet cookie is a comforting treat that can be whipped up in no time. Just imagine pulling it out of the oven, the tantalizing aroma of chocolate wafting through the air, and serving it warm with a scoop of vanilla ice cream on top—pure bliss!
Making a chocolate chip skillet cookie is incredibly simple and calls for basic pantry ingredients. This recipe isn't only easy to follow but also allows for customization. Feel free to add in your favorite mix-ins, whether it's nuts, dried fruit, or even a dash of sea salt for an extra flavor kick.
Gather your ingredients, preheat your oven, and get ready to indulge in a chocolatey dessert that's sure to impress!
Ingredients:
- 1 cup all-purpose flour
- 1/2 teaspoon baking soda
- 1/4 teaspoon salt
- 1/2 cup unsalted butter, melted
- 1/2 cup brown sugar, packed
- 1/4 cup granulated sugar
- 1 teaspoon vanilla extract
- 1 large egg
- 1 cup semi-sweet chocolate chips
- Optional: sea salt for sprinkling
To prepare your decadent chocolate chip skillet cookie, start by preheating your oven to 350°F (175°C). In a medium bowl, whisk together the flour, baking soda, and salt; set aside.
In a large bowl, combine the melted butter, brown sugar, and granulated sugar, mixing well. Add in the vanilla extract and egg, stirring until fully incorporated. Gradually mix in the dry ingredients until just combined, then fold in the chocolate chips.
Pour the cookie dough into a greased 10-inch cast iron skillet, spreading it evenly. Bake for 25-30 minutes, or until the edges are golden brown and the center is set but still soft.
Remove the skillet from the oven and let it cool for a few minutes before serving. For an extra touch, sprinkle a pinch of sea salt on top right after removing from the oven.
Extra Tips: To achieve a perfectly gooey center, be careful not to overbake the cookie. Every oven is different, so start checking for doneness a few minutes before the suggested baking time.
If you like your cookie extra chocolatey, consider adding more chocolate chips or even a swirl of nut butter for a delicious twist. Serve it warm, and don't forget the ice cream for that ultimate dessert experience!
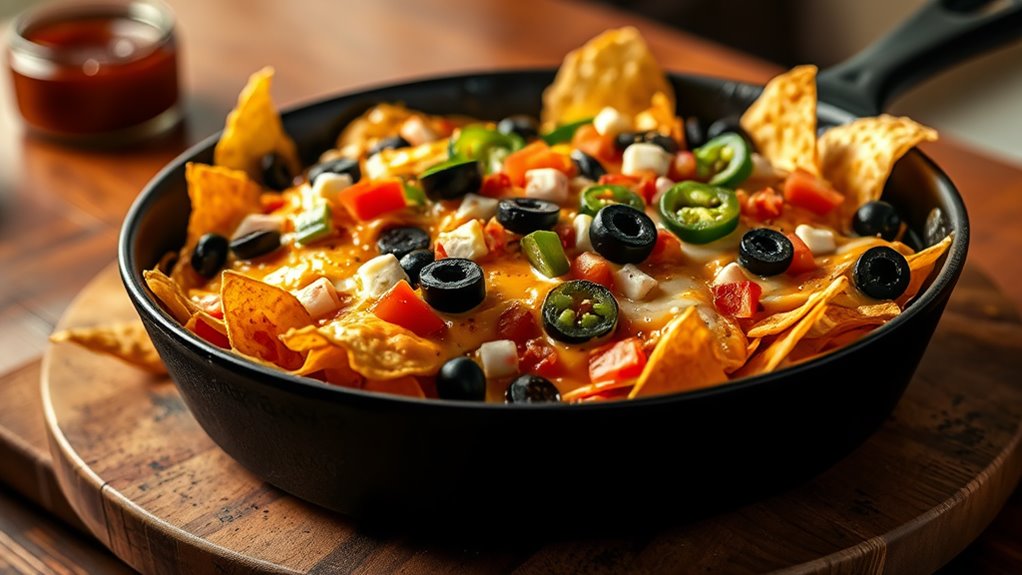
Sizzling Skillet Nachos

Sizzling skillet nachos are the ultimate crowd-pleaser, perfect for game day or a cozy night in. The beauty of this dish lies in its versatility; you can easily customize it to suit your taste preferences or dietary needs. With layers of crispy tortilla chips, gooey melted cheese, and an array of toppings, these nachos are sure to satisfy any craving.
Cooking them in a cast iron skillet not only guarantees even heat distribution but also gives a delightful crispiness to the chips.
Preparation is simple and straightforward, making it an excellent choice for both novice and experienced cooks. As the skillet heats up, the aromas of your chosen toppings will fill the air, creating an irresistible dish that's meant to be shared. Gather your friends and family around the table and dig into this delicious, cheesy treat straight from the skillet.
Ingredients:
- 1 bag of tortilla chips
- 2 cups shredded cheese (cheddar, Monterey Jack, or a mix)
- 1 cup cooked ground beef or shredded chicken
- 1 can black beans, drained and rinsed
- 1 cup diced tomatoes (fresh or canned)
- 1 jalapeño, sliced (optional)
- 1/2 cup sliced black olives
- 1/2 cup chopped green onions
- 1/2 cup sour cream
- Fresh cilantro for garnish
- Salsa or pico de gallo for serving
Cooking Instructions:
Preheat your cast iron skillet over medium heat. Once hot, layer half of the tortilla chips evenly across the bottom of the skillet.
Sprinkle half of the shredded cheese on top, followed by half of the cooked meat, black beans, diced tomatoes, jalapeños, and olives.
Repeat the layers with the remaining chips and toppings, finishing with a generous layer of cheese on top.
Cover the skillet with a lid or aluminum foil and allow it to cook for about 10-15 minutes, or until the cheese is fully melted and bubbly.
Carefully remove the lid and let the nachos cool slightly before garnishing with green onions and cilantro. Serve with dollops of sour cream and salsa on the side for a delicious finish.
Extra Tips:
For an extra kick, consider adding some seasoned taco meat or a sprinkle of your favorite spices to the layers.
You can also experiment with different cheeses for varied flavors. If you prefer a healthier option, swap regular chips for baked tortilla chips and load up on fresh veggies.
Remember to keep an eye on the nachos as they cook to make sure they don't burn, as cast iron retains heat very well!
Frequently Asked Questions
How Do I Properly Season My Cast Iron Skillet?
Imagine your skillet's surface gleaming like a polished gem. To season it, scrub it clean, apply a thin coat of oil, and bake it upside down. You'll create a non-stick, flavorful masterpiece ready for cooking!
Can I Use My Cast Iron Skillet on an Induction Cooktop?
Yes, you can use your cast iron skillet on an induction cooktop! Just make certain it has a flat bottom for ideal contact. Enjoy the quick heat and even cooking that induction provides for your favorite dishes.
What Is the Best Way to Clean a Cast Iron Skillet?
Some folks think cleaning a cast iron skillet's tough, but it's simple! Just use hot water and a stiff brush. Avoid soap, dry it well, and apply a light coat of oil to maintain seasoning.
How Do I Prevent Food From Sticking to My Cast Iron Skillet?
To prevent food from sticking, always preheat your skillet before adding oil. Use enough oil or fat to coat the surface, and avoid overcrowding the pan. Season your skillet regularly to maintain its non-stick properties.
Is It Safe to Use Metal Utensils on Cast Iron Cookware?
Yes, you can safely use metal utensils on cast iron cookware. They won't damage the seasoning if you're careful. Just avoid using extremely sharp objects that might scrape off the seasoning layer over time.