As an affiliate, we may earn a commission from qualifying purchases. We get commissions for purchases made through links on this website from Amazon and other third parties.
Like a tiny canvas waiting for your culinary creativity, a 3-inch cast iron skillet offers endless possibilities for delicious mini meals. Whether you're in the mood for a comforting mac and cheese or a flavorful personal pizza, these recipes are quick and satisfying. Each bite packs a punch, making your cooking experience both fun and rewarding. Curious about how to whip up these delightful dishes? Let's explore the options together.
Key Takeaways
- Mini Skillet Mac and Cheese: A creamy, cheesy delight perfect for one or two, easily customized with toppings like bacon or vegetables.
- Single-Serve Frittata: A quick, nutritious option that allows for various ingredients, cooked in a cast iron skillet for crispy edges.
- Tiny Chocolate Chip Cookie: Freshly baked in under 15 minutes, these cookies are perfect for late-night snacks and require minimal ingredients.
- Personal Pepperoni Pizza: Made in a 3-inch skillet for a crispy crust, this mini pizza bakes in just 12-15 minutes.
- Skillet Cornbread Muffin: Crispy exterior with a soft interior, this muffin is perfect as a snack or side, customizable with ingredients like cheese or jalapeños.
Mini Skillet Mac and Cheese
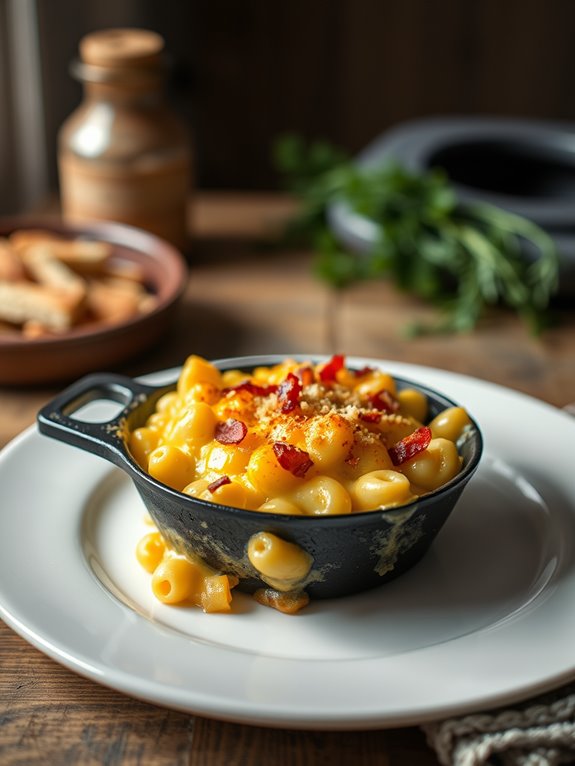
Mini Skillet Mac and Cheese is a delightful twist on the classic comfort food that brings a creamy, cheesy delight right to your table. Perfect for a cozy night in or a quick weeknight dinner, this dish is simple to prepare and can be tailored to suit your taste. Using a cast iron skillet adds a rustic charm and guarantees even cooking, making this mini version just as satisfying as a traditional mac and cheese.
With its rich and gooey texture, Mini Skillet Mac and Cheese is sure to please both kids and adults alike. You can easily customize it by adding your favorite toppings, such as crispy bacon, sautéed vegetables, or an extra sprinkle of cheese. This recipe serves just the right portion for one or two people, making it ideal for a quick meal without the hassle of leftovers.
Ingredients:
- 1 cup elbow macaroni
- 1 cup shredded sharp cheddar cheese
- ½ cup milk
- 2 tablespoons unsalted butter
- 1 tablespoon all-purpose flour
- ¼ teaspoon garlic powder
- ¼ teaspoon onion powder
- Salt and pepper, to taste
- Optional: breadcrumbs or extra cheese for topping
Cooking Instructions:
- Preheat your oven to 350°F (175°C). In your cast iron skillet, bring a pot of salted water to a boil and cook the elbow macaroni according to package instructions until al dente. Drain and set aside.
- In the same skillet, melt the butter over medium heat. Once melted, whisk in the flour and cook for about a minute to form a roux. Gradually stir in the milk, followed by the garlic powder, onion powder, salt, and pepper. Continue to whisk until the mixture thickens slightly.
- Remove the skillet from the heat and stir in the cooked macaroni and shredded cheese until it's fully combined and creamy. If desired, sprinkle breadcrumbs or additional cheese on top. Bake in the preheated oven for about 15-20 minutes or until the top is golden and bubbly.
Extra Tips:
For an extra layer of flavor, consider adding cooked bacon, sautéed mushrooms, or even a pinch of cayenne pepper for a little heat. If you want a creamier texture, you can mix in a bit of cream cheese along with the cheddar.
Remember to keep an eye on the skillet while it bakes to avoid overcooking, as each oven may vary in temperature. Enjoy your delicious and easy Mini Skillet Mac and Cheese!
Single-Serve Frittata

A single-serve frittata is a delightful way to enjoy a quick and nutritious meal, perfect for breakfast or brunch. Using a cast iron skillet guarantees even cooking and adds a nice crispy edge to your frittata. This dish is versatile, allowing you to incorporate your favorite vegetables, meats, or cheeses, making it a great way to use up leftovers.
To make a single-serve frittata, you'll only need a few ingredients, and it comes together in just a matter of minutes. The beauty of this dish is that it's customizable to your taste preferences. Whether you prefer a classic combination of spinach and feta or something heartier like bacon and cheddar, the options are endless!
Ingredients:
- 2 large eggs
- 2 tablespoons milk
- Salt and pepper to taste
- 1/4 cup diced vegetables (e.g., bell peppers, onions, spinach)
- 2 tablespoons shredded cheese (e.g., cheddar, feta, mozzarella)
- Optional: cooked meats (e.g., bacon, ham, sausage)
- Cooking oil or butter for greasing the skillet
Instructions:
- Preheat your cast iron skillet over medium heat and add a small amount of oil or butter to coat the bottom. In a mixing bowl, whisk together the eggs, milk, salt, and pepper until well combined. Stir in the diced vegetables and any optional cooked meats you desire.
- Pour the egg mixture into the preheated skillet, making sure it spreads evenly. Cook for about 2-3 minutes until the edges begin to set. Sprinkle the shredded cheese on top and transfer the skillet to a preheated oven (around 375°F) to bake for an additional 5-7 minutes or until the frittata is fully set and lightly golden on top.
For best results, verify that your skillet is well-seasoned, as this will prevent the frittata from sticking and enhance the flavors.
Experiment with different ingredients to find your perfect combination, and feel free to top your frittata with fresh herbs or a dollop of salsa for added flavor. Enjoy your delicious, single-serve frittata straight from the skillet!
Skillet Cornbread Muffin
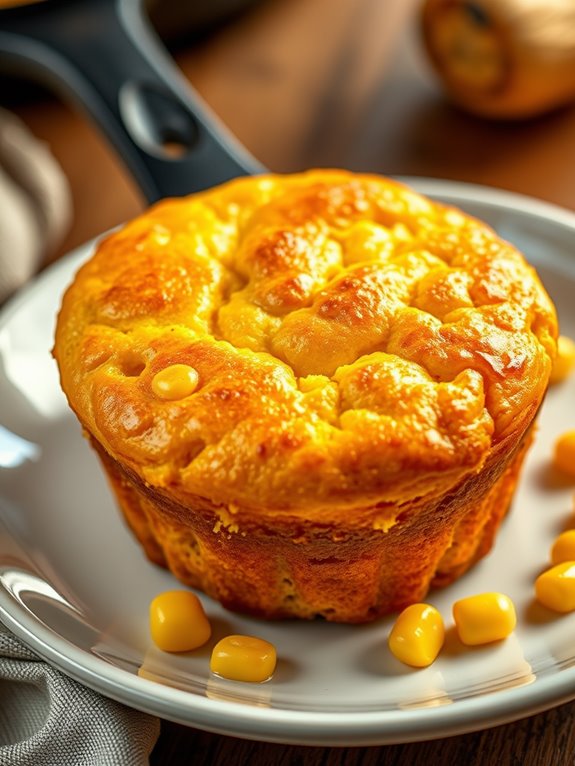
Skillet cornbread muffins are a delightful twist on traditional cornbread, offering a crispy exterior and a soft, moist interior. Made in a cast iron skillet, these muffins are perfect for serving alongside hearty soups, stews, or even as a standalone snack. The use of buttermilk adds a tangy flavor that complements the sweetness of the cornmeal, creating a delicious balance that will have everyone reaching for seconds.
The beauty of cornbread muffins lies in their simplicity and versatility. You can easily customize the recipe by adding ingredients such as jalapeños for heat, corn kernels for texture, or cheese for richness. Preparing them in a cast iron skillet not only enhances the flavor but also gives them that signature golden crust that's hard to resist.
Let's plunge into this easy recipe that's sure to become a family favorite.
Ingredients:
- 1 cup cornmeal
- 1 cup all-purpose flour
- 1 tablespoon baking powder
- 1/2 teaspoon salt
- 1/4 cup sugar
- 1 cup buttermilk
- 1/4 cup vegetable oil
- 2 large eggs
- 1 cup corn kernels (optional)
Cooking Instructions:
Preheat your oven to 425°F (220°C) and place your cast iron skillet inside to heat up. In a large mixing bowl, combine the cornmeal, flour, baking powder, salt, and sugar.
In a separate bowl, whisk together the buttermilk, vegetable oil, and eggs until well combined. Gradually add the wet ingredients to the dry ingredients, stirring until just combined. If you're adding corn kernels, fold them in gently.
Once your skillet is hot, carefully remove it from the oven and add a little oil or butter to coat the bottom. Pour the batter into the heated skillet, smoothing the top with a spatula if needed. Bake for 15-20 minutes or until the muffins are golden brown and a toothpick inserted in the center comes out clean.
Allow to cool slightly before cutting into wedges or serving as muffins.
Extra Tips:
For an extra flavorful twist, consider adding spices like cumin or chili powder to the batter. If you don't have buttermilk on hand, you can easily make a substitute by mixing regular milk with a tablespoon of vinegar or lemon juice and letting it sit for a few minutes.
Always make sure your skillet is well-seasoned to achieve that perfect crust, and don't hesitate to experiment with mix-ins that suit your taste!
Tiny Chocolate Chip Cookie
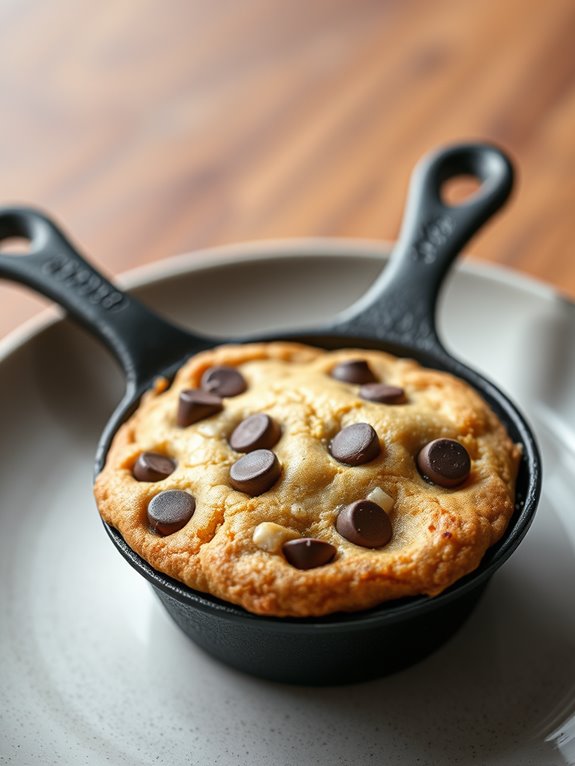
This recipe isn't only simple but also allows you to enjoy freshly baked cookies in no time. Perfect for a late-night snack or a fun dessert, your tiny chocolate chip cookie will be ready in under 15 minutes. Grab your cast iron skillet and let's get baking!
Ingredients:
- 2 tablespoons unsalted butter, melted
- 1 tablespoon granulated sugar
- 1 tablespoon brown sugar, packed
- 1/4 teaspoon vanilla extract
- Pinch of salt
- 1/4 cup all-purpose flour
- 2 tablespoons chocolate chips
Instructions:
Preheat your oven to 350°F (175°C) and lightly grease your cast iron skillet.
In a small bowl, combine the melted butter, granulated sugar, brown sugar, vanilla extract, and salt. Mix until smooth and creamy. Gradually add in the flour, stirring until just combined, then fold in the chocolate chips.
Transfer the dough into the prepared skillet, spreading it evenly to guarantee even baking.
Place the skillet in the preheated oven and bake for about 8 to 10 minutes or until the edges are golden brown and the center is set but still soft.
Remove from the oven and allow it to cool slightly before slicing into wedges or scooping out with a spoon.
Extra Tips:
For an extra touch, consider adding a sprinkle of sea salt on top before baking to enhance the chocolate flavor.
You can also experiment with different types of chocolate chips or add nuts for an added crunch.
If you want a gooier center, bake for just a minute less, but keep an eye on it to prevent burning.
Enjoy your tiny cookie warm, perhaps with a small scoop of ice cream on top for a delightful dessert twist!
Miniature Veggie Stir-Fry

In this recipe, you can customize the vegetables based on what you have on hand or your personal preferences. The combination of fresh veggies with a light sauce creates a delightful dish that can be served on its own or paired with rice or noodles.
Get ready to enjoy a vibrant and tasty stir-fry that can be prepared in under 20 minutes!
Ingredients:
- 1 cup broccoli florets
- 1 cup sliced bell peppers (red, yellow, or green)
- 1 cup sugar snap peas
- 1 small carrot, thinly sliced
- 2 cloves garlic, minced
- 2 tablespoons soy sauce
- 1 tablespoon sesame oil
- 1 tablespoon olive oil
- Salt and pepper to taste
- Sesame seeds (optional, for garnish)
Cooking Instructions:
Begin by heating the olive oil in your cast iron skillet over medium-high heat. Once the oil is hot, add the minced garlic and sauté for about 30 seconds until fragrant.
Next, toss in the broccoli, bell peppers, and carrots, stirring frequently. Cook for about 3-4 minutes until the vegetables start to soften but remain crisp.
Add the sugar snap peas and pour in the soy sauce and sesame oil. Continue to stir-fry for an additional 2-3 minutes, making sure the vegetables are evenly coated with the sauce and heated through.
Season with salt and pepper to taste, and if desired, sprinkle sesame seeds on top before serving.
Extra Tips:
To guarantee your veggies remain crisp and vibrant, avoid overcooking them. Stir-frying is all about quick cooking, so having all your ingredients prepped and ready to go will help in maintaining that perfect texture.
Feel free to experiment with other vegetables or add some protein like tofu or shrimp for a heartier meal. Enjoy your colorful and nutritious miniature veggie stir-fry!
Personal Pepperoni Pizza

To begin, gather your ingredients and prepare for a culinary adventure. With just a few simple components, you can whip up a delicious pizza in no time. The best part? You can enjoy a piping hot slice straight from the skillet. Let's explore the ingredients and cooking process!
Ingredients:
- 1 pre-made pizza dough (store-bought or homemade)
- 1/2 cup pizza sauce
- 1 cup shredded mozzarella cheese
- 1/2 cup sliced pepperoni
- 1 tablespoon olive oil
- 1 teaspoon Italian seasoning (optional)
- Fresh basil leaves (for garnish, optional)
Cooking Instructions:
Preheat your oven to 475°F (245°C). While the oven is heating, take your cast iron skillet and drizzle it with olive oil, making certain to coat the bottom and sides evenly.
Roll out your pizza dough on a floured surface to fit the size of your skillet. Carefully transfer the dough into the skillet, pressing it against the edges to form a crust.
Spread the pizza sauce evenly over the dough, leaving a small border around the edges. Sprinkle the mozzarella cheese generously on top, followed by the pepperoni slices. If desired, sprinkle Italian seasoning for extra flavor.
Place the skillet in the preheated oven and bake for 12-15 minutes, or until the crust is golden brown and the cheese is bubbly. Once done, remove from the oven and let it cool for a few minutes before garnishing with fresh basil leaves if you like.
Extra Tips:
For an even crispier crust, you can preheat the skillet in the oven for a few minutes before adding the dough. This will help the bottom cook quickly and create that delightful crunch.
Feel free to experiment with different toppings such as vegetables, sausage, or even pineapple if you're feeling adventurous. Always keep an eye on your pizza while it cooks to make sure it doesn't burn, as oven temperatures can vary.
Enjoy your homemade personal pepperoni pizza!
Sweet Potato Hash
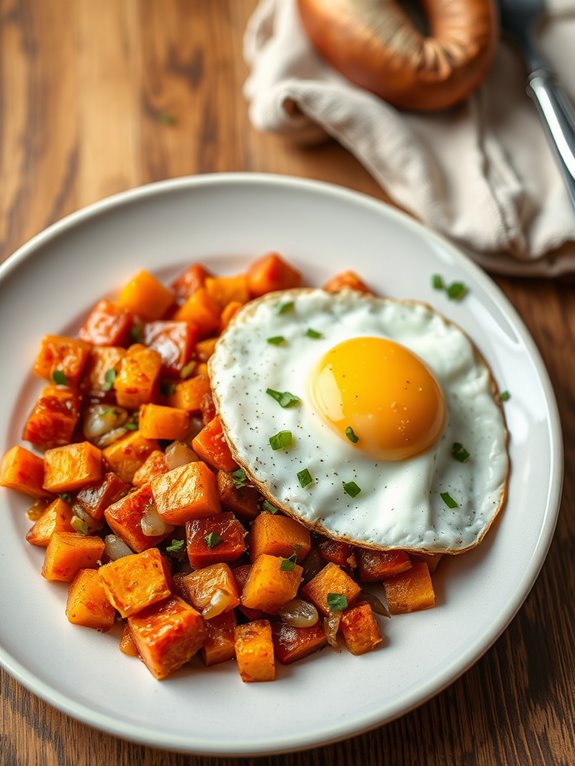
Not only is sweet potato hash packed with nutrients, but it's also easy to customize based on what you have on hand. You can add your favorite proteins, such as eggs, bacon, or sausage, and toss in some seasonal vegetables for added texture and flavor. This dish is sure to become a favorite in your household!
Ingredients:
- 2 medium sweet potatoes, peeled and diced
- 1 bell pepper, diced (any color)
- 1 small onion, diced
- 2 tablespoons olive oil
- 1 teaspoon paprika
- 1 teaspoon garlic powder
- Salt and pepper to taste
- Fresh herbs (optional, for garnish)
Cooking Instructions:
In a cast iron skillet, heat the olive oil over medium heat. Add the diced sweet potatoes and season them with salt, pepper, paprika, and garlic powder. Cook for about 10-15 minutes, stirring occasionally until the sweet potatoes are tender and start to brown.
Next, stir in the diced onion and bell pepper, and continue cooking for an additional 5-7 minutes until the vegetables are softened and the sweet potatoes are nicely caramelized. If you want to add proteins like cooked sausage or bacon, toss them in during the last few minutes of cooking.
For a complete meal, consider making a few sunny-side-up eggs to serve on top of the hash.
Extra Tips:
To guarantee your sweet potatoes cook evenly, try to cut them into uniform pieces. If you prefer a little crunch, feel free to leave the skins on for added texture and nutrients.
For an extra kick, consider adding some diced jalapeños or a sprinkle of hot sauce before serving. Enjoy your sweet potato hash with fresh herbs or avocado for a delightful finishing touch!
Bite-Sized Quiche

These little treats are delightful for breakfast, lunch, or as a snack. You can customize the fillings with your favorite vegetables, meats, or cheeses, making them a unique dish every time you whip them up.
With a creamy egg filling and a flaky crust, these quiches are sure to impress your family and friends.
Ingredients:
- 1 pre-made pie crust (or homemade, if preferred)
- 4 large eggs
- 1 cup heavy cream or milk
- 1 cup shredded cheese (cheddar, Swiss, or your choice)
- 1 cup chopped vegetables (bell peppers, spinach, mushrooms, etc.)
- 1/2 cup cooked and crumbled bacon or sausage (optional)
- Salt and pepper to taste
- Fresh herbs (like chives or parsley) for garnish (optional)
Cooking Instructions:
- Preheat your oven to 375°F (190°C). Roll out the pre-made pie crust on a floured surface and cut it into small circles that fit into the cups of your cast iron skillet or muffin tin. Press the circles into the skillet to form mini crusts.
- In a mixing bowl, whisk together the eggs, heavy cream (or milk), salt, and pepper until well combined. Stir in the shredded cheese, chopped vegetables, and any cooked meats you're using. Pour the egg mixture into each of the crusts, filling them about three-quarters full to allow for expansion.
- Bake the mini quiches in the preheated oven for 20-25 minutes or until the egg is set and the tops are lightly golden. Remove from the oven and let them cool slightly before serving. Garnish with fresh herbs if desired.
Extra Tips:
For an extra touch of flavor, consider adding spices like paprika or a dash of hot sauce to the egg mixture.
This recipe is highly adaptable, so feel free to experiment with different ingredients and flavors. If you're using watery vegetables like zucchini, make sure to sauté them first to reduce moisture, which can make your quiche soggy.
Enjoy these mini quiches warm or store them in an airtight container in the fridge for up to three days for a quick grab-and-go meal!
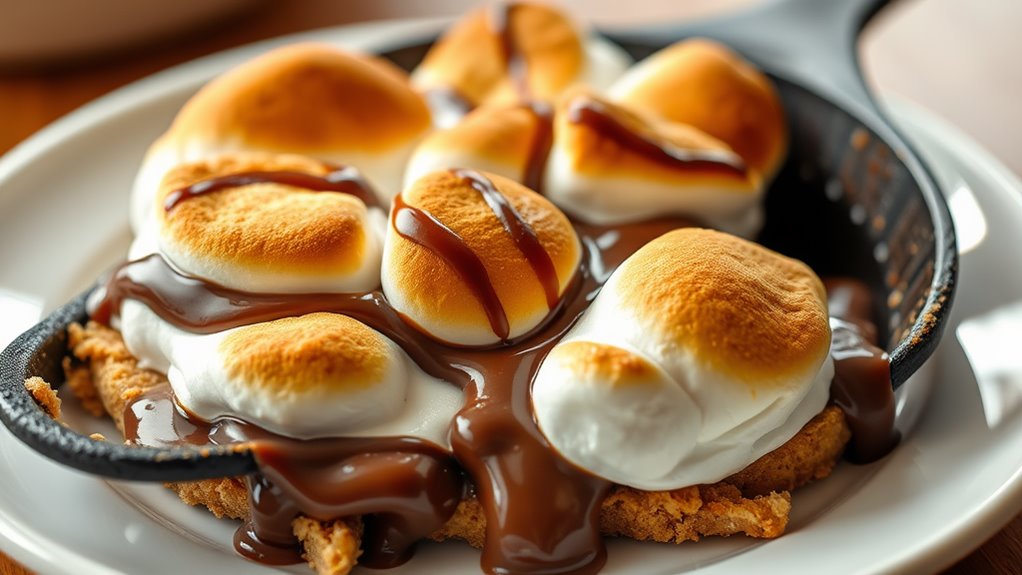
Skillet S'mores Dessert
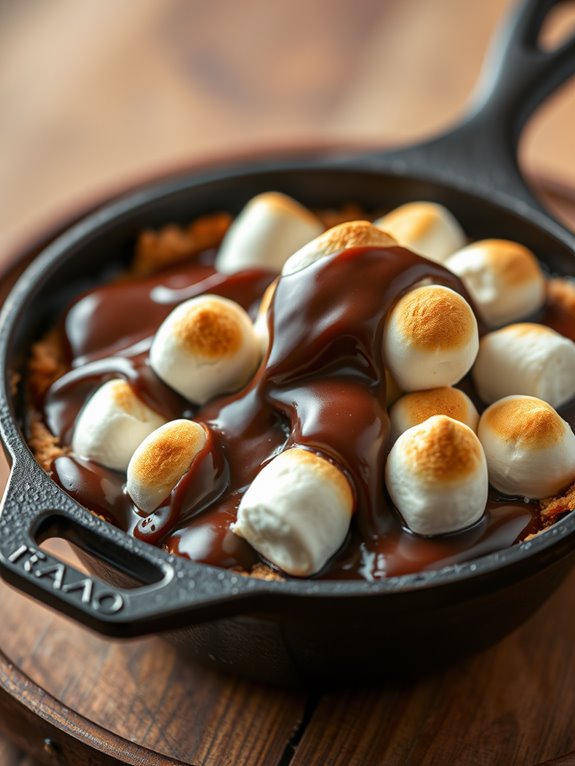
This recipe isn't only simple but also incredibly versatile. You can customize it by adding your favorite ingredients, such as peanut butter cups or caramel drizzle.
Whether you're cooking for family or friends, this skillet dessert is sure to impress. Get ready to satisfy your sweet tooth with this easy and delicious Skillet S'mores Dessert!
Ingredients:
- 1 cup semi-sweet chocolate chips
- 1 cup mini marshmallows
- 1 cup graham cracker crumbs
- 1/2 cup unsalted butter, melted
- 1/4 cup brown sugar
- 1 teaspoon vanilla extract
- Pinch of salt
- Extra graham crackers for serving
Instructions:
Preheat your oven to 350°F (175°C). In a medium bowl, combine the melted butter, graham cracker crumbs, brown sugar, vanilla extract, and a pinch of salt.
Mix until well combined and the mixture resembles wet sand. Press this mixture evenly into the bottom of a 10-inch cast iron skillet to form a crust.
Sprinkle the chocolate chips evenly over the graham cracker crust, then top with the mini marshmallows. Bake in the preheated oven for 10-12 minutes, or until the marshmallows are golden brown and the chocolate is melted.
Remove from the oven, let it cool slightly, and serve warm with extra graham crackers for dipping.
Extra Tips:
For an even more decadent dessert, consider adding a layer of peanut butter or Nutella over the chocolate chips before adding the marshmallows.
You can also experiment with different types of chocolate, like dark chocolate or flavored chocolate chips, for a unique twist. Enjoy your Skillet S'mores Dessert fresh out of the oven for the best gooey experience!
Frequently Asked Questions
Can I Use My Mini Skillet on an Induction Cooktop?
Yes, you can use your mini skillet on an induction cooktop, as long as it's made of ferrous material. Just make sure it's compatible, and you'll enjoy quick, efficient cooking without any issues.
How Do I Clean My Cast Iron Skillet After Use?
Cleaning your cast iron skillet is as easy as pie. After use, rinse it with hot water, scrub gently with a brush, and dry it completely. Don't forget to apply a thin layer of oil!
What Oils Are Best for Seasoning My Mini Skillet?
For seasoning your mini skillet, use oils with high smoke points like flaxseed, canola, or vegetable oil. They'll create a durable, non-stick coating. Just apply a thin layer and heat it until it smokes.
Can These Recipes Be Doubled for Larger Servings?
You can double those recipes to feed an army, but keep in mind that larger servings might require a bigger skillet. Don't let your mini skillet's size limit your culinary creativity—go bold!
Are There Any Vegetarian Options Among These Recipes?
Absolutely, you'll find several vegetarian options among these recipes. They're designed to highlight fresh vegetables and flavorful ingredients, ensuring you enjoy satisfying meals without meat. Just choose the ones that best suit your taste!