As an affiliate, we may earn a commission from qualifying purchases. We get commissions for purchases made through links on this website from Amazon and other third parties.
Imagine a cast iron skillet as your trusted companion on a culinary adventure. With its ability to hold heat and enhance flavors, it transforms simple ingredients into crowd-pleasing appetizers. From gooey dips to crispy bites, the possibilities are endless. If you're looking to impress at your next gathering, these 10+ must-try recipes will elevate your appetizer game. So, what's cooking in your skillet today?
Key Takeaways
- Skillet Queso Dip combines melted cheeses and optional ingredients for a customizable, crowd-pleasing appetizer perfect for parties.
- Crispy Cast Iron Nachos layer tortilla chips, cheese, and toppings, ensuring a satisfying crunch when baked in a preheated skillet.
- Bacon-Wrapped Jalapeño Poppers feature spicy jalapeños stuffed with creamy cheese and wrapped in crispy bacon, delivering a delightful flavor combination.
- Spinach and Artichoke Dip is a classic, creamy appetizer baked to perfection in a cast iron skillet, ideal for dipping with chips or bread.
- Stuffed Mushrooms can be customized with various fillings, baked in a skillet for even cooking, and topped with breadcrumbs for a golden finish.
Skillet Queso Dip
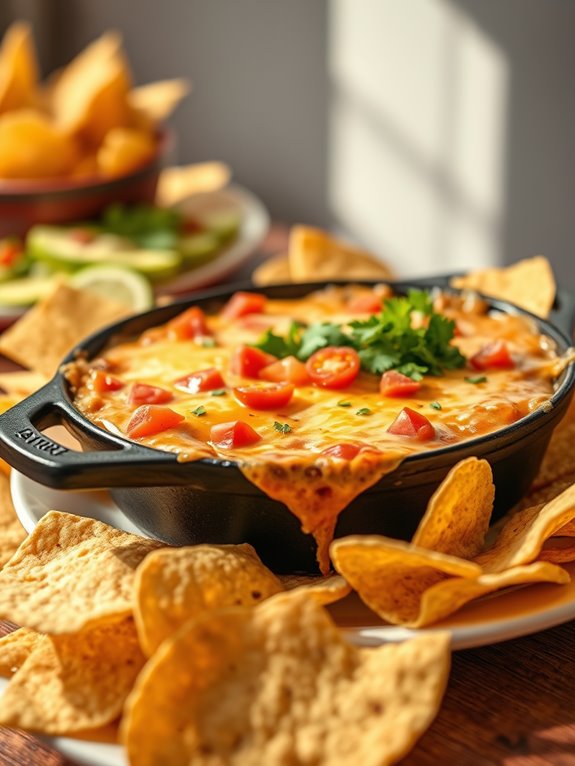
Making skillet queso dip is incredibly easy, and the best part is that you can customize it to suit your taste. Whether you prefer it spicy or mild, you can add in your favorite ingredients like jalapeños, chorizo, or even black beans for extra texture. The result is a gooey, cheesy masterpiece that will have everyone coming back for more.
Ingredients:
- 1 tablespoon olive oil
- 1 small onion, diced
- 2 cloves garlic, minced
- 1 jalapeño, seeded and diced (optional)
- 1 can (10 oz) diced tomatoes with green chilies
- 1 cup shredded cheddar cheese
- 1 cup shredded Monterey Jack cheese
- 1/2 cup cream cheese, cubed
- 1/2 teaspoon cumin
- 1/2 teaspoon smoked paprika
- Salt and pepper to taste
- Fresh cilantro, chopped (for garnish)
- Tortilla chips (for serving)
Cooking Instructions:
Begin by heating the olive oil in your cast iron skillet over medium heat.
Add the diced onion and sauté for about 3-4 minutes until they become translucent.
Stir in the minced garlic and jalapeño (if using) and cook for an additional minute until fragrant.
Next, add the diced tomatoes with green chilies, bringing the mixture to a simmer.
Reduce the heat to low and gradually stir in the cheddar cheese, Monterey Jack cheese, and cream cheese.
Keep stirring until the cheeses are fully melted and the dip is creamy.
Season with cumin, smoked paprika, salt, and pepper to taste.
Once everything is combined and heated through, remove from heat and garnish with fresh cilantro.
Serve immediately with tortilla chips for dipping.
Extra Tips:
For an extra kick, consider adding cooked chorizo or ground beef to the dip.
You can also adjust the level of spice by using different types of peppers or adding hot sauce.
If you want to make it ahead of time, prepare the dip and store it in the refrigerator.
When ready to serve, simply reheat it in the skillet over low heat, adding a splash of milk if it thickens up too much.
Enjoy your skillet queso dip!
Crispy Cast Iron Nachos
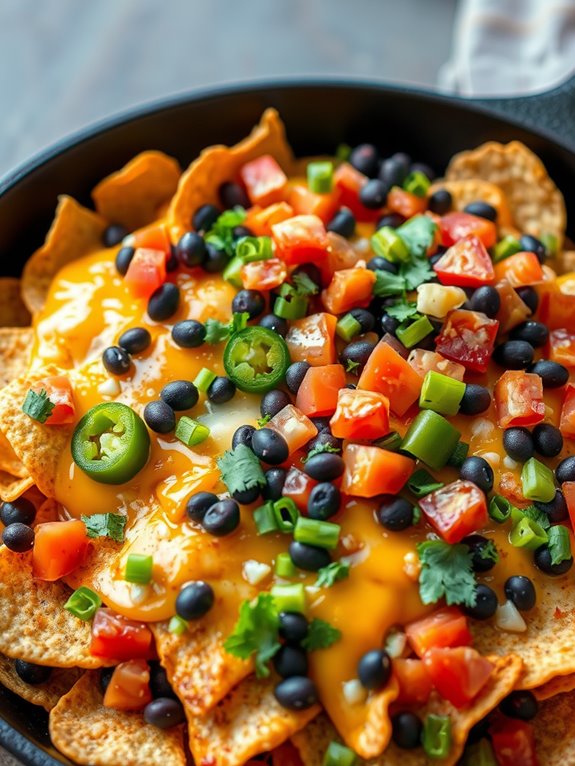
Crispy Cast Iron Nachos are the perfect appetizer for any gathering, combining the satisfying crunch of tortilla chips with melted cheese and savory toppings. Using a cast iron skillet not only allows for even heat distribution but also gives the nachos an irresistible crispy edge that makes them hard to resist.
Whether you're hosting a game day party or simply enjoying a cozy movie night at home, these nachos are sure to impress your friends and family with their flavor and presentation.
This recipe is incredibly versatile, allowing you to customize the toppings to suit your taste. You can stick with classic options like jalapeños, olives, and sour cream, or get creative with ingredients like pulled pork, roasted veggies, or even a drizzle of sriracha for some heat.
The key to achieving that perfect crispiness is ensuring that your cast iron skillet is hot enough before adding the ingredients. Let's explore the recipe and get those nachos sizzling!
Ingredients:
- Tortilla chips
- Shredded cheddar cheese
- Shredded Monterey Jack cheese
- Black beans (canned, drained, and rinsed)
- Jalapeños (sliced)
- Diced tomatoes
- Chopped green onions
- Fresh cilantro (for garnish)
- Sour cream (for serving)
- Salsa (for serving)
Cooking Instructions:
- Preheat your oven to 400°F (200°C). While the oven is heating, place your cast iron skillet on the stove over medium heat to warm it up.
- Once the skillet is hot, layer half of the tortilla chips across the bottom. Sprinkle a generous amount of both cheddar and Monterey Jack cheese over the chips, followed by black beans, jalapeños, and diced tomatoes. Repeat the layering with the remaining chips and toppings, finishing with more cheese on top.
- Transfer the skillet to the preheated oven and bake for about 10-15 minutes, or until the cheese is melted and bubbly. Keep an eye on them to avoid burning.
Once done, carefully remove the skillet from the oven and let it cool slightly before garnishing with chopped green onions and fresh cilantro.
Extra Tips:
For the best results, be sure to use a combination of different cheeses to enhance the flavor and texture. If you prefer your nachos extra crispy, consider broiling them for the last minute of cooking to achieve that golden brown finish.
Additionally, you can offer a variety of toppings on the side so your guests can customize their nachos to their liking. Enjoy your delicious crispy cast iron nachos!
Spinach and Artichoke Dip
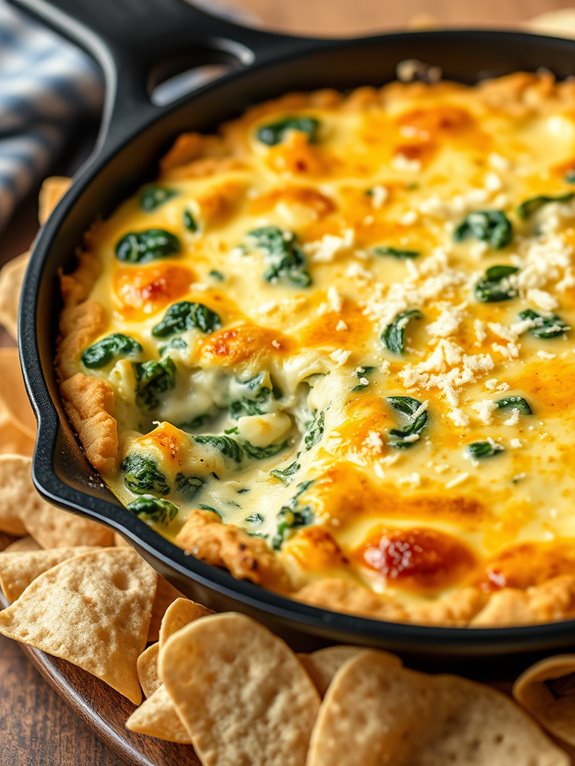
Spinach and artichoke dip is a classic appetizer that never fails to impress at gatherings and parties. This creamy, cheesy delight isn't only easy to prepare but also packed with flavor. Cooking it in a cast iron skillet gives it a lovely golden-brown crust while keeping the inside warm and melty. Serve it with tortilla chips, bread, or fresh vegetables for dipping, and watch it quickly disappear!
This dish is perfect for entertaining or enjoying a cozy night in. With its rich textures and savory taste, spinach and artichoke dip is sure to be a crowd-pleaser. Plus, using a cast iron skillet not only enhances the flavor but also makes for an appealing presentation. Let's plunge into this delicious recipe!
Ingredients:
- 1 cup frozen spinach, thawed and drained
- 1 cup canned artichoke hearts, drained and chopped
- 1 cup cream cheese, softened
- 1/2 cup sour cream
- 1/2 cup mayonnaise
- 1 cup shredded mozzarella cheese
- 1/2 cup grated Parmesan cheese
- 2 cloves garlic, minced
- Salt and pepper to taste
- Tortilla chips or bread for serving
To prepare the spinach and artichoke dip, preheat your oven to 375°F (190°C). In a mixing bowl, combine the softened cream cheese, sour cream, and mayonnaise until smooth. Stir in the chopped spinach, artichoke hearts, minced garlic, mozzarella cheese, and half of the Parmesan cheese.
Season the mixture with salt and pepper to taste. Once everything is well combined, transfer the dip to a preheated cast iron skillet. Sprinkle the remaining Parmesan cheese on top for an added cheesy crust.
Bake the dip in the oven for about 20-25 minutes or until it's bubbly and golden on top. Once it's done, remove it from the oven and let it cool for a few minutes before serving. Enjoy this luscious dip warm with your choice of tortilla chips, bread, or fresh veggies!
Extra Tips:
For an extra flavor boost, consider adding a pinch of red pepper flakes for some heat or a squeeze of lemon juice for brightness. If you want to make it ahead of time, you can prepare the dip and store it in the refrigerator for a day. Just be sure to bake it right before serving to guarantee it's hot and bubbly!
Garlic Butter Shrimp
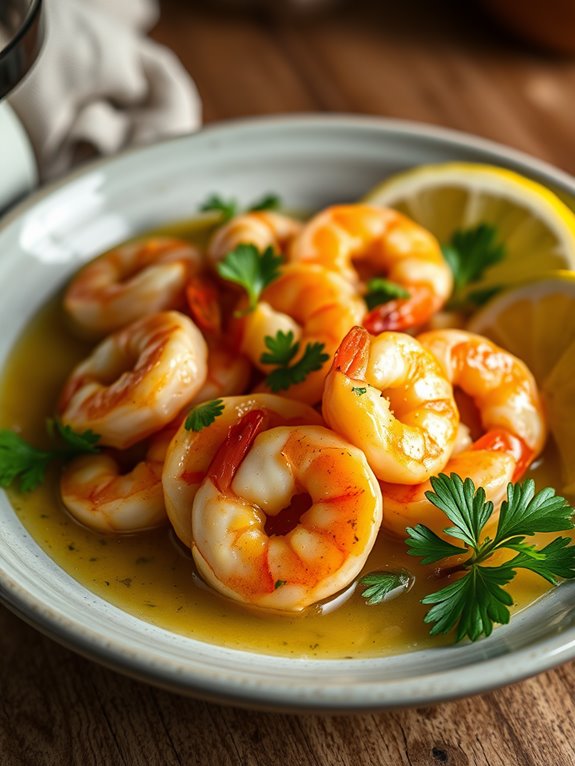
Garlic Butter Shrimp is a delightful appetizer that captures the essence of coastal cuisine with its succulent shrimp bathed in a rich garlic butter sauce. Cooking shrimp in a cast iron skillet not only enhances the flavor but also provides a beautiful sear that elevates the dish's presentation.
Perfect for gatherings or a cozy night in, this dish is quick to prepare and bursting with flavors that will impress your guests. This recipe combines simple ingredients to create a mouthwatering experience. With the aromatic notes of garlic and the richness of butter, the shrimp becomes tender and flavorful, making it an irresistible starter.
Pair it with crusty bread for dipping to soak up the delicious sauce, and you have a winner on your hands.
Ingredients:
- 1 pound large shrimp, peeled and deveined
- 4 tablespoons unsalted butter
- 4 garlic cloves, minced
- 1 teaspoon red pepper flakes (optional)
- Salt and pepper to taste
- Fresh parsley, chopped (for garnish)
- Lemon wedges (for serving)
Cooking Instructions:
Heat your cast iron skillet over medium-high heat and add the butter. Once melted, add the minced garlic and red pepper flakes, sautéing for about 1 minute until fragrant. Be careful not to let the garlic burn.
Add the shrimp to the skillet in a single layer and season with salt and pepper. Cook for 2-3 minutes on one side until they turn pink, then flip them over and cook for an additional 1-2 minutes until fully cooked through. Remove from heat and garnish with fresh parsley.
Serve the garlic butter shrimp immediately with lemon wedges on the side for an extra burst of flavor. This dish is best enjoyed hot and fresh from the skillet, allowing the flavors to shine through.
Extra Tips:
For an added depth of flavor, consider marinating the shrimp in a mixture of olive oil, lemon juice, and a pinch of salt for about 15-30 minutes before cooking.
Also, be mindful not to overcrowd the skillet; cooking in batches may be necessary for the best results. This guarantees that each shrimp gets a nice sear and prevents steaming, keeping them perfectly juicy and tender.
Mini Cornbread Muffins
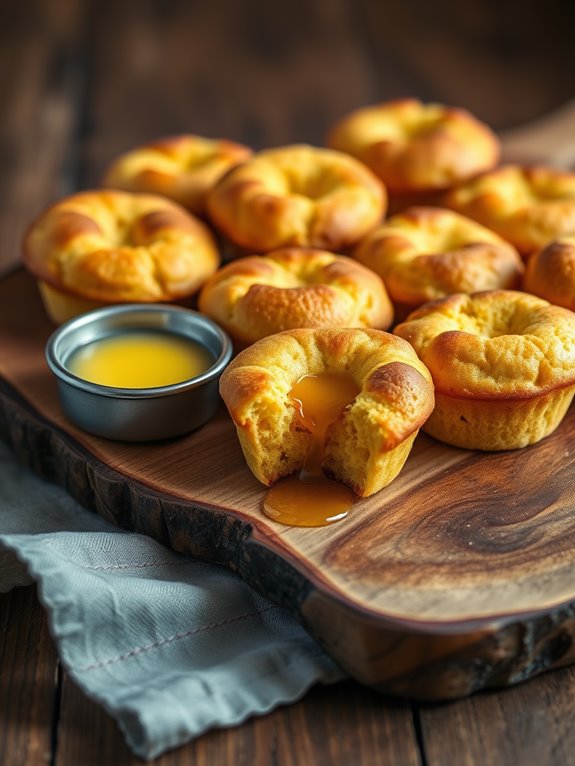
Mini cornbread muffins are a delightful addition to any appetizer spread, especially when cooked in a cast iron skillet. The skillet not only helps to evenly distribute heat but also gives the muffins a delightful crispy edge while keeping the centers soft and fluffy.
These mini muffins are perfect for serving alongside chili, soups, or even as a stand-alone snack with a bit of butter and honey.
Making mini cornbread muffins is simple and rewarding. This recipe is designed to yield a dozen bite-sized treats that are sure to impress your guests. With a few basic ingredients and a bit of time, you can whip up these cornbread muffins that are both sweet and savory, providing a comforting taste of home in every bite.
Ingredients:
- 1 cup cornmeal
- 1 cup all-purpose flour
- 1 tablespoon baking powder
- 1/2 teaspoon salt
- 1/4 cup granulated sugar
- 1 cup milk
- 1/4 cup vegetable oil
- 2 large eggs
- 1 cup corn kernels (fresh or frozen)
Cooking Instructions:
- Preheat your oven to 400°F (200°C) and place your cast iron skillet in the oven to heat up. In a large mixing bowl, combine the cornmeal, flour, baking powder, salt, and sugar. Stir until well mixed.
- In a separate bowl, whisk together the milk, vegetable oil, and eggs. Pour the wet ingredients into the dry ingredients and stir until just combined. Be careful not to overmix. Gently fold in the corn kernels.
- Once the skillet is hot, carefully remove it from the oven and add a small amount of oil to coat the bottom. Pour the cornbread batter into the skillet, filling each muffin section about two-thirds full. Bake for approximately 15-20 minutes, or until the tops are golden brown and a toothpick inserted into the center comes out clean.
Extra Tips:
For an extra flavor boost, consider adding shredded cheese, jalapeños, or diced bell peppers to the batter before baking. This will give your mini cornbread muffins a unique twist and a bit of heat if desired.
Additionally, serve them warm with a pat of butter or a drizzle of honey for a perfect finishing touch!
Stuffed Mushrooms
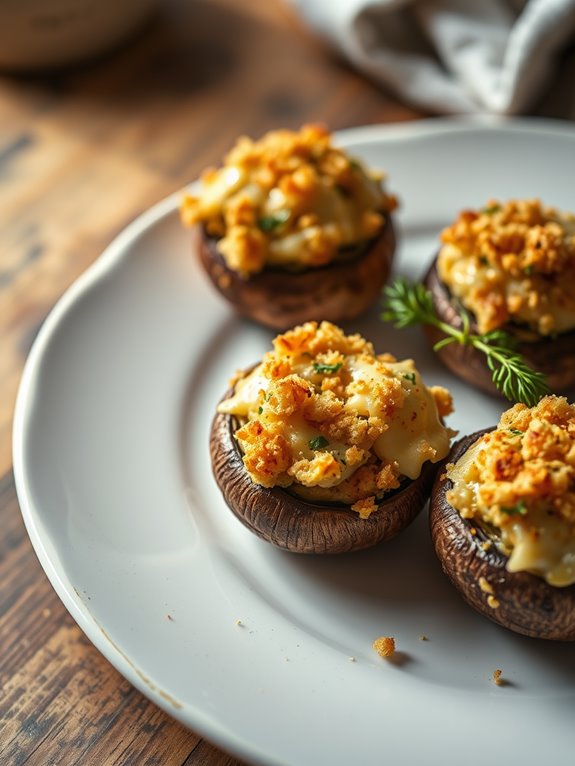
Stuffed mushrooms are an elegant and delicious appetizer that can elevate any gathering. Their earthy flavor and juicy texture make them the perfect canvas for a variety of fillings. Preparing stuffed mushrooms in a cast iron skillet not only guarantees even cooking but also adds a touch of rustic charm to your presentation.
Whether you're hosting a dinner party or looking for a family-friendly snack, these stuffed mushrooms will surely impress your guests.
The great thing about stuffed mushrooms is their versatility. You can customize the filling to suit your tastes, incorporating ingredients like cheese, herbs, and breadcrumbs. This recipe features a delightful combination of cream cheese, garlic, and fresh herbs that complement the mushrooms while keeping them moist and flavorful.
Get ready to enjoy a delightful burst of flavors with each bite!
Ingredients:
- 1 pound large mushrooms (cremini or button)
- 8 ounces cream cheese, softened
- 1 cup shredded mozzarella cheese
- 2 cloves garlic, minced
- 1/4 cup fresh parsley, chopped
- 1/4 cup grated Parmesan cheese
- 1/2 teaspoon salt
- 1/4 teaspoon black pepper
- 1/4 teaspoon red pepper flakes (optional)
- 1/2 cup breadcrumbs
- Olive oil for drizzling
Cooking Instructions:
- Preheat your oven to 375°F (190°C). Clean the mushrooms with a damp cloth and remove the stems. Finely chop the stems and set aside.
- In a mixing bowl, combine the cream cheese, mozzarella cheese, minced garlic, chopped mushroom stems, parsley, Parmesan cheese, salt, black pepper, and red pepper flakes (if using). Mix until well combined.
- Stuff each mushroom cap generously with the filling, pressing it down slightly to guarantee it stays in place. Place the filled mushrooms in a preheated cast iron skillet.
- Sprinkle the breadcrumbs evenly over the stuffed mushrooms and drizzle with olive oil. Bake in the oven for 20-25 minutes or until the mushrooms are tender and the tops are golden brown.
Extra Tips:
To enhance the flavor of your stuffed mushrooms, consider adding crispy bacon bits or sautéed onions to the filling. You can also experiment with different types of cheese, such as feta or goat cheese, for a unique twist.
If you prefer a slightly spicier version, add a dash of hot sauce to the filling mixture. Always keep an eye on the mushrooms while baking to prevent overcooking; you want them tender but not mushy.
Enjoy your flavorful stuffed mushrooms straight from the skillet for a delightful appetizer experience!
Bacon-Wrapped Jalapeño Poppers
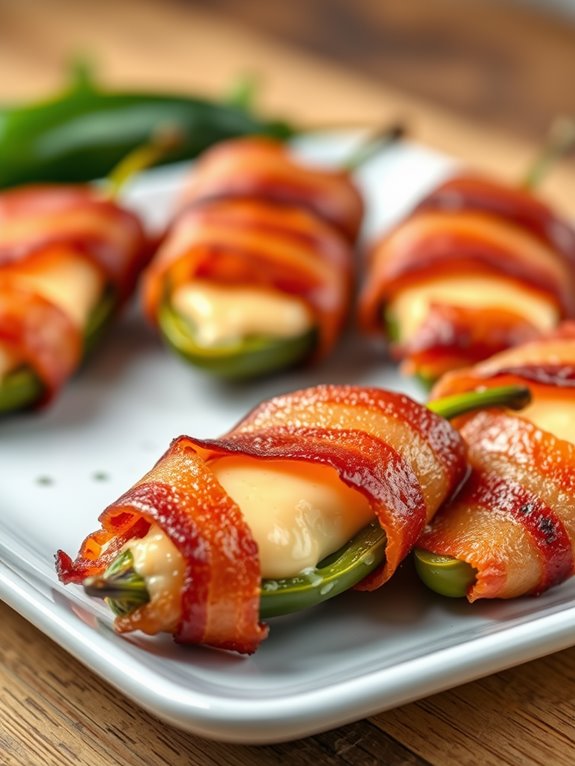
Bacon-wrapped jalapeño poppers are the perfect combination of spicy and savory, making them an irresistible appetizer for any gathering. The crispy bacon envelops the creamy cheese and zesty jalapeños, delivering a burst of flavor in every bite. Cooking them in a cast iron skillet allows for even heat distribution, ensuring that every popper is cooked to perfection.
These delicious bites aren't only easy to prepare but also customizable. Feel free to experiment with different types of cheese or add your favorite seasonings to the filling. Whether you're hosting a game day party or a casual get-together, these bacon-wrapped jalapeño poppers will surely be a crowd-pleaser.
Ingredients:
- 10 fresh jalapeños
- 8 oz cream cheese, softened
- 1 cup shredded cheddar cheese
- 1 tsp garlic powder
- 1 tsp onion powder
- 10 slices of bacon, cut in half
- Cooking spray (optional)
- Fresh chives or green onions for garnish (optional)
Cooking Instructions:
- Preheat your oven to 400°F (200°C). While the oven is heating, prepare the jalapeños by slicing them in half lengthwise and removing the seeds and membranes (for less heat, leave some seeds in).
- In a mixing bowl, combine the softened cream cheese, shredded cheddar cheese, garlic powder, and onion powder. Mix until well blended.
- Stuff each jalapeño half with the cream cheese mixture, then wrap each one with a half slice of bacon, ensuring the ends are tucked in.
- Arrange the stuffed jalapeños in a preheated cast iron skillet. If desired, lightly spray the skillet with cooking spray to prevent sticking. Bake in the oven for 20-25 minutes or until the bacon is crispy and the cheese is bubbly.
Extra Tips:
For added flavor, consider marinating the jalapeños in a mixture of olive oil, lime juice, and spices before stuffing.
You can also experiment by adding ingredients like diced cooked chicken or even crab meat to the cheese filling for a unique twist.
To achieve an extra crispy bacon finish, broil the poppers for a few minutes at the end of cooking, but keep a close eye on them to prevent burning.
Enjoy your delicious bacon-wrapped jalapeño poppers!
Cast Iron Bruschetta
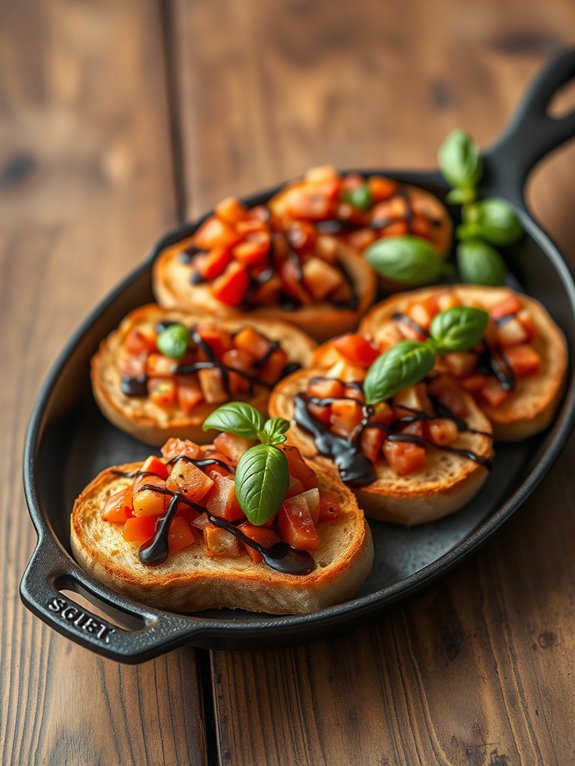
Using a cast iron skillet not only enhances the flavor but also provides an even cooking surface. The high heat retention of cast iron allows you to achieve a beautiful golden brown on your bread pieces, while the toppings meld together beautifully.
Serve your cast iron bruschetta with a drizzle of balsamic glaze or a sprinkle of Parmesan cheese for an extra touch of gourmet flair.
Ingredients:
- 1 French baguette or Italian bread
- 2 cups ripe tomatoes, diced
- 2 cloves garlic, minced
- 1/4 cup fresh basil, chopped
- 1/4 cup extra-virgin olive oil
- Salt and pepper to taste
- Balsamic glaze (optional)
- Grated Parmesan cheese (optional)
Cooking Instructions:
- Preheat your cast iron skillet over medium heat. While it heats, slice the baguette or Italian bread into 1-inch thick slices. Brush both sides of each slice with olive oil.
- Once the skillet is hot, place the bread slices in the skillet and toast them for about 2-3 minutes on each side, or until they're golden brown and crispy.
- In a bowl, combine the diced tomatoes, minced garlic, chopped basil, and remaining olive oil. Season with salt and pepper to taste. Mix thoroughly.
- Once the bread is toasted, remove it from the skillet and top each slice with the tomato mixture. Return the bruschetta to the skillet for an additional minute to warm the toppings slightly.
Extra Tips:
For an even more flavorful bruschetta, you can marinate the diced tomatoes in olive oil, garlic, and basil for 30 minutes before assembling. This allows the flavors to meld beautifully.
Additionally, feel free to experiment with toppings—adding ingredients like fresh mozzarella or avocado can elevate your bruschetta to a whole new level.
Enjoy your delicious cast iron bruschetta as a delightful start to your meal!
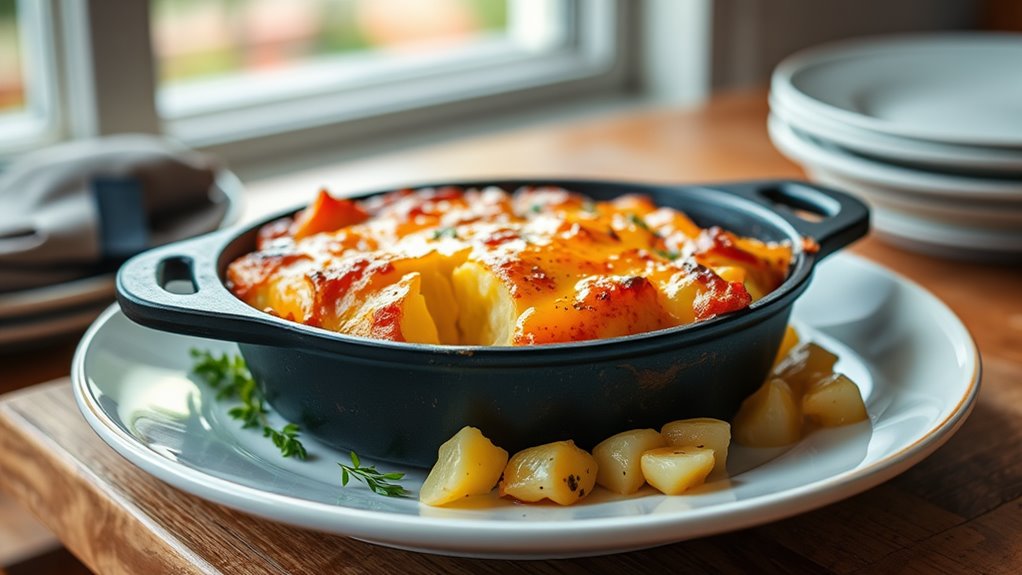
Cheesy Potato Skillet Bake
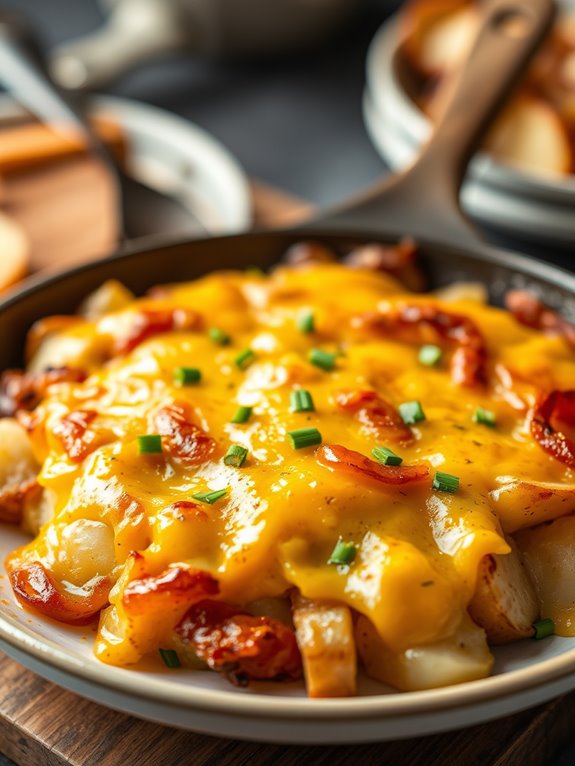
This dish isn't only simple to make but also allows for customization. You can add your favorite toppings such as crispy bacon, green onions, or even jalapeños for a spicy kick.
The cast iron skillet guarantees that the potatoes cook evenly and achieve that perfect golden-brown crust. Let's get started on this delectable recipe that brings comfort food to a whole new level.
Ingredients:
- 4 medium-sized russet potatoes, peeled and diced
- 2 tablespoons olive oil
- 1 teaspoon garlic powder
- 1 teaspoon onion powder
- Salt and pepper, to taste
- 1 cup shredded cheddar cheese
- ½ cup sour cream
- ½ cup milk
- 2 tablespoons chopped fresh chives (optional)
Cooking Instructions:
Preheat your oven to 400°F (200°C).
In a large cast iron skillet, heat the olive oil over medium heat. Add the diced potatoes and season them with garlic powder, onion powder, salt, and pepper. Sauté the potatoes for about 10-15 minutes, stirring occasionally, until they start to become tender and golden brown.
Once the potatoes are cooked through, reduce the heat to low and mix in the sour cream and milk until well combined.
Sprinkle the shredded cheddar cheese evenly over the top. Transfer the skillet to the preheated oven and bake for about 15-20 minutes, or until the cheese is bubbly and golden.
Remove the skillet from the oven and garnish with fresh chives, if desired.
Extra Tips:
For an extra layer of flavor, consider adding cooked bacon bits or sautéed onions to the potato mixture before baking.
Additionally, verify that the potatoes are cut into uniform sizes for even cooking. If you prefer a crispier top, you can broil the dish for the last couple of minutes in the oven, but keep a close eye on it to prevent burning.
Enjoy your cheesy potato skillet bake hot and fresh for the best taste!
Frequently Asked Questions
Can I Use a Regular Skillet Instead of Cast Iron?
Sure, you can swap a regular skillet for cast iron, but keep in mind their differences. Cast iron retains heat better, so you might notice a slight shift in cooking times and results.
How Do I Season My Cast Iron Skillet?
To season your cast iron skillet, clean it thoroughly, dry it completely, and apply a thin layer of vegetable oil. Bake it upside down in the oven at 350°F for an hour to create a non-stick surface.
What Is the Best Way to Clean a Cast Iron Skillet?
To clean your cast iron skillet, you'll want to avoid soap. Instead, scrub it with a stiff brush and hot water, then dry it thoroughly. Finish by applying a light coat of oil to prevent rust.
Can I Cook These Appetizers in the Oven?
Think of your oven as a cozy campfire, perfect for roasting marshmallows. Yes, you can cook those appetizers in the oven! Just adjust the time and temperature, and you'll have delicious bites ready to enjoy.
How Do I Prevent Sticking in My Cast Iron Skillet?
To prevent sticking in your cast iron skillet, always preheat it properly and use enough oil. Regularly season your skillet, too; it'll create a natural non-stick surface that makes cooking and cleanup much easier.