As an affiliate, we may earn a commission from qualifying purchases. We get commissions for purchases made through links on this website from Amazon and other third parties.
If you're looking to elevate your dessert game, baking in a cast iron skillet might be just what you need. These versatile pans create deliciously crispy edges while keeping the center moist and tender. Imagine pulling a warm Skillet Chocolate Chip Cookie Pie from the oven or serving up a comforting Peach and Blueberry Cobbler. Curious about how these simple recipes can transform your gatherings? Let's explore some irresistible options that will surely impress.
Key Takeaways
- Cast iron skillets ensure even cooking, making them perfect for desserts like skillet chocolate chip cookie pie and brownie batter skillet cake.
- Fruit-based desserts like classic apple crisp and peach blueberry cobbler thrive in skillets, enhancing flavors through even heat distribution.
- Cakes and pies, such as skillet cinnamon roll casserole and chocolate lava cake, benefit from the skillet's ability to retain heat and moisture.
- Unique treats like s'mores skillet dip and skillet strawberry shortcake offer quick, delightful desserts ideal for gatherings or cozy nights.
- Customization is easy; add nuts, chocolate chips, or fresh fruit to enhance the flavor and texture of skillet desserts.
Skillet Chocolate Chip Cookie Pie
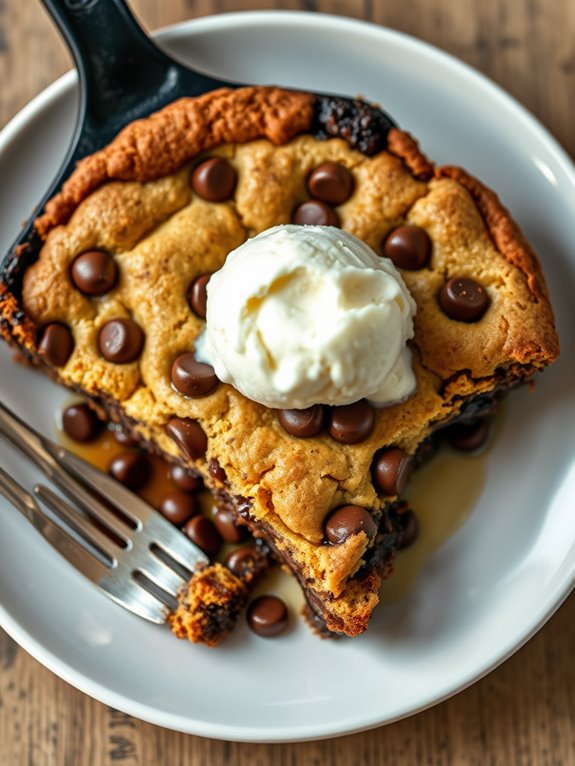
Indulging in a Skillet Chocolate Chip Cookie Pie is like biting into a warm hug of gooey chocolate goodness. This delightful dessert combines the classic flavors of a chocolate chip cookie with the comforting texture of a pie, all baked to perfection in a cast iron skillet.
It's the perfect treat to share with family and friends, or to savor all by yourself while curled up on the couch with a good book.
The beauty of this recipe lies not only in its simplicity but also in its ability to be customized. From adding nuts to swapping out chocolate chips for your favorite candies, the possibilities are endless.
So gather your ingredients and get ready to whip up a dessert that will leave everyone asking for seconds!
Ingredients:
- 1 cup unsalted butter, softened
- 3/4 cup granulated sugar
- 3/4 cup brown sugar, packed
- 1 teaspoon vanilla extract
- 2 large eggs
- 2 1/4 cups all-purpose flour
- 1 teaspoon baking soda
- 1/2 teaspoon salt
- 2 cups semi-sweet chocolate chips
Instructions:
Preheat your oven to 350°F (175°C) and grease a 10-inch cast iron skillet with butter or cooking spray.
In a large mixing bowl, cream together the softened butter, granulated sugar, and brown sugar until the mixture is light and fluffy. Add in the vanilla extract and eggs, mixing until well combined.
In a separate bowl, whisk together the flour, baking soda, and salt. Gradually add the dry ingredients to the wet mixture, stirring until just combined. Fold in the chocolate chips until evenly distributed.
Pour the cookie dough into the prepared skillet, spreading it out evenly. Bake in the preheated oven for 25-30 minutes, or until the edges are golden brown and the center is set but still slightly soft.
Allow the skillet cookie pie to cool for a few minutes before serving. It's delicious on its own, but you can also top it with a scoop of vanilla ice cream or a drizzle of chocolate sauce for added indulgence.
Extra Tips:
For an extra layer of flavor, consider adding a pinch of sea salt on top before baking. This will enhance the sweetness of the chocolate and give your dessert a gourmet touch.
If you have leftovers (which is rare!), store them in an airtight container at room temperature for up to three days. Reheat individual slices in the microwave for a few seconds to enjoy that freshly baked taste again!
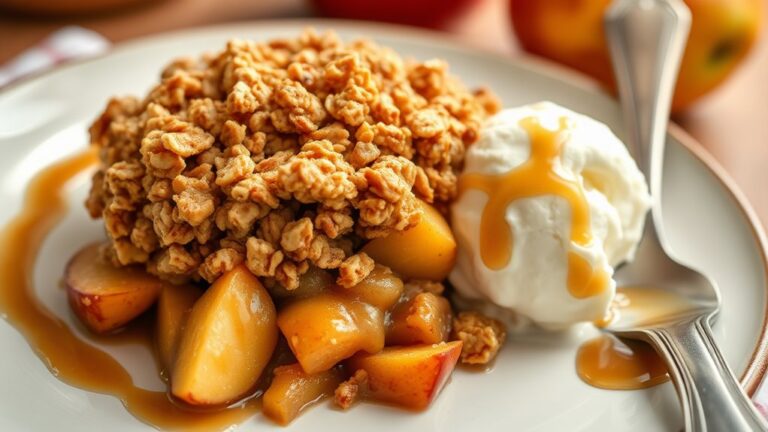
Classic Apple Crisp
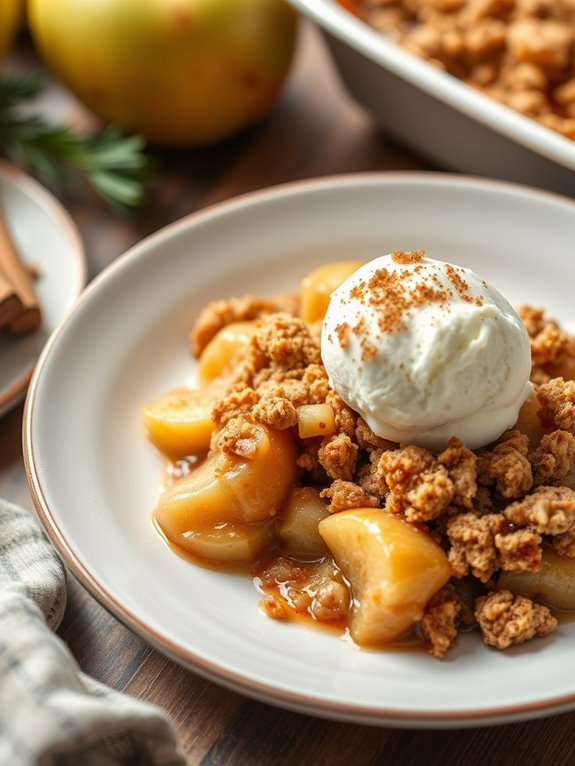
Using fresh, tart apples brings out the best flavors in this dessert, while the cast iron skillet guarantees even cooking and a beautifully browned topping.
Serve it warm, topped with a scoop of vanilla ice cream or a dollop of whipped cream, and you have a comforting treat that's perfect for any occasion.
Ingredients:
- 6 cups tart apples, peeled, cored, and sliced (Granny Smith or Honeycrisp work well)
- 1 tablespoon lemon juice
- ¾ cup granulated sugar
- 1 teaspoon ground cinnamon
- ½ teaspoon ground nutmeg
- 1 cup old-fashioned oats
- ¾ cup all-purpose flour
- ½ cup packed brown sugar
- ½ cup unsalted butter, melted
- ½ teaspoon salt
Cooking Instructions:
Preheat your oven to 350°F (175°C).
In a large mixing bowl, combine the sliced apples with lemon juice, granulated sugar, cinnamon, and nutmeg. Toss the apples until they're well coated with the mixture, then transfer them to a greased cast iron skillet, spreading them evenly.
In another bowl, mix together the oats, flour, brown sugar, melted butter, and salt until crumbly.
Sprinkle this mixture over the apples in the skillet. Bake in the preheated oven for about 30-35 minutes, or until the apples are tender and the topping is golden brown. Allow it to cool slightly before serving.
Extra Tips:
For an added depth of flavor, consider mixing in some chopped nuts or dried fruit into the topping.
You can also experiment with different apple varieties for a unique taste. If you prefer a sweeter dessert, increase the sugar in the apple mixture to your liking.
Brownie Batter Skillet Cake
Indulging in a Brownie Batter Skillet Cake is the perfect way to satisfy your sweet tooth while enjoying the rustic charm of a cast iron skillet. This dessert brings together the rich, fudgy goodness of brownies with the delightful experience of serving it straight from the skillet. The warm, gooey center and slightly crispy edges create a heavenly combination that will have everyone coming back for seconds.
Serve it warm with a scoop of vanilla ice cream or a dollop of whipped cream for an extra special treat. This recipe is incredibly simple to make, allowing you to whip it up in no time for spontaneous gatherings or cozy nights at home. The beauty of using a cast iron skillet is that it retains heat beautifully, ensuring your brownie cake bakes evenly and stays warm when served.
So, let's roll up our sleeves and get baking!
Ingredients:
- 1 cup (2 sticks) unsalted butter
- 2 cups granulated sugar
- 4 large eggs
- 1 teaspoon vanilla extract
- 1 cup all-purpose flour
- 1 cup cocoa powder
- 1/2 teaspoon salt
- 1 cup semi-sweet chocolate chips (optional)
Instructions:
Preheat your oven to 350°F (175°C). In a 10-inch cast iron skillet, melt the butter over low heat. Once melted, remove the skillet from the heat and stir in the granulated sugar until well combined.
Allow the mixture to cool slightly, then add in the eggs one at a time, mixing well after each addition. Stir in the vanilla extract.
Next, add the flour, cocoa powder, and salt to the skillet, mixing until just combined. If desired, fold in the chocolate chips for an extra layer of richness.
Spread the batter evenly in the skillet and bake for 25-30 minutes, or until a toothpick inserted in the center comes out with a few moist crumbs. Let it cool for a few minutes before serving.
For the best results, be mindful of the baking time; the brownie cake should be fudgy, not overcooked. If you prefer a more intense chocolate flavor, consider adding a pinch of espresso powder to the batter.
You can also customize your skillet cake by incorporating nuts or other mix-ins of your choice. Enjoy your warm Brownie Batter Skillet Cake with a scoop of ice cream or a drizzle of chocolate sauce to elevate your dessert experience!
Peach and Blueberry Cobbler
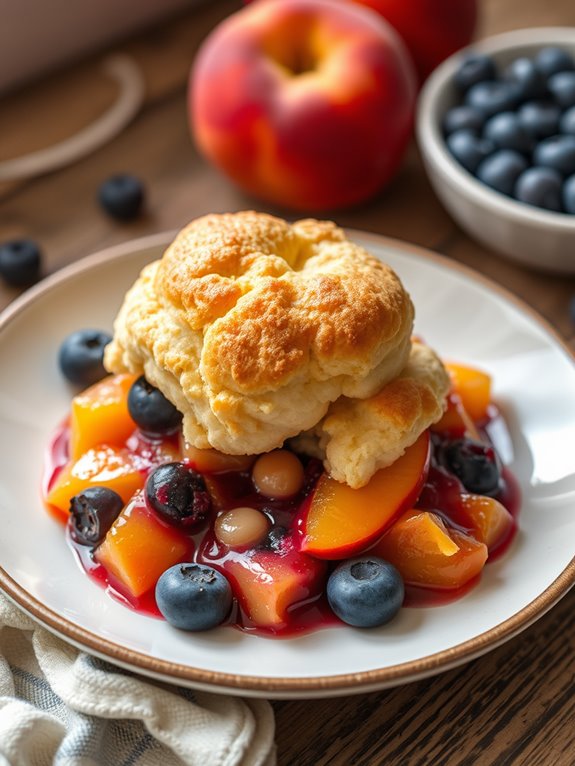
Peach and blueberry cobbler is a delightful dessert that perfectly marries the juicy sweetness of ripe peaches with the tartness of fresh blueberries. Baking this cobbler in a cast iron skillet not only enhances the flavors but also gives it a beautiful golden-brown crust.
This rustic dessert is ideal for summer gatherings or cozy evenings at home, and it can be enjoyed warm or at room temperature. Top it off with a scoop of vanilla ice cream for an irresistible treat.
This recipe is straightforward and requires minimal preparation, making it perfect for both novice and experienced bakers. With fresh ingredients and a few pantry staples, you can whip up a delicious cobbler that will impress your family and friends.
The combination of the sweet fruit filling and the buttery biscuit topping creates a comforting dessert that feels like a warm hug in a skillet.
Ingredients:
- 4 cups fresh peaches, peeled and sliced
- 2 cups fresh blueberries
- 1 cup granulated sugar
- 1 tablespoon lemon juice
- 1 teaspoon vanilla extract
- 1 teaspoon ground cinnamon
- 1 cup all-purpose flour
- 1 teaspoon baking powder
- 1/2 teaspoon salt
- 1/4 cup unsalted butter, melted
- 1/2 cup milk
Instructions:
Preheat your oven to 350°F (175°C). In a large mixing bowl, combine the sliced peaches, blueberries, sugar, lemon juice, vanilla extract, and cinnamon. Gently toss the fruit mixture until the fruit is well coated.
Pour the fruit mixture into a greased cast iron skillet, spreading it evenly across the bottom.
In another bowl, whisk together the flour, baking powder, and salt. Stir in the melted butter and milk until just combined.
Pour the batter over the fruit mixture, allowing it to drizzle down into the fruit. Bake in the preheated oven for about 35-40 minutes or until the topping is golden brown and a toothpick inserted into the center comes out clean.
Let it cool slightly before serving.
Extra Tips:
For the best flavor, use ripe, in-season peaches and fresh blueberries. If you prefer a thicker filling, feel free to add a tablespoon of cornstarch to the fruit mixture.
You can also swap out the blueberries for other berries like blackberries or raspberries to cater to your taste. Serve the cobbler warm with a scoop of vanilla ice cream or a dollop of whipped cream for an extra indulgence. Enjoy!
Skillet Cinnamon Roll Casserole
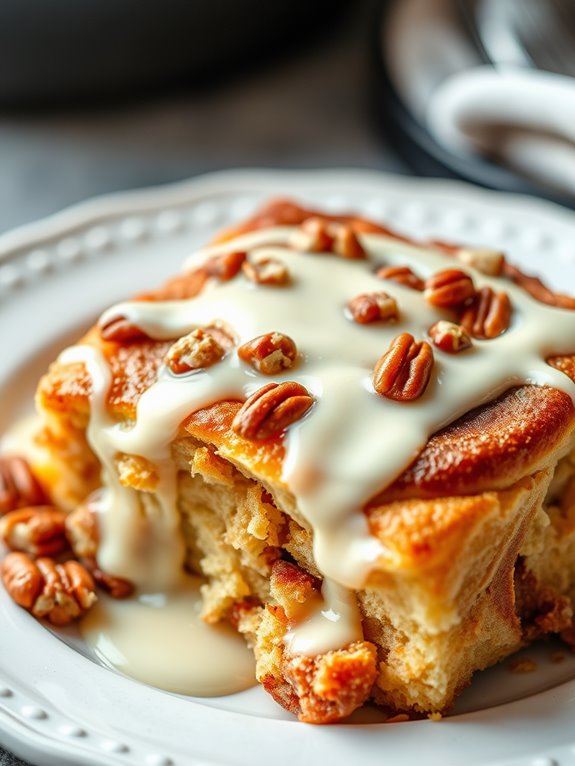
This skillet cinnamon roll casserole isn't only easy to prepare but also allows for customization. You can add your favorite toppings or mix-ins, such as nuts or dried fruit, for an extra layer of flavor.
Whether you're hosting a brunch or simply want to enjoy a cozy evening at home, this dish is sure to become a new favorite.
Ingredients:
- 2 cans of refrigerated cinnamon rolls
- 4 large eggs
- 1 cup milk
- 1/2 cup maple syrup
- 1 teaspoon vanilla extract
- 1 teaspoon ground cinnamon
- 1/4 teaspoon salt
- 1/2 cup chopped pecans (optional)
- Cream cheese icing (from the cinnamon rolls)
Cooking Instructions:
Preheat your oven to 350°F (175°C). Begin by greasing your cast iron skillet with butter or cooking spray.
Open the cans of cinnamon rolls and cut each roll into quarters. Arrange the pieces evenly in the skillet.
In a mixing bowl, whisk together the eggs, milk, maple syrup, vanilla extract, ground cinnamon, and salt. Pour this mixture over the cinnamon roll pieces in the skillet, ensuring they're evenly coated. If you're using chopped pecans, sprinkle them on top for added crunch.
Bake in the preheated oven for 25-30 minutes, or until the casserole is puffed and golden brown. Remove it from the oven and let it cool for a few minutes.
Drizzle the cream cheese icing over the top while it's still warm, allowing it to melt into the cracks and crevices of the casserole. Serve warm and enjoy!
Extra Tips:
To enhance the flavors even more, consider adding a pinch of nutmeg or a splash of almond extract to the egg mixture.
For a fun twist, you can substitute regular cinnamon rolls with flavored varieties like caramel or pumpkin spice.
If you're preparing this dish ahead of time, you can assemble it the night before, cover it, and store it in the refrigerator. Just bake it in the morning for a fresh and delightful breakfast!
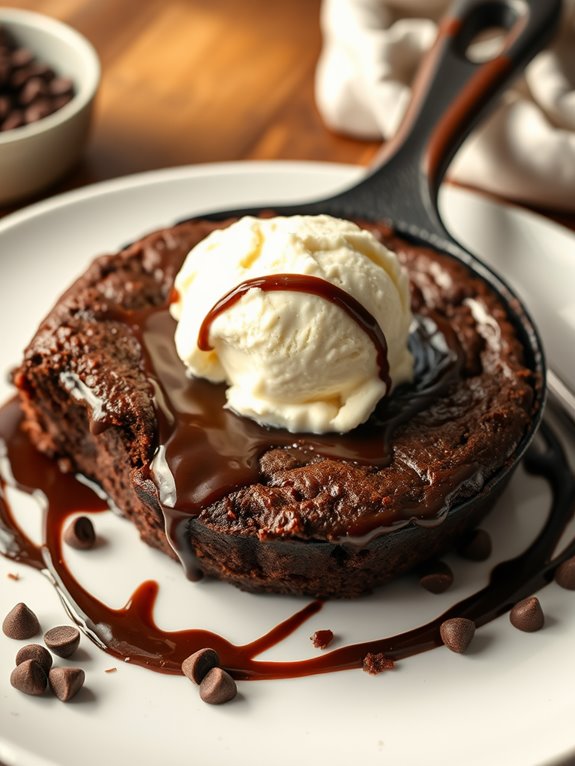
Chocolate Lava Cake
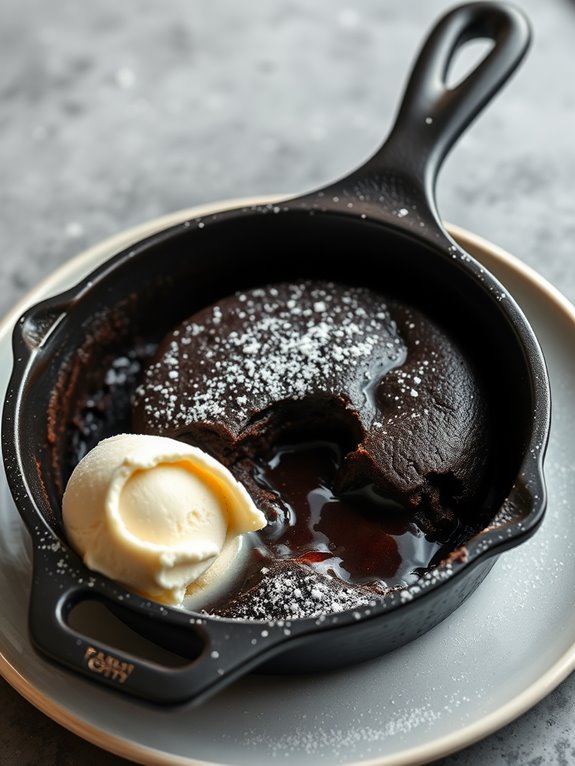
Indulging in a rich and gooey chocolate lava cake is an experience that many dessert lovers cherish. This decadent treat, with its warm, flowing center, is surprisingly simple to make in a cast iron skillet. The combination of high-quality chocolate, butter, and eggs come together to create an irresistible dessert that's perfect for special occasions or a cozy night in.
Using a cast iron skillet not only gives your lava cake a beautiful crust but also guarantees even heat distribution, resulting in a perfectly baked exterior with a molten center. Serve it warm, topped with vanilla ice cream or a dollop of whipped cream for an extra touch of indulgence.
Ingredients:
- 1/2 cup unsalted butter
- 1 cup semi-sweet chocolate chips
- 2 large eggs
- 2 large egg yolks
- 1/4 cup granulated sugar
- 2 tablespoons all-purpose flour
- 1/4 teaspoon salt
- 1 teaspoon vanilla extract
- Optional: powdered sugar for dusting
To begin, preheat your oven to 425°F (220°C). In a small saucepan, melt the butter and chocolate chips together over low heat, stirring constantly until smooth. Once melted, remove from heat and allow to cool slightly.
In a mixing bowl, whisk together the eggs, egg yolks, and granulated sugar until the mixture is thick and pale. Gradually add in the melted chocolate mixture, stirring until well combined. Gently fold in the flour, salt, and vanilla extract until just incorporated.
Next, grease a 10-inch cast iron skillet with butter and pour in the chocolate batter. Bake in the preheated oven for 12-14 minutes, or until the edges are set but the center remains soft and slightly jiggly. Remove from the oven and let it cool for a minute before serving.
To serve, cut into the cake, allowing the molten chocolate to flow out, and pair it with your choice of ice cream or whipped cream.
Extra Tips: For the best results, use high-quality chocolate as it will greatly enhance the flavor of your lava cake. If you want to prepare this dessert in advance, you can make the batter ahead of time, refrigerate it, and bake it just before serving. Additionally, be cautious not to overbake the cake; a perfectly cooked lava cake should have a gooey center that oozes when cut into. Enjoy this delightful dessert fresh out of the oven for an unforgettable treat!
Berry Galette

Making a galette is a wonderful way to showcase fresh berries, whether they're plump strawberries, tart raspberries, or succulent blueberries. With a few simple ingredients and minimal fuss, you can whip up this delightful treat. Serve it warm with a scoop of vanilla ice cream or a dollop of whipped cream for an extra special touch.
Let's plunge into the ingredients and instructions for this mouthwatering dessert.
Ingredients
- 1 ½ cups all-purpose flour
- ½ teaspoon salt
- 1 tablespoon granulated sugar
- ½ cup unsalted butter, chilled and cubed
- 4-6 tablespoons ice water
- 2 cups mixed berries (strawberries, blueberries, raspberries)
- ¼ cup brown sugar
- 1 tablespoon cornstarch
- 1 teaspoon vanilla extract
- 1 egg (for egg wash)
- Raw sugar (for sprinkling)
Cooking Instructions
1. Start by preparing the pie crust. In a large mixing bowl, combine the flour, salt, and granulated sugar. Add the chilled, cubed butter and use a pastry cutter or your fingers to mix until the mixture resembles coarse crumbs.
Gradually add ice water, one tablespoon at a time, mixing just until the dough comes together. Form the dough into a disk, wrap it in plastic wrap, and refrigerate for at least 1 hour.
2. Preheat your oven to 375°F (190°C). While the oven heats, prepare the berry filling. In a medium bowl, combine the mixed berries, brown sugar, cornstarch, and vanilla extract.
Roll out the chilled dough on a floured surface into a rough circle, about 12 inches in diameter. Transfer the dough to your cast iron skillet, letting the edges hang over the sides. Pour the berry mixture into the center and fold the edges of the dough over the berries, pleating as needed.
Brush the crust with an egg wash and sprinkle raw sugar on top.
3. Bake the galette in the preheated oven for 30-35 minutes, or until the crust is golden brown and the berries are bubbling. Allow it to cool for a few minutes before serving.
Extra Tips
For an added flavor boost, consider adding a sprinkle of lemon zest to the berry mixture or a pinch of cinnamon to the dough.
Feel free to mix and match your favorite berries based on what's in season or available in your local market. Finally, make sure you let the galette cool slightly before slicing; this helps the filling set up a bit more, making it easier to serve.
Enjoy your delicious berry galette!
Skillet Banana Bread
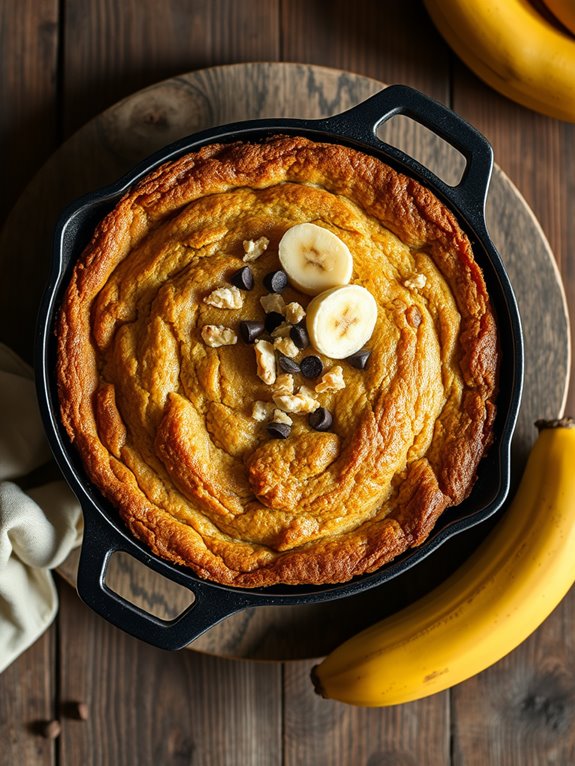
Skillet banana bread is a delightful twist on a classic favorite, made easier by using a cast iron skillet. The beauty of this method is that it allows for a wonderfully crispy crust while keeping the inside moist and tender. This recipe is perfect for using up overripe bananas, and it's so simple that you can whip it up in no time.
Whether enjoyed for breakfast, as a snack, or as a dessert, this skillet banana bread is sure to impress your family and friends. The addition of nuts or chocolate chips makes this banana bread extra special, but feel free to customize it to your liking. You can also experiment with spices, such as cinnamon or nutmeg, for an added depth of flavor.
With a few basic pantry staples and ripe bananas, you'll be on your way to creating a deliciously irresistible dessert that's sure to become a staple in your kitchen.
Ingredients:
- 3 ripe bananas, mashed
- 1/3 cup melted butter
- 1 teaspoon vanilla extract
- 1 teaspoon baking soda
- Pinch of salt
- 3/4 cup sugar (or brown sugar for a deeper flavor)
- 1 large egg, beaten
- 1 cup all-purpose flour
- Optional: 1/2 cup chopped nuts or chocolate chips
Cooking Instructions:
Preheat your oven to 350°F (175°C). In a large bowl, mix the mashed bananas with the melted butter until well combined. Stir in the vanilla extract, then add the baking soda and salt, mixing until incorporated.
Next, add the sugar and beaten egg, stirring until everything is well combined. In conclusion, fold in the flour until just combined, being careful not to overmix. If you're using nuts or chocolate chips, gently fold them into the batter.
Grease your cast iron skillet with a little butter or non-stick spray, then pour the batter into the skillet. Bake in the preheated oven for about 25-30 minutes or until a toothpick inserted into the center comes out clean. Let it cool for a few minutes before slicing, and enjoy your warm, delicious skillet banana bread!
Extra Tips:
For the best flavor, use very ripe bananas with lots of brown spots. This will guarantee your banana bread is sweet and flavorful.
If you want to add a little extra texture or flavor, consider toasting the nuts before adding them to the batter. Finally, if you have leftovers, wrap the banana bread in plastic wrap and store it at room temperature for a couple of days or in the refrigerator for up to a week. You can also freeze individual slices for a quick treat later on!
Salted Caramel Pecan Pie
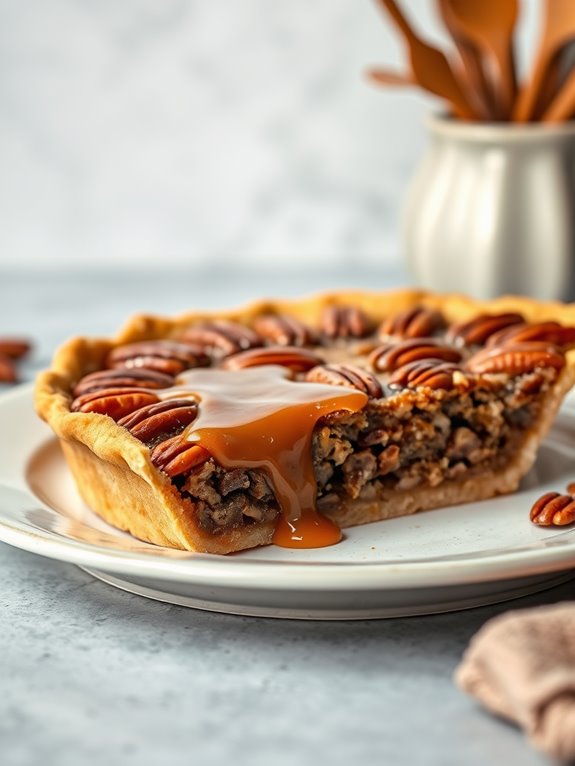
Salted caramel pecan pie is a decadent dessert that combines the rich flavors of buttery pecans and a luscious salted caramel sauce, all baked to perfection in a cast iron skillet. The nutty, crunchy topping pairs beautifully with the sweet, gooey filling, creating a delightful contrast that will leave everyone wanting more.
Whether you're serving it at a holiday gathering or simply treating yourself, this pie is bound to impress. Using a cast iron skillet not only adds a rustic charm to your dessert but also guarantees even cooking and a perfectly golden crust. The combination of sweet and salty flavors makes this pie irresistible, and when served warm with a scoop of vanilla ice cream, it becomes an unforgettable experience.
Get ready to indulge in this mouth-watering creation that's as fun to make as it's to eat!
Ingredients:
- 1 1/2 cups pecan halves
- 1 cup granulated sugar
- 1/2 cup unsalted butter
- 1 cup light corn syrup
- 1/4 cup heavy cream
- 3 large eggs
- 1 teaspoon vanilla extract
- 1/2 teaspoon sea salt
- 1 pre-made pie crust (or homemade if preferred)
Instructions:
Preheat your oven to 350°F (175°C). Begin by toasting the pecan halves in a dry cast iron skillet over medium heat for about 5-7 minutes, stirring frequently until fragrant. Remove from heat and set aside.
In a saucepan, combine the sugar, butter, and corn syrup over medium heat, stirring until the mixture comes to a simmer. Once it starts bubbling, allow it to cook for an additional 2-3 minutes before removing it from the heat. Stir in the heavy cream, followed by the eggs, vanilla extract, and sea salt until fully combined and smooth.
Next, arrange the toasted pecans evenly over the bottom of your pie crust. Pour the warm caramel mixture over the pecans, making sure they're well coated. Bake the pie in the preheated oven for 45-50 minutes, or until the filling is set and slightly puffed. Let it cool for at least 15 minutes before slicing. Serve warm or at room temperature, ideally with a scoop of vanilla ice cream.
Extra Tips:
To achieve the best results, make sure your ingredients are at room temperature before mixing. This will help create a smooth filling.
For an extra touch, consider drizzling some additional salted caramel on top before serving. Always keep an eye on the pie as it bakes, as oven temperatures can vary and you want to avoid over-baking. Enjoy your delicious salted caramel pecan pie!
S'mores Skillet Dip
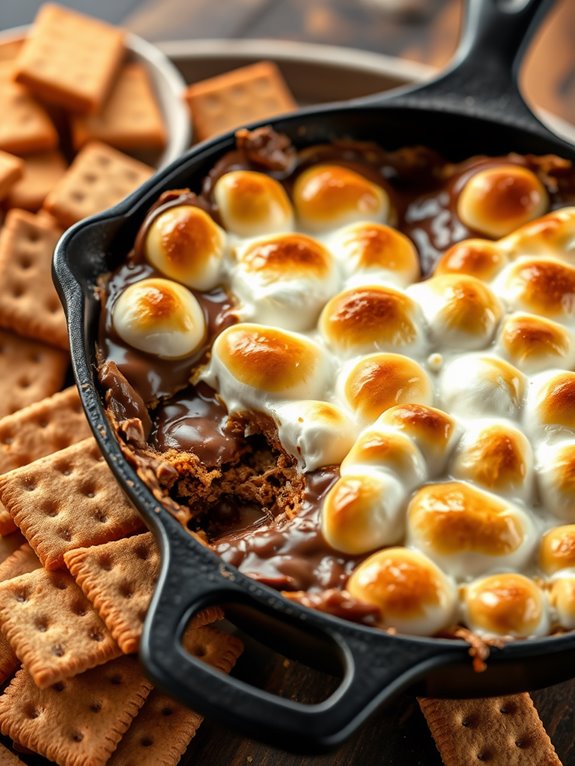
S'mores Skillet Dip is the ultimate indulgence for anyone craving a sweet and gooey treat that captures the essence of classic campfire s'mores. This delightful dessert is perfect for sharing with family and friends, whether you're hosting a cozy gathering or simply enjoying a night in.
With a melty blend of chocolate and marshmallows baked to perfection in a cast iron skillet, this dip is best served warm alongside graham crackers for dipping.
Making S'mores Skillet Dip isn't only easy, but it also allows you to customize the flavors to suit your taste. Whether you prefer milk chocolate, dark chocolate, or even a sprinkle of sea salt on top, the possibilities are endless.
The best part? You can have this delectable dessert ready in just a matter of minutes, so you can dive right into the deliciousness without any fuss.
Ingredients:
- 1 cup semi-sweet chocolate chips
- 1 cup mini marshmallows
- 1/2 cup creamy peanut butter (optional)
- 1 tablespoon unsalted butter
- 1 package of graham crackers (for dipping)
Cooking Instructions:
Preheat your oven to 400°F (200°C). In a 10-inch cast iron skillet, melt the butter over medium heat.
Once melted, remove from heat and add the semi-sweet chocolate chips, spreading them evenly across the bottom of the skillet. If you're using peanut butter, drizzle it over the chocolate chips for an extra layer of flavor.
Top the chocolate mixture with mini marshmallows, covering them generously.
Place the skillet in the preheated oven and bake for about 10 minutes, or until the marshmallows are golden brown and the chocolate is melted and bubbly.
Remove from the oven and let it cool for a minute before serving. Pair the warm dip with graham crackers for dipping, and enjoy this irresistible treat with friends and family!
Extra Tips:
For a fun twist, try adding different flavors to your S'mores Skillet Dip. Consider mixing in crushed cookies, caramel sauce, or even a hint of cinnamon for an extra kick.
Keep an eye on the dip while it's baking to prevent the marshmallows from burning, and don't hesitate to get creative with your toppings! Enjoy experimenting with different chocolates or nut butters to find your favorite combination.
Skillet Pumpkin Spice Cake
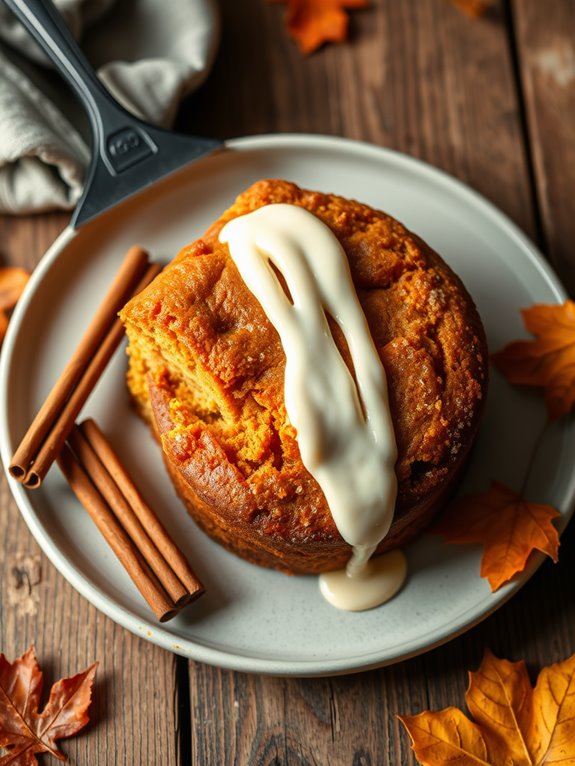
Indulging in a warm slice of Skillet Pumpkin Spice Cake is one of the simplest yet most satisfying ways to embrace the cozy flavors of fall. This dessert combines the rich taste of pumpkin with the aromatic spices of cinnamon, nutmeg, and cloves, all baked to perfection in a cast iron skillet. The result is a moist and flavorful cake that serves beautifully straight from the skillet, making it a perfect centerpiece for gatherings or a comforting treat for yourself on a cool evening.
This recipe isn't only easy to prepare but also allows for delightful variations, including the option to top it with cream cheese frosting or a dusting of powdered sugar. The cast iron skillet guarantees an even bake and a lovely golden crust, while the pumpkin keeps the cake tender and delicious.
Whether you're a seasoned baker or just starting, this Skillet Pumpkin Spice Cake is sure to impress your family and friends.
Ingredients:
- 1 ½ cups all-purpose flour
- 1 cup granulated sugar
- 1 teaspoon baking powder
- ½ teaspoon baking soda
- ½ teaspoon salt
- 1 teaspoon ground cinnamon
- ½ teaspoon ground nutmeg
- ½ teaspoon ground ginger
- ½ teaspoon ground cloves
- 1 cup canned pumpkin puree
- ½ cup vegetable oil
- 2 large eggs
- 1 teaspoon vanilla extract
Cooking Instructions:
Preheat your oven to 350°F (175°C) and grease a 10-inch cast iron skillet with non-stick spray or butter.
In a large mixing bowl, whisk together the flour, sugar, baking powder, baking soda, salt, and spices until well combined. In another bowl, mix the pumpkin puree, vegetable oil, eggs, and vanilla extract until smooth. Gradually fold the dry ingredients into the wet mixture until just combined; be careful not to overmix.
Pour the batter into the prepared skillet and spread it evenly. Bake in the preheated oven for about 25-30 minutes, or until a toothpick inserted into the center comes out clean. Allow the cake to cool for a few minutes before serving. Serve warm, optionally topped with whipped cream or a scoop of vanilla ice cream.
Extra Tips:
For an added touch, consider mixing in some chocolate chips or chopped nuts into the batter for extra texture and flavor. If you have fresh pumpkin on hand, you can roast and puree it for a homemade version instead of using canned pumpkin.
Lemon Blueberry Skillet Cake
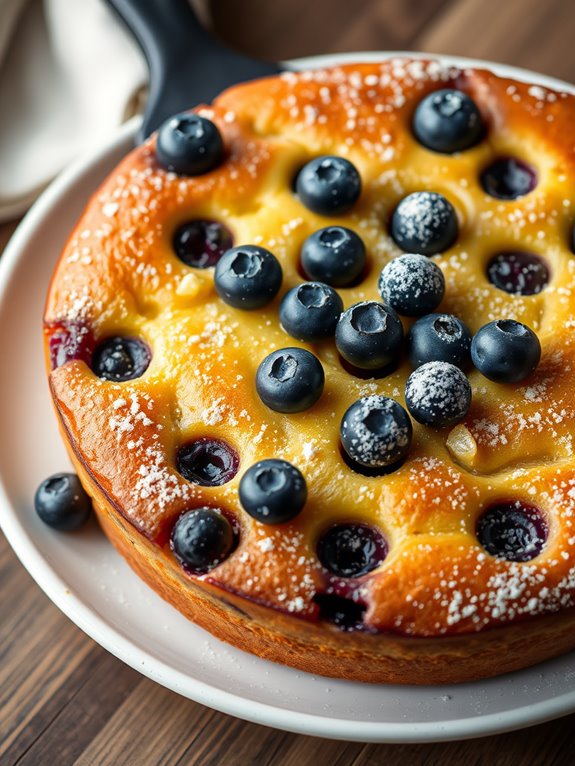
Lemon Blueberry Skillet Cake is a delightful dessert that combines the tartness of fresh lemons with the sweetness of juicy blueberries, all baked to perfection in a cast iron skillet. This cake isn't only incredibly easy to prepare, but it also delivers an enticing aroma that fills your kitchen while baking.
The golden brown top, studded with vibrant blueberries, makes for a stunning presentation that will impress your family and friends. Perfect for any occasion—be it a summer picnic, a cozy dinner, or a brunch gathering—this skillet cake is sure to become a favorite.
Serve it warm with a dusting of powdered sugar or a dollop of whipped cream for an irresistible treat. Let's explore the ingredients and instructions to create this scrumptious dessert!
Ingredients:
- 1 cup all-purpose flour
- 1 teaspoon baking powder
- 1/2 teaspoon baking soda
- 1/4 teaspoon salt
- 1/2 cup unsalted butter, softened
- 1 cup granulated sugar
- 2 large eggs
- 1 teaspoon vanilla extract
- Zest of 1 lemon
- 1/4 cup fresh lemon juice
- 1 cup fresh blueberries
- Powdered sugar for dusting (optional)
Instructions:
Preheat your oven to 350°F (175°C). In a medium bowl, whisk together the flour, baking powder, baking soda, and salt.
In a large mixing bowl, cream the softened butter and granulated sugar until light and fluffy. Add the eggs one at a time, mixing well after each addition. Stir in the vanilla extract, lemon zest, and lemon juice until blended.
Gradually add the dry ingredients to the wet mixture, stirring until just combined. Gently fold in the fresh blueberries. Pour the batter into a pre-greased cast iron skillet and spread it evenly.
Bake in the preheated oven for 25-30 minutes or until a toothpick inserted in the center comes out clean. Allow the cake to cool slightly before serving, and dust with powdered sugar if desired.
Extra Tips:
For best results, use fresh, ripe blueberries to enhance the flavor of the cake. If you want to add a little extra zing, consider drizzling a simple lemon glaze over the top after baking.
To do this, mix powdered sugar with lemon juice until you reach your desired consistency and pour it over the cooled cake. Additionally, this cake can be stored in an airtight container at room temperature for up to 3 days, making it perfect for meal prep or leftovers!
Peanut Butter Cup Skillet Brownies
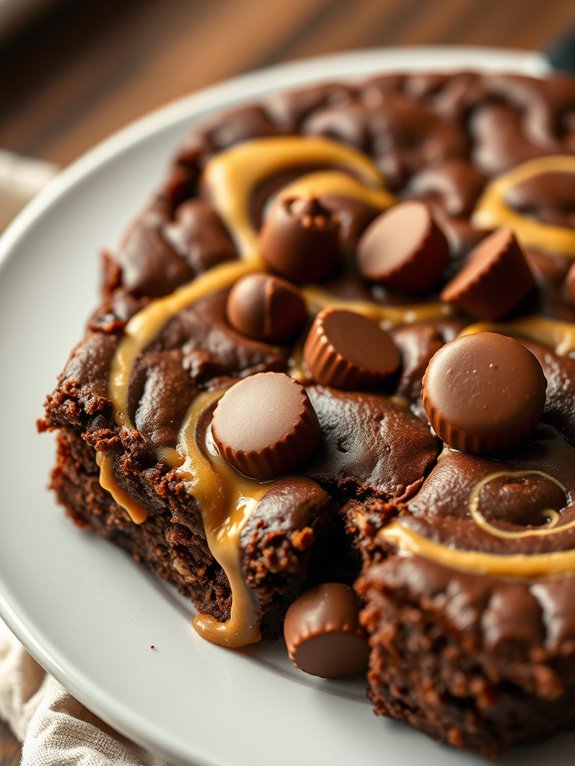
Indulging in a warm, gooey dessert straight from the oven is one of life's simple pleasures, and nothing embodies that more than the Peanut Butter Cup Skillet Brownies. These brownies are a perfect blend of rich chocolate and creamy peanut butter, all baked right in a cast iron skillet for a beautifully rustic presentation.
Topped with delicious peanut butter cups that melt into the fudgy brownie mixture, these treats are bound to impress your friends and family, making them an ideal choice for gatherings or cozy nights in.
Making these skillet brownies is a breeze, and the results are absolutely irresistible. With the combination of melted chocolate and smooth peanut butter, each bite is a delightful explosion of flavor.
Plus, baking them in a cast iron skillet guarantees even cooking and a perfectly crispy edge. Whether served warm with a scoop of vanilla ice cream or enjoyed on their own, these Peanut Butter Cup Skillet Brownies are a dessert that will keep you coming back for more.
Ingredients:
- 1/2 cup unsalted butter
- 1 cup semi-sweet chocolate chips
- 1 cup granulated sugar
- 2 large eggs
- 1 teaspoon vanilla extract
- 1/2 cup all-purpose flour
- 1/4 teaspoon salt
- 1/2 cup creamy peanut butter
- 6-8 mini peanut butter cups, chopped
Instructions:
Preheat your oven to 350°F (175°C). In a cast iron skillet, melt the butter and semi-sweet chocolate chips together over low heat, stirring until smooth.
Once melted, remove from heat and mix in the granulated sugar until well combined. Add the eggs one at a time, mixing well after each addition, followed by the vanilla extract.
Gently fold in the flour and salt until just combined, being careful not to overmix.
Next, swirl the creamy peanut butter into the brownie batter using a knife or spatula, then fold in the chopped mini peanut butter cups.
Pour the batter back into the same skillet and spread it evenly. Bake for 20-25 minutes, or until the edges are set and the center is slightly undercooked for that fudgy texture.
Allow the brownies to cool for a few minutes before serving.
Extra Tips:
For an extra touch of flavor, consider adding a sprinkle of sea salt on top of the brownies just before baking. This enhances the sweetness and gives a delightful contrast to the rich chocolate and peanut butter.
Additionally, if you want to get creative, try mixing in some chopped nuts or swirls of caramel for added texture and flavor. Enjoy your decadent dessert!
Skillet Strawberry Shortcake

Skillet Strawberry Shortcake is a delightful twist on the traditional dessert, making it perfect for warm-weather gatherings or cozy nights at home. This recipe isn't only simple to prepare but also allows the strawberries to shine, giving you that fresh, fruity flavor in every bite.
The cast iron skillet adds a beautiful golden crust to the shortcake, while the juicy strawberries create a luscious filling that's simply irresistible. This dessert is versatile and can be enjoyed warm or chilled, making it a great option for any occasion.
Whether you're hosting a backyard barbecue or just want to treat yourself and your loved ones, this Skillet Strawberry Shortcake is sure to impress. Serve it with a dollop of whipped cream or a scoop of vanilla ice cream for an extra indulgent experience!
Ingredients:
- 2 cups fresh strawberries, hulled and sliced
- 1/4 cup granulated sugar
- 2 cups all-purpose flour
- 1 tablespoon baking powder
- 1/2 teaspoon salt
- 1/4 cup unsalted butter, cold and cubed
- 3/4 cup milk
- 1 teaspoon vanilla extract
- Whipped cream or ice cream, for serving (optional)
Cooking Instructions:
- Preheat your oven to 400°F (200°C). In a medium bowl, toss the sliced strawberries with 2 tablespoons of sugar and set aside to macerate while you prepare the shortcake batter. This will draw out the juices and enhance the flavor of the strawberries.
- In a large bowl, whisk together the flour, baking powder, salt, and remaining sugar. Add the cold butter and use a pastry cutter or your fingers to work it into the flour mixture until it resembles coarse crumbs. Stir in the milk and vanilla extract until just combined, being careful not to overmix.
- In a greased cast iron skillet, pour the shortcake batter and spread it evenly across the bottom. Spoon the macerated strawberries over the batter, making sure to distribute them evenly. Bake in the preheated oven for 25-30 minutes or until the shortcake is golden brown and a toothpick inserted into the center comes out clean.
Extra Tips:
For the best flavor, use ripe, in-season strawberries, as they'll be sweeter and juicier. You can also add a splash of lemon juice or a sprinkle of lemon zest to the strawberries for a revitalizing twist.
If you're feeling adventurous, try adding a handful of blueberries or raspberries for a mixed berry shortcake! Finally, serve the dessert warm for the ultimate experience, and don't forget the whipped cream or ice cream to complement the warm, fruity goodness. Enjoy!
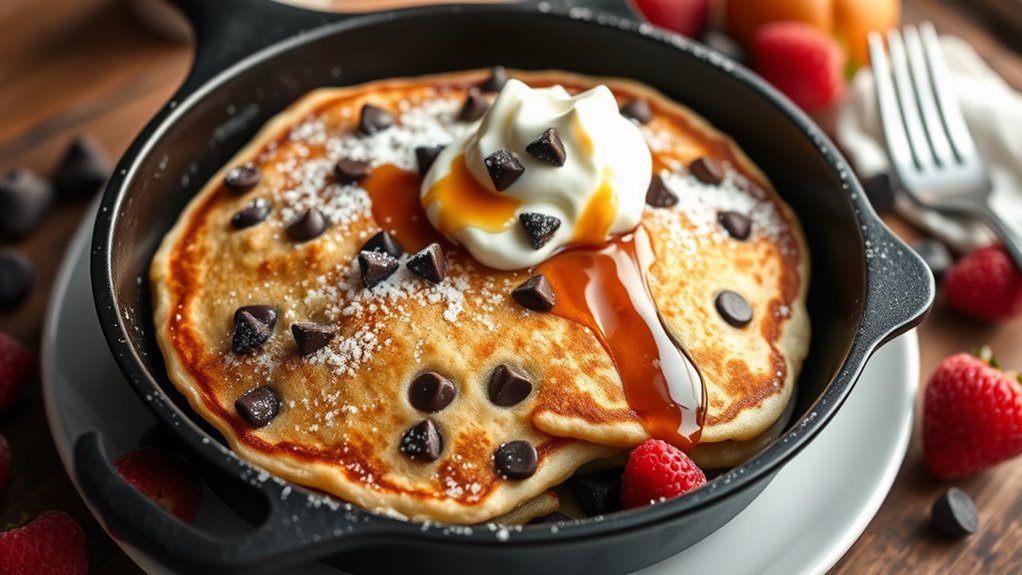
Chocolate Chip Skillet Pancakes
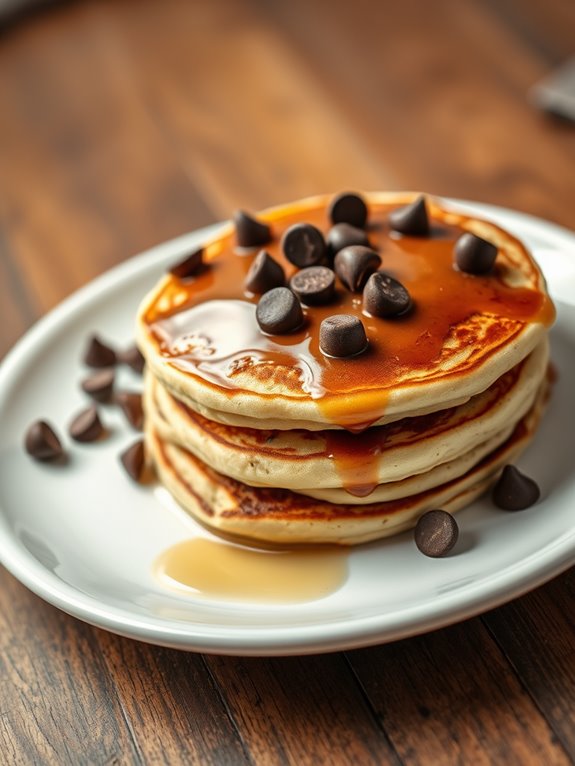
Chocolate Chip Skillet Pancakes are a delightful twist on a classic breakfast favorite. Cooking pancakes in a cast iron skillet adds a lovely crispness to the edges while keeping the center fluffy and tender. The combination of warm pancakes and melted chocolate chips creates a deliciously indulgent experience that can be enjoyed at any time of the day.
Whether you're serving them for brunch or a late-night treat, these skillet pancakes are sure to be a hit with family and friends.
The beauty of this recipe lies in its simplicity and speed. With just a few ingredients and minimal preparation time, you can whip up a batch of these delightful pancakes in no time. The cast iron skillet retains heat beautifully, ensuring that each pancake is cooked evenly.
Plus, there's something extra special about serving pancakes straight from the skillet, making it a fun and interactive dining experience.
Ingredients:
- 1 cup all-purpose flour
- 2 tablespoons sugar
- 1 tablespoon baking powder
- 1/2 teaspoon salt
- 1 cup milk
- 1 large egg
- 2 tablespoons melted butter
- 1/2 teaspoon vanilla extract
- 1/2 cup chocolate chips
- Additional butter or oil for greasing the skillet
Cooking Instructions:
Start by preheating your oven to 375°F (190°C). In a large mixing bowl, whisk together the flour, sugar, baking powder, and salt until well combined.
In another bowl, mix the milk, egg, melted butter, and vanilla extract. Pour the wet ingredients into the dry ingredients and stir until just combined; be careful not to overmix. Gently fold in the chocolate chips.
Grease a cast iron skillet with a little butter or oil and place it over medium heat on the stovetop. Once the skillet is hot, pour the pancake batter into the center, spreading it out slightly. Cook for about 2-3 minutes until bubbles form on the surface.
Then, transfer the skillet to the preheated oven and bake for an additional 10-12 minutes, or until the center is set and lightly golden. Allow it to cool for a few minutes before slicing into wedges and serving warm.
Extra Tips:
For an extra touch of flavor, consider adding a pinch of cinnamon to the batter or substituting some of the chocolate chips with nuts or berries.
If you want to serve these pancakes in style, top them with whipped cream, syrup, or a sprinkle of powdered sugar. Enjoy experimenting with different toppings and add-ins to customize your skillet pancakes!
Frequently Asked Questions
Can I Use a Non-Stick Cast Iron Skillet for Baking Desserts?
Yes, you can use a non-stick cast iron skillet for baking desserts. Just guarantee it's oven-safe and follow your recipe's temperature guidelines. The non-stick surface helps with easy release and cleanup afterward, making baking enjoyable.
How Do I Clean My Cast Iron Skillet After Baking?
After baking, let your skillet cool slightly. Rinse it with warm water, scrub gently with a brush or sponge, and avoid soap. Dry it thoroughly and apply a thin layer of oil to maintain seasoning.
What Temperature Should I Preheat My Oven for Skillet Desserts?
You should preheat your oven to 350°F for most skillet desserts. This temperature guarantees even baking and helps achieve that perfect golden crust while keeping the inside moist. Always check specific recipes for adjustments.
Can I Bake Multiple Desserts in One Skillet?
Imagine your skillet filled with warm, gooey goodness. Yes, you can bake multiple desserts in one skillet! Just layer them thoughtfully, allowing flavors to mingle, but keep an eye on baking times for perfect results.
How Do I Adjust Baking Time for a Larger Skillet?
To adjust baking time for a larger skillet, increase the time by 5 to 10 minutes, checking for doneness with a toothpick. Keep an eye on your dessert to avoid overbaking.