As an affiliate, we may earn a commission from qualifying purchases. We get commissions for purchases made through links on this website from Amazon and other third parties.
Cooking with a cast iron press transforms grilled cheese sandwiches, elevates panini variations, and enhances the flavors of your favorite meats. It's a versatile tool that brings out the best in every dish. Whether you're craving something savory or sweet, this kitchen essential offers endless possibilities. Curious about how to master these recipes and impress your friends at your next gathering? Let's explore the culinary delights that await you.
Key Takeaways
- Create crispy grilled cheese sandwiches using quality bread and cheese in a cast iron press for a timeless comfort meal.
- Experiment with panini variations like Caprese, utilizing a cast iron press for a golden crust and melty fillings.
- Make delectable quesadillas with cheese and sautéed vegetables, achieving a crispy exterior and melted interior in just a few minutes.
- Sear succulent herb-infused grilled chicken or sizzling steak using a cast iron press for even cooking and flavorful crusts.
- Bake sweet treats like chocolate chip cookies or rustic fruit galette in a cast iron skillet for deliciously golden results.
Perfectly Grilled Cheese Sandwiches
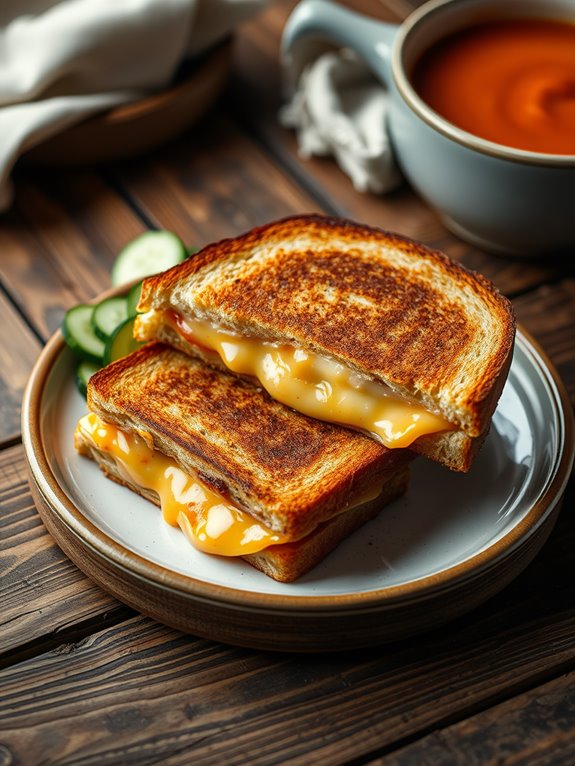
Grilled cheese sandwiches are a timeless comfort food, perfect for a quick lunch or a cozy dinner. Using a cast iron press can elevate your grilled cheese experience by guaranteeing that the bread is perfectly crispy and the cheese melts to gooey perfection.
Whether you prefer classic cheddar or a blend of gourmet cheeses, this method will give you a sandwich that's deliciously satisfying. The cast iron press not only helps to evenly distribute heat but also compresses the sandwich, allowing for a delightful crust that holds in all the cheesy goodness.
With just a few simple ingredients and a bit of technique, you can whip up a grilled cheese sandwich that rivals those from your favorite diner.
Ingredients:
- 2 slices of bread (your choice)
- 2 slices of cheese (cheddar, American, or your favorite)
- 1-2 tablespoons of butter
- Optional: additional fillings (tomato, bacon, avocado, etc.)
To make the perfect grilled cheese sandwich, start by preheating your cast iron skillet over medium heat. While the skillet is heating, spread butter on one side of each slice of bread.
Place one slice of bread, butter side down, in the skillet. Layer the cheese on top of the bread, then add any additional fillings if desired. Finally, place the second slice of bread on top, butter side up.
Once the sandwich is in the skillet, carefully place the cast iron press on top to guarantee even cooking. Cook for about 3-4 minutes on one side, or until the bread is golden brown and the cheese begins to melt.
Carefully flip the sandwich using a spatula, replace the press, and cook for another 3-4 minutes on the other side. Once both sides are perfectly browned and the cheese is fully melted, remove the sandwich from the skillet and let it cool slightly before slicing.
For best results, choose a good quality bread that can hold up to the heat and moisture of the melted cheese. Experiment with different cheese combinations for varying flavors, and don't be afraid to add unique ingredients to customize your sandwich.
Always monitor the heat, as cast iron retains heat well and can quickly burn the bread if the temperature is too high. Enjoy your delicious creation!
Crispy Panini Variations
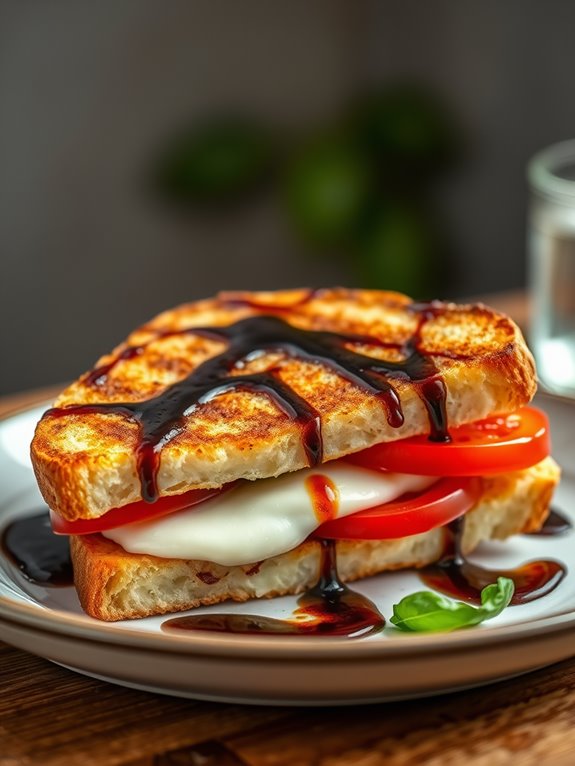
Using a cast iron press not only aids in achieving that golden crust but also guarantees even heat distribution.
The versatility of a panini allows you to mix and match ingredients based on what's in your pantry or your personal preferences. Here's a delicious recipe for a Caprese Panini that combines fresh mozzarella, ripe tomatoes, and fragrant basil, all drizzled with balsamic glaze for a delightful twist.
Ingredients:
- 2 slices of ciabatta or sourdough bread
- 1 medium ripe tomato, sliced
- 4 ounces fresh mozzarella cheese, sliced
- Fresh basil leaves
- 1 tablespoon balsamic glaze
- 1 tablespoon olive oil
- Salt and pepper to taste
Cooking Instructions:
Begin by preheating your cast iron press on medium heat.
While it's heating, assemble your panini by placing one slice of bread on a clean surface. Layer the sliced tomatoes, fresh mozzarella, and basil leaves on top. Drizzle the balsamic glaze over the fillings, and season with salt and pepper.
Finish by placing the second slice of bread on top. Brush the outside of the bread with olive oil to help achieve that crispy texture.
Once the press is hot, carefully place your panini in the center and close the press. Cook for about 3-5 minutes, or until the bread is golden brown and the cheese is melted.
You can check the progress occasionally to guarantee it's cooking evenly. Once done, remove from the heat, slice in half, and serve warm.
Extra Tips:
For added flavor, consider infusing your olive oil with garlic or herbs before brushing it on the bread.
You can also experiment with different cheeses like provolone or goat cheese for a unique twist. If you enjoy a bit of heat, add some sliced jalapeños or a drizzle of hot sauce inside your panini.
Don't be afraid to get creative with your fillings, as the beauty of a panini lies in its versatility!
Herb-Infused Grilled Chicken
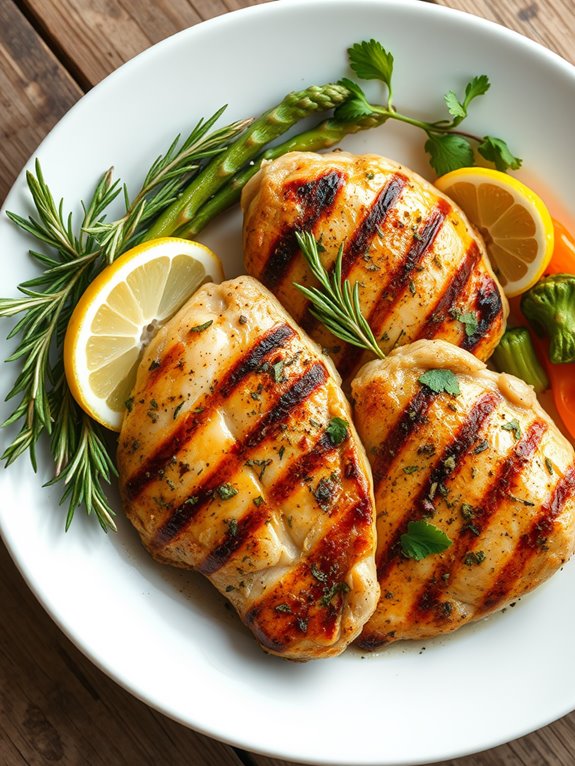
Grilling chicken using a cast iron press is a fantastic way to lock in flavor and achieve a perfectly cooked, juicy result. The combination of herbs and spices not only enhances the chicken's natural taste but also adds an aromatic element that makes the dish truly irresistible.
Whether you're preparing a weeknight dinner or hosting a backyard barbecue, this herb-infused grilled chicken recipe will elevate your meal and impress your guests.
To attain the best results, use fresh herbs whenever possible. They bring vibrant flavors that dried herbs simply can't match. The cast iron press is essential for guaranteeing even cooking and achieving those beautiful grill marks that make grilled chicken so appealing.
Pair your herb-infused chicken with seasonal vegetables or a light salad for a complete meal.
Ingredients:
- 4 boneless, skinless chicken breasts
- 2 tablespoons olive oil
- 2 teaspoons fresh rosemary, chopped
- 2 teaspoons fresh thyme, chopped
- 2 teaspoons fresh parsley, chopped
- 3 garlic cloves, minced
- Salt and pepper, to taste
- Lemon wedges, for serving
To start, preheat your grill or cast iron skillet over medium-high heat. In a mixing bowl, combine the olive oil, chopped rosemary, thyme, parsley, minced garlic, salt, and pepper to create a marinade.
Coat each chicken breast evenly with the marinade and let them sit for about 15-20 minutes to absorb the flavors. Once the grill is hot, place the chicken breasts on it, and use the cast iron press to gently press down on each piece. This guarantees maximum contact with the heat source and promotes even cooking.
Grill the chicken for about 6-8 minutes on one side, then flip and press down again with the cast iron press. Cook for an additional 6-8 minutes or until the chicken reaches an internal temperature of 165°F (75°C).
Once cooked, remove the chicken from the grill and let it rest for a few minutes before slicing. Serve with lemon wedges to add a zesty finish.
Extra Tips:
For an even more pronounced flavor, marinate the chicken for several hours or overnight in the refrigerator. This allows the herbs to penetrate deeper into the meat.
Additionally, consider adding a splash of balsamic vinegar or a tablespoon of honey to the marinade for a touch of sweetness. Always allow the chicken to rest after grilling; this helps retain its juices, guaranteeing every bite is succulent and flavorful.
Sizzling Steak With a Crust

Sizzling steak with a crust is a culinary delight that brings out the rich flavors of the meat while providing a satisfying texture. Using a cast iron press elevates the cooking experience by ensuring even heat distribution, resulting in a perfectly seared steak. This method locks in the juices and creates a delicious crust that enhances the overall taste.
Whether you're a seasoned chef or a novice cook, this recipe is sure to impress your family and friends.
To achieve the best results, it's important to choose the right cut of steak. Ribeye, sirloin, or T-bone are excellent options. The key to a great crust is to start with a dry surface and high heat. This will allow the Maillard reaction to occur, giving your steak that sought-after caramelization.
Pair it with your favorite sides for a complete meal that can be prepared in no time.
Ingredients:
- 2 ribeye steaks (1-inch thick)
- Salt
- Freshly ground black pepper
- 2 tablespoons olive oil
- 2 tablespoons unsalted butter
- 4 cloves garlic, crushed
- Fresh thyme or rosemary sprigs (optional)
Cooking Instructions:
- Begin by removing the steaks from the refrigerator about 30 minutes before cooking to bring them to room temperature. Pat the steaks dry with paper towels and season generously with salt and pepper on both sides.
- Heat a cast iron skillet over high heat for about 5 minutes until it's very hot. Add the olive oil, swirling it around to coat the pan. Carefully place the steaks in the skillet, and let them sear without moving them for about 4-5 minutes until a crust forms.
- Flip the steaks and add the butter, garlic, and herbs to the pan. As the butter melts, use a spoon to baste the steaks with the melted butter for another 4-5 minutes, depending on your desired level of doneness. For medium-rare, aim for an internal temperature of 130-135°F.
- Once cooked, remove the steaks from the skillet and let them rest for 5-10 minutes. This allows the juices to redistribute throughout the meat, ensuring a juicy steak.
Extra Tips:
For an extra layer of flavor, consider marinating the steaks in a mixture of garlic, herbs, and olive oil for a few hours before cooking.
Always use a meat thermometer for precision, and don't skip the resting period after cooking; this is essential for achieving a tender and juicy steak. Enjoy your perfectly seared sizzling steak!
Flavorful Vegetable Fajitas
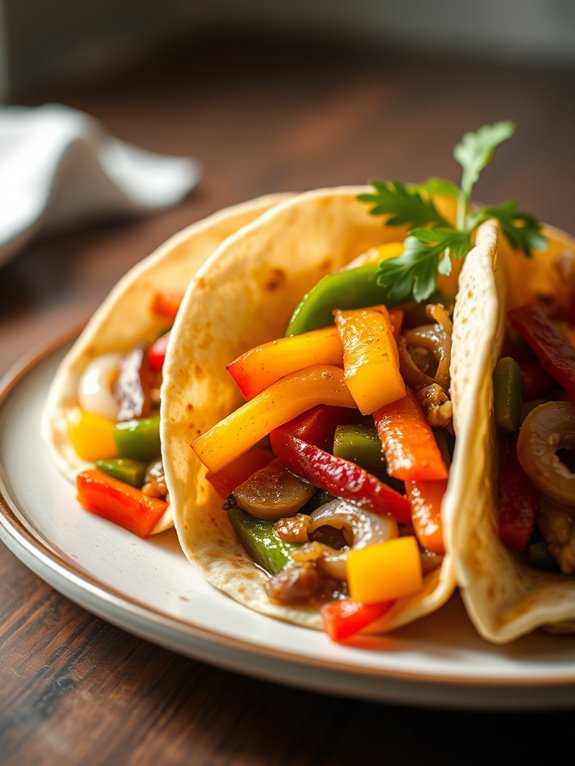
Using a cast iron press helps to lock in moisture and adds a beautiful char to the vegetables, enhancing their natural flavors.
Serve these fajitas with warm tortillas and your choice of toppings like guacamole, salsa, or sour cream for a complete meal. Perfect for a weeknight dinner or a fun gathering with friends, these vegetable fajitas will surely become a staple in your cooking repertoire.
Ingredients:
- 1 red bell pepper, sliced
- 1 yellow bell pepper, sliced
- 1 green bell pepper, sliced
- 1 medium onion, sliced
- 2 tablespoons olive oil
- 2 teaspoons chili powder
- 1 teaspoon cumin
- 1 teaspoon garlic powder
- 1 teaspoon smoked paprika
- Salt and pepper to taste
- 4 large flour or corn tortillas
- Optional toppings: avocado, cilantro, lime wedges, salsa
Cooking Instructions:
Begin by heating a cast iron skillet over medium-high heat and adding the olive oil.
Once the oil is hot, add the sliced onions and bell peppers. Sprinkle with chili powder, cumin, garlic powder, smoked paprika, salt, and pepper.
Sauté the vegetables for about 5-7 minutes until they're tender and slightly charred, stirring occasionally to guarantee even cooking.
Once the vegetables are cooked, remove them from the skillet and set aside.
In the same skillet, place the tortillas and press them with the cast iron press for about 30 seconds on each side to warm and slightly crisp them up.
After that, fill each tortilla with the sautéed vegetable mixture and any desired toppings. Serve immediately and enjoy!
Extra Tips:
For added flavor, you can marinate the vegetables in the spice mix and olive oil for 30 minutes before cooking.
This will enhance their taste and make sure they absorb all the delicious spices.
Additionally, feel free to mix in your favorite vegetables, such as mushrooms or zucchini, to make the dish even more satisfying.
Don't forget to keep your cast iron press clean and well-seasoned to maintain its non-stick properties!
Savory Cornbread
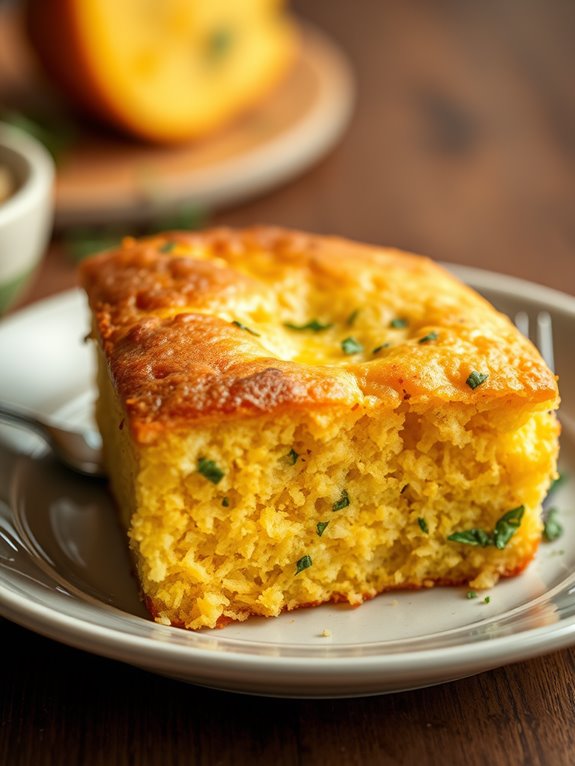
Savory cornbread is a comforting and versatile dish that pairs perfectly with a variety of meals, from chili to barbecue. With its golden-brown crust and tender, moist interior, this cornbread recipe takes advantage of the cast iron press to achieve a delightful texture and flavor. The heat retention of cast iron helps create a perfectly crispy exterior while keeping the inside soft and fluffy.
This savory version incorporates cheese and herbs, adding an extra layer of flavor that elevates the traditional recipe. Whether served as a side dish or enjoyed on its own, this cornbread will surely become a favorite. Plus, it's easy to whip up in just a few simple steps, making it an ideal choice for a quick weeknight dinner or a weekend gathering.
Ingredients:
- 1 cup cornmeal
- 1 cup all-purpose flour
- 1 tablespoon baking powder
- 1/2 teaspoon salt
- 1/4 cup sugar (optional, adjust to taste)
- 1 cup buttermilk
- 2 large eggs
- 1/4 cup vegetable oil or melted butter
- 1 cup shredded cheddar cheese
- 1/4 cup chopped fresh herbs (such as chives or parsley)
To prepare the savory cornbread, start by preheating your oven to 400°F (200°C). In a large mixing bowl, combine the cornmeal, flour, baking powder, salt, and sugar. In another bowl, whisk together the buttermilk, eggs, and oil or melted butter until well combined. Gradually add the wet ingredients to the dry ingredients, stirring until just blended.
Gently fold in the shredded cheese and chopped herbs until evenly distributed. Next, grease your cast iron press and place it in the preheated oven for about 5 minutes to heat. Carefully remove the hot press and pour the batter into it, spreading it evenly.
Return the press to the oven and bake for 20-25 minutes, or until the cornbread is golden brown and a toothpick inserted into the center comes out clean. Allow it to cool for a few minutes before slicing and serving.
Extra Tips: To enhance the flavor of your savory cornbread, consider adding cooked bacon bits or jalapeños for a spicy kick. You can also experiment with different types of cheese, such as pepper jack or feta, for a unique twist.
For best results, always guarantee your cast iron press is well-seasoned to prevent sticking and achieve that perfect crust. Enjoy your delicious cornbread warm, ideally with a pat of butter on top!
Delectable Quesadillas
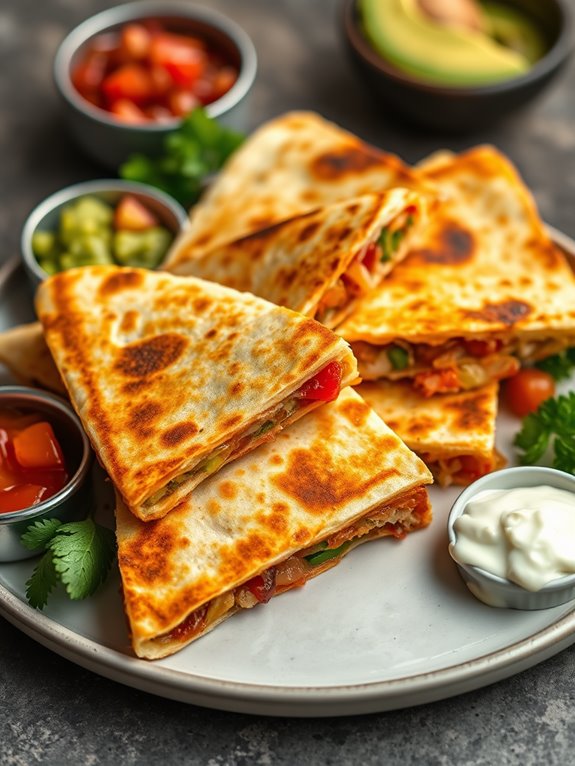
Not only are quesadillas quick to prepare, but they also make for a great snack, appetizer, or light meal.
The cast iron press guarantees that your quesadillas cook evenly and achieve that perfect golden-brown crust. Pair them with salsa, guacamole, or sour cream for an extra flavor boost!
Ingredients:
- 4 large flour tortillas
- 2 cups shredded cheese (cheddar, Monterey Jack, or a blend)
- 1 cup cooked and shredded chicken (optional)
- 1 cup sautéed bell peppers and onions (optional)
- 1 tablespoon olive oil or butter
- Salt and pepper, to taste
Cooking Instructions:
Begin by preheating your cast iron press over medium heat.
While it heats, assemble your quesadillas. Lay one tortilla flat and sprinkle a generous amount of cheese on one half. If desired, add the cooked chicken and sautéed vegetables, making sure they're evenly distributed. Fold the tortilla over to create a half-moon shape. Repeat with the remaining tortillas and fillings.
Once the press is heated, lightly grease it with olive oil or butter. Place one quesadilla in the press and close it gently. Cook for about 3-4 minutes on each side, or until the tortillas are crispy and the cheese has melted.
Remove the quesadilla from the press and let it cool for a minute before slicing it into wedges. Serve warm with your favorite dipping sauces.
Extra Tips:
For added flavor, consider seasoning your fillings with spices like cumin, chili powder, or garlic powder.
You can also experiment with different types of cheeses or add ingredients like black beans, corn, or jalapeños for extra texture and taste. Be sure not to overfill the quesadillas, as this can make them difficult to cook evenly.
Enjoy your delicious quesadillas!
Golden-Brown Hash Browns
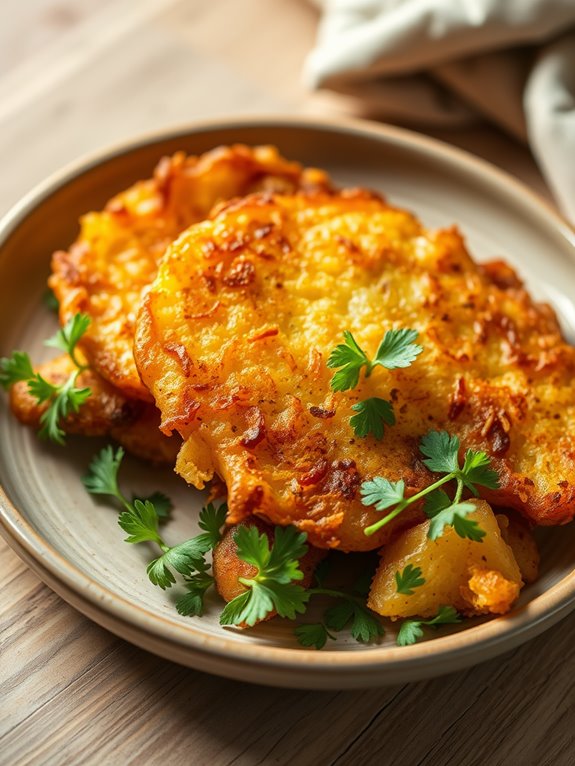
Golden-brown hash browns are a breakfast classic that can transform your morning routine into a delightful experience. The satisfying crunch on the outside paired with a soft, fluffy interior makes these potatoes irresistible.
Using a cast iron press to cook your hash browns guarantees even heat distribution and a beautifully crisp texture, elevating this simple dish to gourmet status. Whether enjoyed alongside eggs and bacon or served as a base for a hearty breakfast bowl, these golden-brown delights are sure to please everyone at the table.
To achieve the perfect hash browns, it's vital to select the right type of potatoes. Russet potatoes work best because of their high starch content, which helps achieve that crispy exterior. Once you master this method, you can customize your hash browns with various seasonings or mix-ins like onions, peppers, or cheese for added flavor.
With a few simple ingredients and a cast iron press, you can whip up this delicious breakfast staple in no time.
Ingredients:
- 2 large russet potatoes
- 1 small onion (optional)
- Salt, to taste
- Pepper, to taste
- 2 tablespoons vegetable oil or butter
- Fresh herbs (optional, for garnish)
Cooking Instructions:
- Begin by peeling the russet potatoes and then shredding them using a box grater or food processor. If you're using onion, finely chop or grate it as well. Place the shredded potatoes and onion in a clean kitchen towel or cheesecloth and squeeze out as much moisture as possible. This step is fundamental for achieving crispy hash browns.
- Heat the vegetable oil or butter in a cast iron skillet over medium heat. Once the oil is hot, spread the shredded potatoes evenly in the skillet, pressing down firmly with the cast iron press to guarantee even cooking. Cook for about 5-7 minutes until the bottom is golden brown and crispy.
Flip the hash browns carefully, using the press again to flatten, and cook for an additional 5-7 minutes on the other side until they're golden brown and crispy throughout.
Extra Tips:
For the best results, avoid overcrowding the pan, as this can lead to steaming rather than browning. If you're making a large batch, consider cooking the hash browns in batches instead of trying to fit them all at once.
Additionally, don't skip the moisture-squeezing step; it's key to achieving that perfect crispy texture. Feel free to experiment with different seasonings or mix-ins to make these hash browns your own!
Mouthwatering Pork Chops

To achieve the best results, it's important to use thick-cut pork chops, ideally bone-in, as they tend to be juicier and more flavorful.
The combination of high heat from the cast iron skillet and the weight of the press helps create that sought-after caramelization, making the chops irresistible. Pair these delicious pork chops with your favorite side dishes for a complete meal.
Ingredients:
- 4 thick-cut bone-in pork chops (about 1 inch thick)
- 2 tablespoons olive oil
- 1 teaspoon garlic powder
- 1 teaspoon onion powder
- 1 teaspoon smoked paprika
- Salt and pepper to taste
- Fresh herbs (like rosemary or thyme) for garnish (optional)
Cooking Instructions:
1. Begin by taking the pork chops out of the refrigerator and allowing them to come to room temperature for about 30 minutes. This helps them cook evenly.
Pat the chops dry with paper towels to guarantee a good sear, then season both sides generously with salt, pepper, garlic powder, onion powder, and smoked paprika.
2. Heat a cast iron skillet over medium-high heat and add the olive oil. Once the oil is hot and shimmering, carefully place the seasoned pork chops in the skillet.
Top each chop with the cast iron press to guarantee direct contact with the heat. Sear for about 4-5 minutes on one side without moving them, then carefully flip the chops, pressing down with the cast iron press again.
Cook for another 4-5 minutes or until the internal temperature reaches 145°F (63°C). Remove from heat, cover loosely with foil, and let rest for 5 minutes before serving.
Extra Tips:
For added flavor, marinate the pork chops in your favorite marinade for a few hours or overnight before cooking.
Additionally, consider adding some sliced apples or onions to the skillet during the last few minutes of cooking for a sweet and savory accompaniment.
Always remember to let the meat rest after cooking; this allows the juices to redistribute, guaranteeing that each bite is packed with flavor.
Sweet and Spicy Bacon-Wrapped Dates

Sweet and Spicy Bacon-Wrapped Dates are the perfect appetizer for gatherings or a delightful treat for any occasion. The combination of sweet, chewy dates and crispy, savory bacon creates a mouthwatering flavor explosion that's hard to resist.
Plus, the hint of spice adds a unique twist that elevates this dish from a simple snack to a standout culinary delight. Using a cast iron press helps achieve that perfect crispy texture on the bacon while maintaining the sweetness of the dates.
Not only does this dish come together quickly, but it also requires minimal ingredients, making it an easy yet impressive addition to your recipe repertoire. Prepare to wow your guests with this sweet and savory finger food that's sure to disappear within minutes!
Ingredients:
- 12 Medjool dates, pitted
- 12 slices of bacon
- 1 tablespoon brown sugar
- 1 teaspoon cayenne pepper
- Toothpicks
Cooking Instructions:
Preheat your oven to 400°F (200°C). While the oven is heating, prepare the dates by pitting them if they aren't already. Cut each slice of bacon in half, creating two shorter strips.
Take a date and wrap a halved bacon strip around it, securing it with a toothpick. Repeat this process for all the dates. Once all the dates are wrapped in bacon, place them on a baking sheet lined with parchment paper.
In a small bowl, mix the brown sugar and cayenne pepper together and sprinkle this mixture generously over the bacon-wrapped dates. Bake in the preheated oven for about 20-25 minutes, or until the bacon is crispy and caramelized.
For extra crispiness, you can place a cast iron press on top of the dates during the last 5 minutes of cooking.
Extra Tips:
To enhance the flavor of your Sweet and Spicy Bacon-Wrapped Dates, consider adding a sprinkle of smoked paprika or a drizzle of honey before serving.
If you prefer a milder version, you can reduce the amount of cayenne pepper or omit it entirely. For a touch of elegance, serve these dates on a platter with toothpicks for easy eating, and don't forget to let them cool for a few minutes after baking to avoid burning your mouth on the hot filling!
Fluffy Pancakes

Fluffy pancakes are a breakfast favorite that can easily be transformed into a delightful experience with the use of a cast iron press. The unique heat retention of cast iron allows for even cooking, giving your pancakes a golden-brown exterior while keeping them soft and fluffy on the inside.
Whether you're cooking for a crowd or just for yourself, mastering this recipe will set the tone for a wonderful morning. Using a cast iron press not only aids in cooking your pancakes evenly, but it also adds a slight crispiness to the exterior that pairs perfectly with syrup, fruit, or your favorite toppings.
With just a few simple ingredients, you can whip up a batch of these light and airy pancakes that are sure to impress anyone at your breakfast table.
Ingredients:
- 1 cup all-purpose flour
- 2 tablespoons sugar
- 1 tablespoon baking powder
- 1/2 teaspoon salt
- 1 cup milk
- 1 large egg
- 2 tablespoons melted butter
- 1 teaspoon vanilla extract
- Additional butter or oil for cooking
Instructions:
- In a large mixing bowl, whisk together the flour, sugar, baking powder, and salt until well combined.
- In a separate bowl, mix the milk, egg, melted butter, and vanilla extract together until smooth. Gradually pour the wet ingredients into the dry ingredients, stirring gently until just combined. Be careful not to overmix; a few lumps are perfectly fine.
- Preheat your cast iron skillet or griddle over medium heat and add a small amount of butter or oil. Once hot, pour about 1/4 cup of the pancake batter onto the skillet for each pancake.
- Allow them to cook for about 2-3 minutes or until bubbles form on the surface. Place the cast iron press on top of the pancakes to assist them in rising and cooking evenly.
- Flip the pancakes and cook for another 2-3 minutes until golden brown.
Extra Tips:
For the fluffiest pancakes, make sure not to overmix the batter; a few lumps are okay. You can also let the batter rest for about 5-10 minutes before cooking to allow the baking powder to activate fully.
If you like, add in chocolate chips, blueberries, or nuts to the batter for a fun twist. Keep an eye on the heat; if the pancakes are browning too quickly, lower the temperature slightly to guarantee they cook through without burning.
Enjoy your deliciously fluffy pancakes!
Decadent Chocolate Chip Cookies
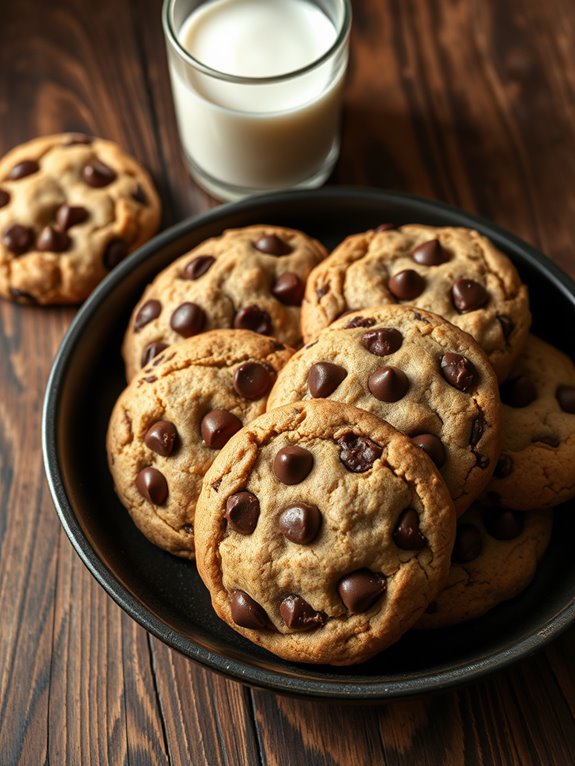
Decadent chocolate chip cookies made with a cast iron press are a delicious twist on a classic favorite. The cast iron press not only helps to achieve a perfectly even bake but also gives the cookies a delightful crispy edge while keeping the center soft and chewy.
Whether you're baking for a special occasion or simply indulging in a sweet treat, these cookies are sure to impress.
This recipe utilizes simple ingredients, making it easy for anyone to whip up a batch. The combination of rich chocolate chips and a hint of vanilla creates an irresistible flavor that will have you reaching for seconds.
Prepare to enjoy a warm, gooey cookie that's packed with chocolate goodness, and don't forget to pair it with a glass of cold milk!
Ingredients:
- 2 1/4 cups all-purpose flour
- 1 teaspoon baking soda
- 1 teaspoon salt
- 1 cup unsalted butter, softened
- 3/4 cup granulated sugar
- 3/4 cup brown sugar, packed
- 1 teaspoon vanilla extract
- 2 large eggs
- 2 cups semi-sweet chocolate chips
Instructions:
- Preheat your oven to 350°F (175°C) and prepare your cast iron skillet by greasing it lightly with butter or non-stick spray.
- In a small bowl, whisk together the flour, baking soda, and salt. In a larger mixing bowl, cream together the softened butter, granulated sugar, brown sugar, and vanilla extract until smooth and fluffy. Beat in the eggs one at a time, mixing well after each addition.
- Gradually add the dry ingredients to the wet mixture, stirring until just combined. Fold in the chocolate chips, ensuring they're evenly distributed throughout the dough.
- Using a spoon or cookie scoop, drop dough balls onto the greased cast iron skillet, leaving enough space between them for spreading. Press each dough ball gently with the cast iron press to flatten slightly.
- Bake in the preheated oven for 12-15 minutes, or until the edges are golden brown and the centers look slightly underbaked. Remove from the oven and let cool for a few minutes in the skillet before transferring to a wire rack to cool completely.
Extra Tips:
For an added depth of flavor, try using a mix of chocolate chips, such as dark chocolate or white chocolate, along with the semi-sweet variety.
If you prefer a more caramelized flavor, allow the dough to chill in the refrigerator for 30 minutes before baking. This will help enhance the flavors and improve the texture of the cookies.
Enjoy experimenting with different add-ins like nuts or dried fruit for a personalized touch!
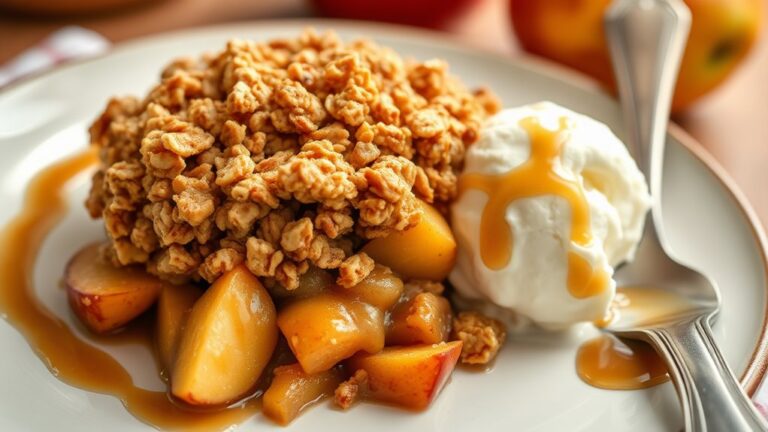
Rustic Fruit Galette
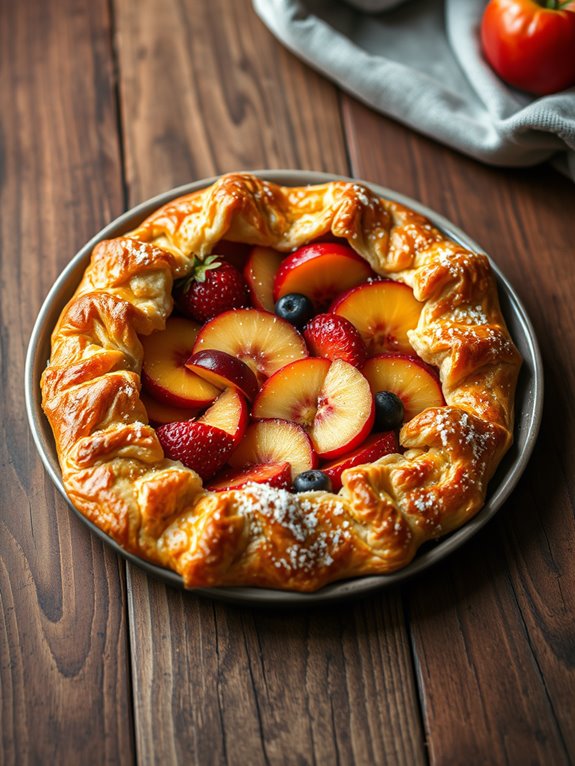
Using a cast iron press to cook your galette guarantees even heat distribution, resulting in a perfectly golden and crispy crust. The rustic appearance of the galette adds to its charm, making it a versatile dessert that can be served warm with a scoop of ice cream or at room temperature with a dollop of whipped cream.
Whether you're enjoying a quiet evening at home or entertaining guests, this Rustic Fruit Galette is a delicious way to highlight the flavors of fresh fruit.
Ingredients:
- 1 ½ cups all-purpose flour
- ½ cup unsalted butter, chilled and cubed
- ¼ cup granulated sugar (plus more for sprinkling)
- ¼ tsp salt
- 4-6 tbsp ice water
- 2 cups mixed seasonal fruits (e.g., berries, peaches, apples)
- 1 tbsp cornstarch
- 1 tsp cinnamon
- 1 egg (for egg wash)
Cooking Instructions:
- In a large bowl, combine the flour, sugar, and salt. Cut in the chilled butter using a pastry cutter or your fingers until the mixture resembles coarse crumbs. Gradually add the ice water, one tablespoon at a time, mixing until the dough comes together. Form the dough into a disk, wrap it in plastic wrap, and refrigerate for at least 30 minutes.
- Preheat your oven to 375°F (190°C). On a floured surface, roll out the dough into a 12-inch circle. Transfer the dough to a parchment-lined cast iron skillet. In another bowl, toss the mixed fruits with cornstarch, cinnamon, and an additional tablespoon of sugar. Place the fruit mixture in the center of the dough, leaving a 2-inch border. Fold the edges of the dough over the fruit, pleating as necessary. Brush the crust with the beaten egg and sprinkle with sugar. Bake for 35-40 minutes, or until the crust is golden and the fruit is bubbly.
Extra Tips:
To achieve the best results with your Rustic Fruit Galette, make certain to use chilled ingredients when preparing the crust, as this will create a flakier texture.
Don't be afraid to experiment with different combinations of fruits based on what's in season or what you have available. If the fruit is particularly juicy, you might want to add a bit more cornstarch to help absorb excess moisture.
Finally, serving the galette warm with a scoop of vanilla ice cream or a drizzle of cream will elevate the dessert to new heights!
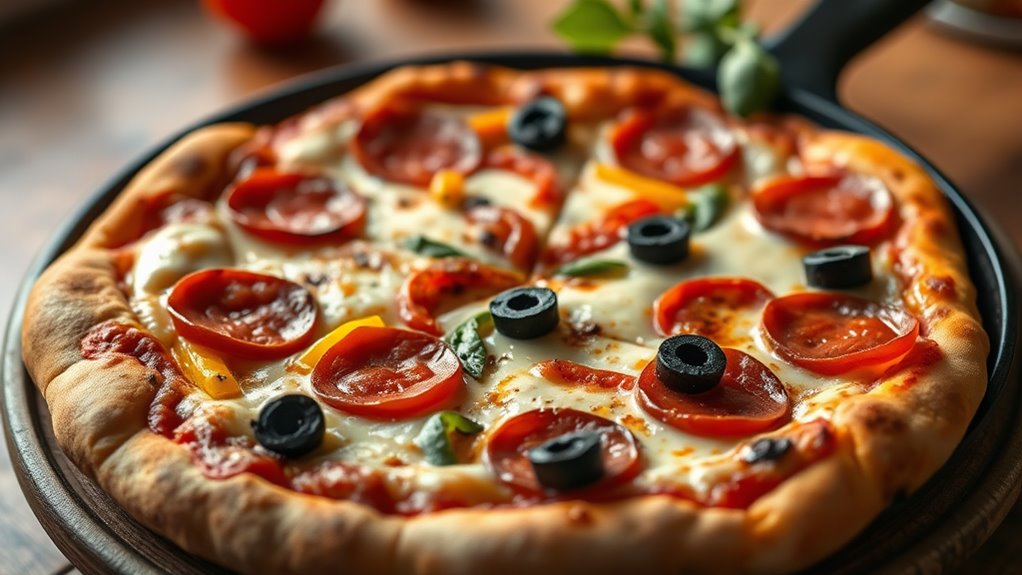
Savory Cast Iron Pizza
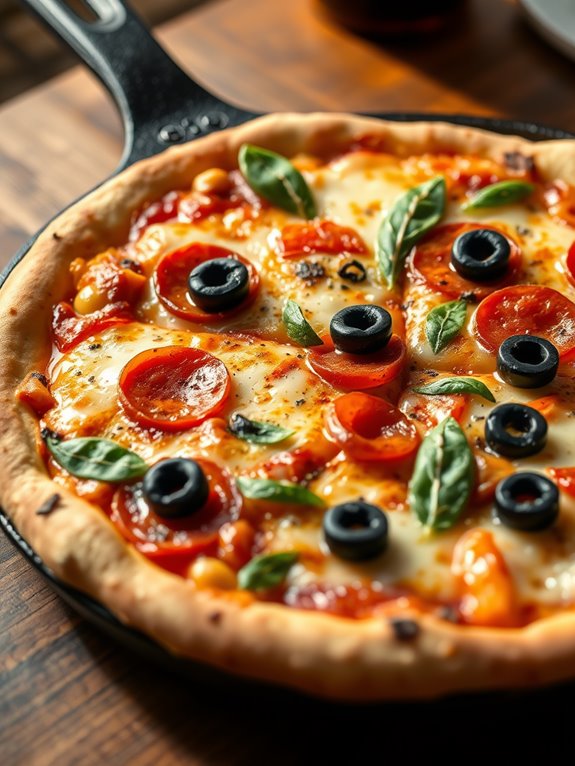
Savory cast iron pizza is a delicious and versatile dish that brings a crispy crust and a burst of flavor to your dinner table. Using a cast iron press not only helps to create an evenly cooked pizza but also enhances the overall texture, giving you that perfect golden-brown crust.
Whether you're a fan of classic pepperoni or adventurous toppings, this recipe allows you to customize your pizza to suit your cravings.
The beauty of making pizza in a cast iron skillet is that it's simple and requires minimal prep time. You can use store-bought pizza dough or make your own from scratch, and the cooking process is quick, making it a great option for a weeknight dinner or a weekend gathering.
Gather your ingredients, heat your skillet, and get ready to impress your family and friends with this homemade treat.
Ingredients:
- 1 lb pizza dough (store-bought or homemade)
- 1 cup pizza sauce
- 2 cups shredded mozzarella cheese
- 1/2 cup sliced pepperoni
- 1/2 cup sliced bell peppers
- 1/4 cup sliced black olives
- 1 tsp dried oregano
- 1 tsp garlic powder
- Olive oil (for greasing)
Cooking Instructions:
Preheat your oven to 475°F (245°C) and place your cast iron skillet inside to heat up.
While the skillet is heating, roll out the pizza dough on a lightly floured surface to fit the size of your skillet. Once the oven has reached the desired temperature, carefully remove the skillet and add a tablespoon of olive oil, swirling it around to coat the bottom.
Place the rolled-out dough into the skillet, pressing it gently against the sides to create a crust.
Spread the pizza sauce evenly over the dough, then sprinkle with shredded mozzarella cheese. Layer on your favorite toppings, such as sliced pepperoni, bell peppers, and black olives.
Finally, sprinkle the oregano and garlic powder over the top. Return the skillet to the oven and bake for 15-20 minutes, or until the cheese is bubbly and the crust is golden brown.
Remove from the oven and let it cool for a few minutes before slicing and serving.
Extra Tips:
For an extra crispy crust, try pre-baking the pizza dough for 5-7 minutes before adding the toppings.
Additionally, feel free to experiment with different cheeses and toppings to find your perfect combination. Just remember to adjust the baking time as necessary for any additional ingredients you may add.
Enjoy your homemade savory cast iron pizza!
Frequently Asked Questions
How Do I Properly Season My Cast Iron Press?
Seasoning your cast iron press is like giving it a magical makeover! First, clean it thoroughly, then apply a thin layer of oil, and finally bake it upside down to create a non-stick surface.
Can I Use a Cast Iron Press on an Electric Stove?
Yes, you can use a cast iron press on an electric stove. Just make sure your stovetop heats evenly, and keep an eye on the temperature to avoid overheating and damaging your cookware. Happy cooking!
What Is the Best Way to Clean My Cast Iron Press?
To clean your cast iron press, scrape off food residue, rinse with warm water, and dry thoroughly. If needed, use a gentle scrubber and apply a thin layer of oil to maintain its seasoning.
Is It Safe to Use Metal Utensils With a Cast Iron Press?
Yes, it's safe to use metal utensils with your cast iron press, but be cautious. They can scratch the surface if you're not careful. Opt for silicone or wooden utensils to preserve your press's seasoning.
Can I Store Food in My Cast Iron Press?
You shouldn't store food in your cast iron press. It can lead to rust and damage the seasoning. Instead, transfer leftovers to another container for proper storage, keeping your press in great shape for cooking.