As an affiliate, we may earn a commission from qualifying purchases. We get commissions for purchases made through links on this website from Amazon and other third parties.
When it comes to hosting, you might say the kitchen is where the magic happens. With a 9×13 cast iron skillet, you can whip up a variety of dishes that not only satisfy but impress your guests. From hearty casseroles to sweet desserts, the possibilities are endless. Curious about how you can turn your gatherings into memorable feasts? Let's explore some crowd-pleasing recipes that make cooking and cleanup a breeze.
Key Takeaways
- Cheesy Chicken and Rice Casserole provides a comforting one-pan meal, perfect for family dinners and easy cleanup.
- Classic Lasagna offers layers of meat sauce and cheese, ideal for gatherings and can be prepared ahead of time.
- Baked Ziti With Sausage combines ziti pasta, sausage, and melted cheese, baked to perfection for a hearty dish.
- Stuffed Bell Peppers feature versatile fillings and vibrant colors, making them a nutritious and visually appealing option.
- Spinach and Artichoke Dip is a crowd-pleaser, creamy and flavorful, great for serving with chips or bread at gatherings.
Cheesy Chicken and Rice Casserole
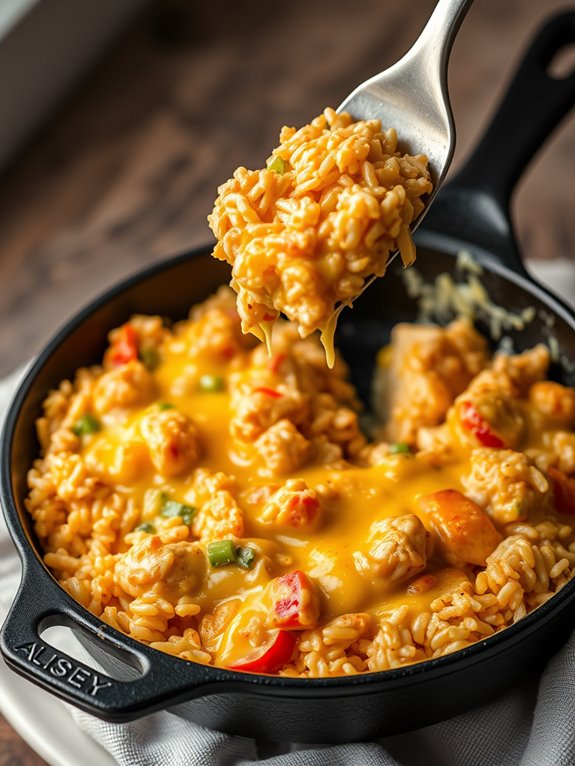
Cheesy Chicken and Rice Casserole is the perfect dish for any occasion, whether it's a family dinner, a potluck, or just a cozy night in. This comforting casserole combines tender chicken, fluffy rice, and a rich, creamy cheese sauce that will have everyone coming back for seconds.
Using a cast iron skillet not only enhances the flavors but also provides an even cooking surface that guarantees a beautifully browned top. With its hearty ingredients and simple preparation, this dish is both satisfying and easy to make.
The combination of chicken, rice, and cheese makes for a deliciously indulgent meal that can be prepared in one pan, making cleanup a breeze. Get ready to impress your friends and family with this delightful cheesy chicken and rice casserole!
Ingredients:
- 2 cups cooked chicken, shredded
- 1 cup uncooked rice
- 3 cups chicken broth
- 1 cup shredded cheddar cheese
- 1 cup cream of chicken soup
- 1 cup frozen mixed vegetables (peas, carrots, corn)
- 1 teaspoon garlic powder
- 1 teaspoon onion powder
- Salt and pepper to taste
- 2 tablespoons olive oil
- Fresh parsley for garnish (optional)
Cooking Instructions:
Preheat your oven to 375°F (190°C). In a cast iron skillet, heat the olive oil over medium heat. Add the shredded chicken and sauté for a few minutes until warmed through.
Stir in the uncooked rice, chicken broth, cream of chicken soup, frozen mixed vegetables, garlic powder, onion powder, salt, and pepper. Mix everything together until well combined.
Bring the mixture to a gentle simmer, then reduce the heat to low and cover the skillet with a lid. Allow it to cook for about 15 minutes, or until the rice is tender and has absorbed most of the liquid.
Once cooked, remove the skillet from the heat, sprinkle the shredded cheddar cheese on top, and transfer it to the oven. Bake uncovered for 10-15 minutes, or until the cheese is bubbly and golden brown.
Extra Tips:
For added flavor, consider marinating the chicken beforehand or using leftover rotisserie chicken for convenience.
You can also customize the casserole by adding your favorite vegetables or spices to suit your taste. If you prefer a crispier topping, broil the casserole for an additional 2-3 minutes after baking.
Be sure to let the casserole sit for a few minutes before serving to allow it to set, making it easier to scoop and serve. Enjoy!
Classic Lasagna
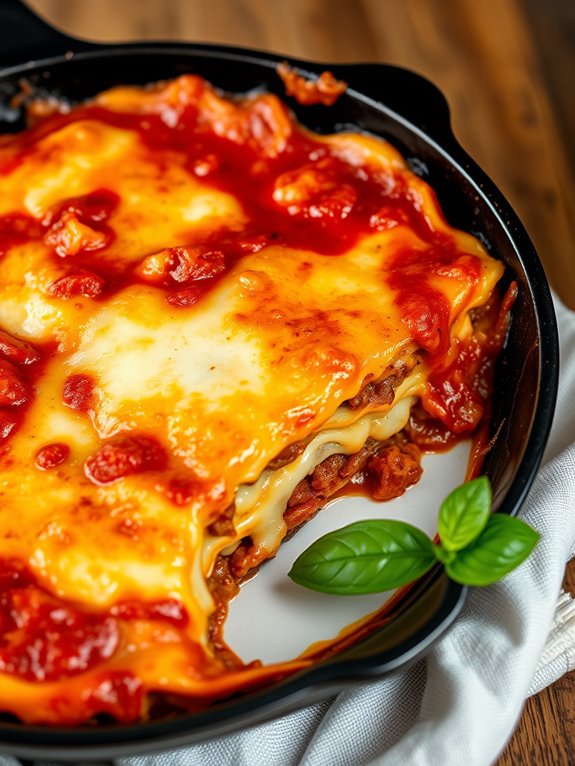
Classic Lasagna is a timeless dish that brings warmth and comfort to any gathering. Its layers of rich meat sauce, creamy béchamel, and gooey cheese create a mouthwatering experience that's sure to delight your family and friends. Cooking lasagna in a cast iron skillet not only enhances the flavors but also provides a beautiful, rustic presentation that will impress your guests.
This dish is perfect for any occasion, from family dinners to potlucks. The best part is that you can prepare it ahead of time and simply pop it in the oven when you're ready to serve. The combination of savory ingredients melds together beautifully, resulting in a lasagna that's both hearty and satisfying.
Ingredients:
- 9 lasagna noodles
- 1 lb ground beef or Italian sausage
- 1 small onion, diced
- 2 cloves garlic, minced
- 28 oz can crushed tomatoes
- 2 tbsp tomato paste
- 1 tsp dried oregano
- 1 tsp dried basil
- Salt and pepper to taste
- 15 oz ricotta cheese
- 1 egg
- 2 cups shredded mozzarella cheese
- 1 cup grated Parmesan cheese
- Fresh basil leaves for garnish (optional)
Instructions:
- Preheat your oven to 375°F (190°C). In your cast iron skillet, brown the ground beef or sausage over medium heat, adding the diced onion and minced garlic. Cook until the meat is browned and the onion is translucent. Drain excess fat if needed.
- Stir in the crushed tomatoes, tomato paste, oregano, basil, salt, and pepper. Simmer for about 15 minutes until the sauce thickens slightly. Meanwhile, cook the lasagna noodles according to package instructions, then drain and set aside.
- In a bowl, mix the ricotta cheese with the egg, a pinch of salt, and pepper until well combined. Once the meat sauce is ready, spread a thin layer of the sauce in the bottom of the skillet, followed by three lasagna noodles. Layer half of the ricotta mixture, one-third of the mozzarella, and one-third of the remaining meat sauce. Repeat the layers, finishing with noodles, sauce, and then topping with the remaining mozzarella and Parmesan cheese.
- Cover the skillet with aluminum foil and bake for 25 minutes. Remove the foil and bake for an additional 15 minutes, or until the cheese is bubbly and golden. Let it rest for about 10 minutes before serving. Garnish with fresh basil leaves if desired.
Extra Tips:
For an even richer flavor, consider adding vegetables like spinach or mushrooms to the meat sauce. If you prefer a vegetarian lasagna, replace the meat with sautéed vegetables and add an extra layer of cheese for creaminess.
You can also make the lasagna a day ahead and refrigerate it, allowing the flavors to meld overnight before baking for a perfect meal any time!
Beef and Vegetable Stir-Fry
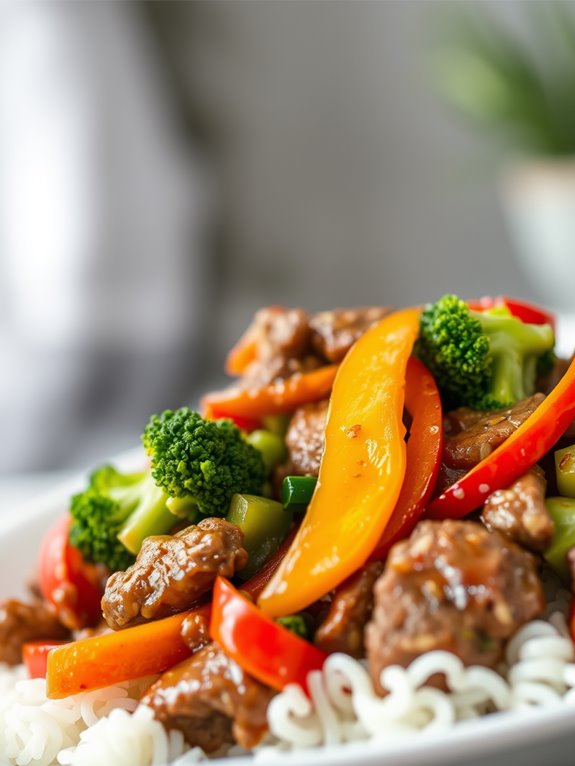
This stir-fry is versatile, allowing you to customize the vegetables based on what you have on hand or your personal preferences. The beef can be marinated for extra flavor, but it's also delicious when quickly cooked with just a few seasonings. Serve it over rice or noodles for a complete meal that everyone will love.
Ingredients
- 1 lb beef sirloin, thinly sliced
- 2 tablespoons soy sauce
- 1 tablespoon cornstarch
- 2 tablespoons vegetable oil
- 1 bell pepper, sliced
- 1 cup broccoli florets
- 1 carrot, julienned
- 3 green onions, chopped
- 2 cloves garlic, minced
- 1 tablespoon fresh ginger, minced
- Salt and pepper to taste
Cooking Instructions
Start by marinating the beef in a bowl with soy sauce and cornstarch. Let it sit for about 15 minutes while you prepare the vegetables.
Heat the vegetable oil in your cast iron skillet over medium-high heat. Once the skillet is hot, add the marinated beef in a single layer. Sear the beef for about 2-3 minutes on each side until it's browned but not fully cooked. Remove the beef from the skillet and set it aside.
In the same skillet, add the garlic and ginger, stirring briefly until fragrant. Then, toss in the sliced bell pepper, broccoli, and carrot. Stir-fry the vegetables for about 4-5 minutes until they're tender-crisp.
Return the beef to the skillet, adding salt and pepper to taste. Cook for an additional 2-3 minutes until the beef is cooked through and everything is well combined. Finally, sprinkle the chopped green onions over the stir-fry before serving.
Extra Tips
To guarantee your stir-fry has the best flavor and texture, make sure your skillet is hot before adding the beef. This will help achieve a nice sear.
Additionally, cut the vegetables into uniform sizes for even cooking. Feel free to experiment with different vegetables or proteins, and don't hesitate to adjust the seasoning based on your tastes.
Spinach and Artichoke Dip
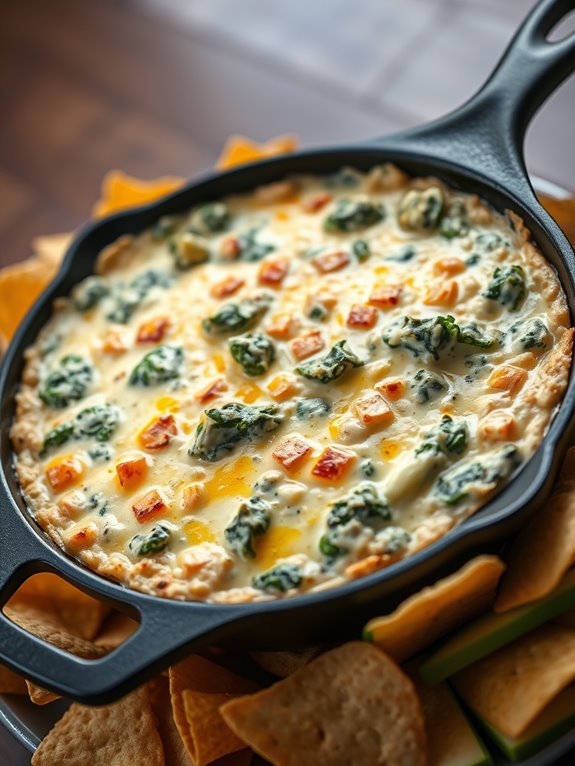
Spinach and Artichoke Dip is a classic crowd-pleaser, perfect for gatherings and casual get-togethers. With its creamy texture and rich flavors, this dip is a sure-fire hit that pairs wonderfully with tortilla chips, toasted bread, or vegetable sticks. Cooking this dish in a cast iron skillet not only enhances the flavors but also provides a beautiful presentation, making it the star of your appetizer spread.
This recipe is simple and quick, allowing you to whip up a delicious dip in no time. The combination of fresh spinach, tangy artichokes, and melty cheese creates a delightful experience for your taste buds. Serve it hot and bubbly right from the skillet for maximum enjoyment!
Ingredients:
- 1 cup fresh spinach, chopped
- 1 cup artichoke hearts, chopped (canned or frozen)
- 1 cup cream cheese, softened
- 1/2 cup sour cream
- 1/2 cup mayonnaise
- 1 cup shredded mozzarella cheese
- 1/2 cup grated Parmesan cheese
- 2 cloves garlic, minced
- 1/2 teaspoon salt
- 1/4 teaspoon black pepper
- 1/4 teaspoon crushed red pepper flakes (optional)
To prepare the dip, preheat your oven to 375°F (190°C). In a large mixing bowl, combine the softened cream cheese, sour cream, and mayonnaise until smooth.
Stir in the chopped spinach, artichoke hearts, minced garlic, mozzarella cheese, and Parmesan cheese. Season the mixture with salt, black pepper, and crushed red pepper flakes if you like a bit of heat. Once everything is well incorporated, transfer the mixture to a preheated cast iron skillet.
Spread the dip evenly in the skillet and bake in the oven for about 25-30 minutes or until the top is golden and bubbly. For an extra crispy top, you can broil it for an additional 2-3 minutes, but keep a close eye on it to prevent burning.
Once done, remove from the oven and let it cool slightly before serving.
Extra Tips: For an added depth of flavor, consider using roasted garlic instead of raw. You can also customize your dip by adding ingredients like diced jalapeños for heat or a sprinkle of fresh herbs like parsley or chives for garnish.
Enjoy the dip while it's hot for the best taste, and feel free to double the recipe if you're expecting a larger crowd!
Baked Ziti With Sausage
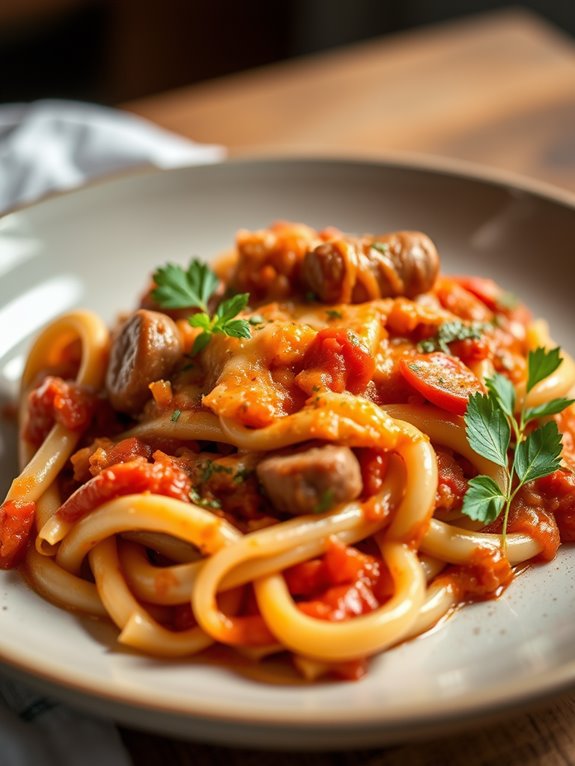
Baked Ziti with Sausage is a hearty and satisfying dish that brings comfort and warmth to any gathering. This classic Italian-American recipe features ziti pasta, savory sausage, and a rich tomato sauce, all topped with gooey melted cheese. Cooking it in a cast iron skillet not only enhances the flavor but also provides an excellent way to serve it straight from the oven to the table.
This recipe is perfect for busy weeknights or casual get-togethers with friends and family. The combination of tender pasta, flavorful sausage, and cheesy goodness means that this dish is sure to please a crowd. With just a few simple ingredients and straightforward steps, you can create a delicious baked ziti that everyone will love.
Ingredients:
- 1 pound ziti pasta
- 1 pound Italian sausage (sweet or spicy)
- 2 cups marinara sauce
- 1 cup ricotta cheese
- 1 cup shredded mozzarella cheese
- 1/2 cup grated Parmesan cheese
- 2 tablespoons olive oil
- 2 cloves garlic, minced
- 1 teaspoon dried oregano
- 1 teaspoon salt
- 1/2 teaspoon black pepper
- Fresh basil leaves for garnish (optional)
Instructions:
- Preheat your oven to 375°F (190°C). In a large pot, bring salted water to a boil and cook the ziti pasta according to package instructions until al dente. Drain and set aside.
- In a cast iron skillet, heat olive oil over medium heat. Add the Italian sausage, breaking it up with a spoon, and cook until browned. Stir in the minced garlic, oregano, salt, and pepper, cooking for an additional minute until fragrant. Remove the skillet from the heat.
- In a large bowl, combine the cooked ziti, marinara sauce, ricotta cheese, and half of the mozzarella and Parmesan cheeses. Mix well, then transfer the mixture back into the skillet with the sausage. Spread it evenly and top with the remaining mozzarella and Parmesan cheeses.
- Bake in the preheated oven for 25-30 minutes, or until the cheese is bubbly and golden brown. Remove from the oven and let it cool for a few minutes before serving. Garnish with fresh basil leaves if desired.
Extra Tips:
For a little extra flavor, consider adding sautéed vegetables like bell peppers or mushrooms to the sausage mixture. You can also swap out the sausage for ground turkey or a meat-free alternative for a lighter version.
To guarantee the perfect cheesy crust, broil the dish for an additional 2-3 minutes at the end of baking if you prefer a crispy top. Enjoy your delicious baked ziti straight from the skillet for a rustic dining experience!
One-Pan Breakfast Hash
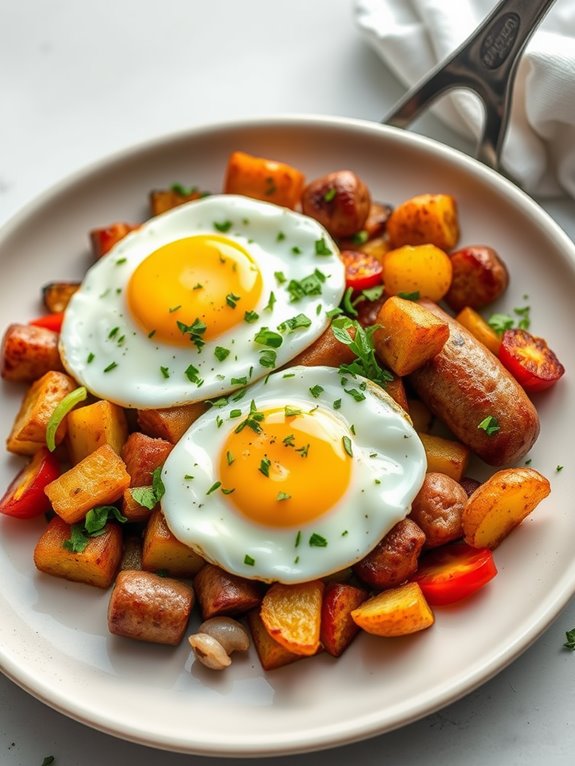
This recipe is incredibly versatile, allowing you to use whatever ingredients you have on hand.
Feel free to swap out the proteins or vegetables based on your preferences or what's available in your fridge. With crispy potatoes, savory sausage, and perfectly cooked eggs, this breakfast hash is the perfect way to fuel your day.
Ingredients:
- 4 medium potatoes, diced
- 1 tablespoon olive oil
- 1 onion, chopped
- 1 bell pepper, diced
- 1 cup cooked sausage (or bacon)
- 4 large eggs
- Salt and pepper to taste
- Fresh herbs (like parsley or chives) for garnish
Instructions:
- Heat the olive oil in a cast iron skillet over medium heat. Add the diced potatoes and season with salt and pepper. Cook for about 10-15 minutes, stirring occasionally, until the potatoes are golden brown and tender.
- Add the chopped onion and bell pepper to the skillet, stirring to combine. Cook for an additional 5 minutes, until the vegetables are softened. Stir in the cooked sausage and continue to cook until heated through.
- Create four small wells in the mixture and crack an egg into each well. Cover the skillet with a lid and let it cook for another 5-7 minutes, or until the eggs are set to your liking.
For an extra flavor boost, consider adding some spices like paprika or chili powder to the potato mixture.
You can also experiment with different types of sausage or add in vegetables like spinach or mushrooms. If you prefer your eggs over-easy, you can gently flip them after they've set for a couple of minutes, ensuring they cook evenly without losing the yolk.
Enjoy your delicious breakfast hash fresh from the skillet!
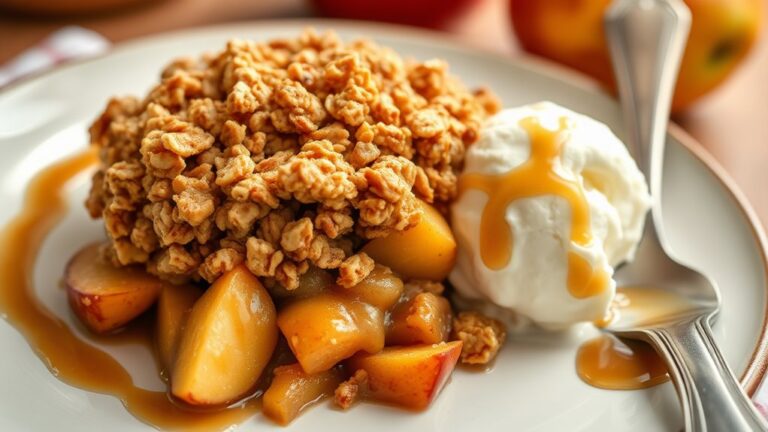
Apple Crisp
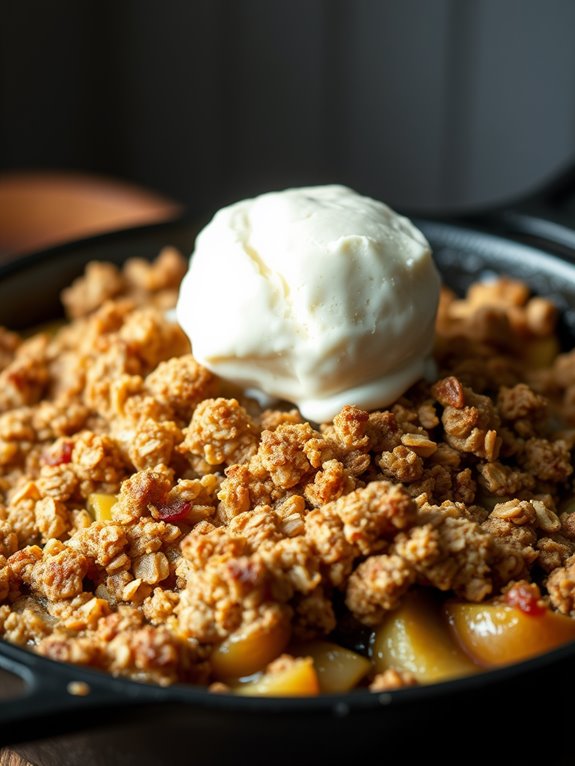
Apple crisp is a delightful dessert that combines the sweetness of tender, baked apples with a crunchy, buttery topping. This classic dish is perfect for showcasing fresh apples, especially in the fall when they're at their peak.
Using a cast iron skillet not only provides an even heat distribution for perfect baking, but also creates a beautiful presentation when served straight from the pan.
This recipe is simple and quick to prepare, making it an ideal choice for gatherings, potlucks, or a cozy night in. With just a handful of ingredients, you can whip up a delicious apple crisp that will have everyone coming back for seconds.
Serve it warm, perhaps with a scoop of vanilla ice cream on top, to elevate this comforting dessert to the next level.
Ingredients:
- 6 cups of sliced apples (Granny Smith or Honeycrisp are great choices)
- 1 tablespoon lemon juice
- 1 cup brown sugar
- 1 cup rolled oats
- 1 cup all-purpose flour
- 1 teaspoon ground cinnamon
- ½ teaspoon salt
- ½ cup unsalted butter, melted
- ¼ cup granulated sugar (optional, for additional sweetness)
Instructions:
Preheat your oven to 350°F (175°C). In a large mixing bowl, combine the sliced apples with lemon juice, tossing to coat evenly.
Place the apples in your cast iron skillet, spreading them out evenly. In another bowl, mix together the brown sugar, rolled oats, flour, cinnamon, and salt.
Pour in the melted butter and combine until the mixture resembles coarse crumbs. Sprinkle this topping evenly over the apples.
Bake in the preheated oven for about 40-45 minutes, or until the apples are tender and the topping is golden brown. Once it's done, allow the apple crisp to cool for a few minutes before serving.
For the best results, use a mixture of sweet and tart apples for added complexity in flavor. You can also experiment by adding nuts or dried fruits to the topping for extra texture and taste.
If you want a little extra indulgence, serve your apple crisp with a scoop of vanilla ice cream or a dollop of whipped cream for that perfect finishing touch. Enjoy!
Cornbread With Jalapeños
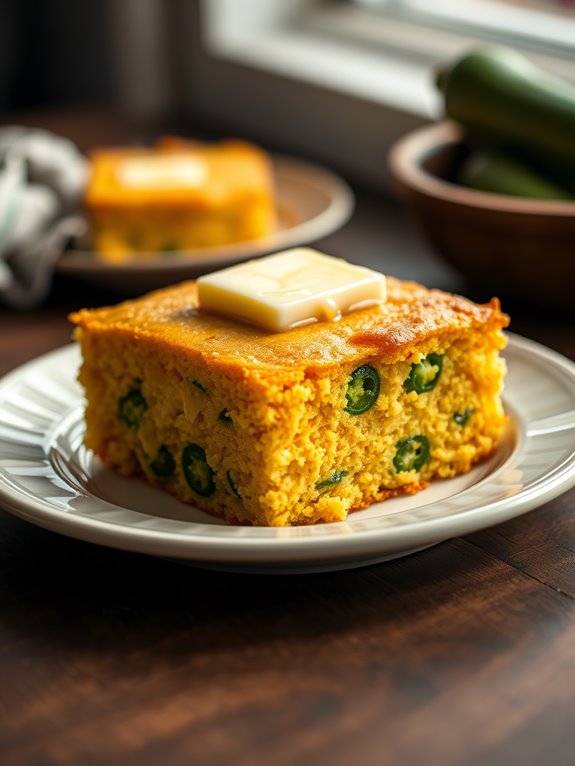
Cornbread with jalapeños is a delightful twist on the classic cornbread recipe, perfect for those who enjoy a little kick in their baked goods. The combination of sweet cornmeal and spicy jalapeños creates a mouthwatering dish that's certain to impress your friends and family.
This cornbread isn't only easy to make but also versatile, making it a perfect side for barbecues, soups, or even a hearty breakfast. To achieve the perfect texture, using a cast iron skillet is crucial. The skillet guarantees even cooking and provides a beautiful crust that enhances the overall flavor.
This recipe is simple and comes together quickly, making it an ideal choice for both novice and experienced cooks. So, preheat your oven and get ready to whip up a batch of this delicious cornbread with jalapeños!
Ingredients:
- 1 cup cornmeal
- 1 cup all-purpose flour
- 1 tablespoon baking powder
- 1/2 teaspoon salt
- 1/4 cup sugar (optional)
- 1 cup buttermilk
- 2 large eggs
- 1/4 cup melted butter
- 1 cup diced jalapeños (fresh or pickled)
Instructions:
- Preheat your oven to 425°F (220°C) and place your cast iron skillet inside to heat up.
- In a large mixing bowl, combine the cornmeal, flour, baking powder, salt, and sugar (if using).
- In a separate bowl, whisk together the buttermilk, eggs, and melted butter until well combined.
- Pour the wet ingredients into the dry ingredients and stir until just combined. Gently fold in the diced jalapeños.
- Carefully remove the hot skillet from the oven, add a tablespoon of butter to coat the bottom, then pour the cornbread batter into the skillet. Spread it evenly and return it to the oven.
- Bake for 20-25 minutes or until the top is golden brown and a toothpick inserted comes out clean.
Extra Tips:
For an added layer of flavor, consider sautéing the jalapeños in a bit of butter before adding them to the batter. This will mellow their heat while enhancing their taste.
Additionally, if you prefer a sweeter cornbread, increase the sugar to 1/3 cup. Serve your cornbread warm, with a pat of butter or alongside your favorite chili for a delightful meal. Enjoy!
BBQ Chicken Pizza
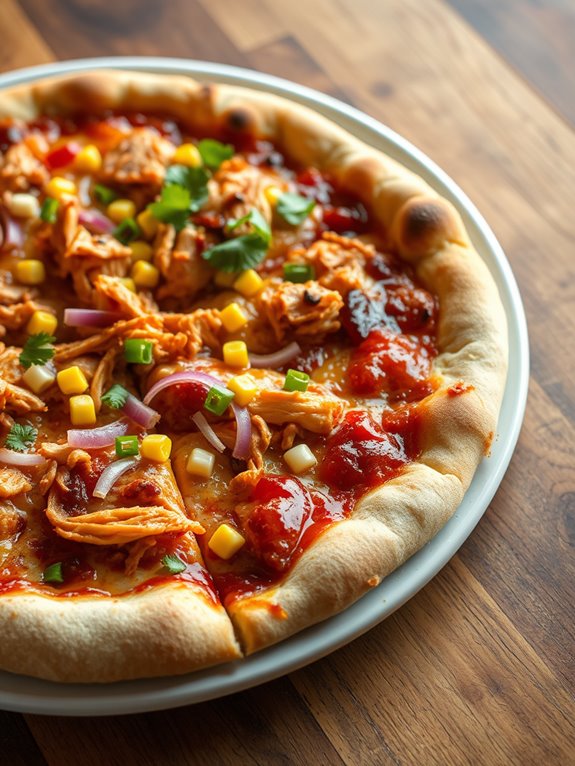
BBQ Chicken Pizza is a deliciously satisfying dish that's perfect for a casual dinner or a gathering with friends. The combination of smoky BBQ sauce, juicy chicken, and gooey cheese creates a flavor explosion that will please any crowd.
Using a cast iron skillet not only gives the pizza a beautifully crisp crust but also allows for even cooking, making each bite a delight.
This recipe is simple and can easily be customized to fit your taste preferences. Whether you prefer extra toppings or a spicier BBQ sauce, you can make this pizza your own. With just a few ingredients and a little prep time, you'll be on your way to creating a meal that everyone will be raving about.
Ingredients:
- 1 pre-made pizza dough (store-bought or homemade)
- 1 cup cooked chicken, shredded
- 1/2 cup BBQ sauce
- 1 cup shredded mozzarella cheese
- 1/2 cup red onion, thinly sliced
- 1/2 cup corn kernels (optional)
- Fresh cilantro or parsley for garnish (optional)
Cooking Instructions:
- Preheat your oven to 475°F (245°C). While the oven is heating, mix the shredded chicken with the BBQ sauce in a bowl, ensuring the chicken is well coated.
- Grease your cast iron skillet lightly with olive oil and roll out the pizza dough to fit the skillet. Press the dough evenly into the bottom and up the sides of the skillet.
- Spread a thin layer of BBQ sauce on top of the dough, then evenly distribute the BBQ chicken mixture over the sauce. Sprinkle the shredded mozzarella cheese, followed by the sliced red onions and corn if using.
- Place the skillet in the preheated oven and bake for about 15-20 minutes or until the crust is golden brown and the cheese is bubbling. Once done, remove from the oven and let it cool for a few minutes before garnishing with fresh cilantro or parsley.
Extra Tips:
For an extra crispy crust, you can pre-bake the pizza dough for about 5 minutes before adding your toppings.
Additionally, feel free to experiment with different cheeses or add other toppings like jalapeños or bell peppers for added flavor. If you like a bit of heat, consider using a spicy BBQ sauce to kick things up a notch!
Stuffed Bell Peppers

Stuffed bell peppers are a classic comfort food that can easily be made in a cast iron skillet, offering a delightful combination of flavors and textures. These vibrant vegetables serve as a perfect vessel for a savory filling of rice, meat, and spices, making them a nutritious and satisfying meal.
The beauty of stuffed bell peppers lies in their versatility; you can customize the filling to suit your taste or dietary preferences, whether it be with ground beef, turkey, or a vegetarian option.
When cooked in a cast iron skillet, the peppers develop a beautifully caramelized exterior while the filling becomes perfectly tender and infused with flavor. This dish not only looks appealing on the table but also provides a hearty meal that can feed a crowd. Pair them with a side salad or some crusty bread for a complete dinner that everyone will love.
Ingredients:
- 4 large bell peppers (any color)
- 1 cup cooked rice (white, brown, or cauliflower rice for a low-carb option)
- 1 pound ground beef or turkey
- 1 small onion, diced
- 2 cloves garlic, minced
- 1 can (15 oz) diced tomatoes, drained
- 1 teaspoon dried oregano
- 1 teaspoon paprika
- 1 teaspoon salt
- ½ teaspoon black pepper
- 1 cup shredded cheese (cheddar or mozzarella)
- Fresh parsley for garnish (optional)
Instructions:
- Preheat your oven to 375°F (190°C). Cut the tops off the bell peppers and remove the seeds and membranes. Set them aside.
- In a cast iron skillet over medium heat, cook the ground meat until browned. Add the diced onion and minced garlic, sautéing until the onion becomes translucent. Stir in the cooked rice, diced tomatoes, oregano, paprika, salt, and pepper. Mix well until heated through.
- Stuff each bell pepper with the meat and rice mixture, pressing down gently to pack it in. Place the stuffed peppers upright in the skillet and sprinkle the cheese on top. If necessary, you can add a splash of water to the bottom of the skillet to create steam during cooking.
- Cover the skillet with a lid or aluminum foil and bake for 25 minutes. Remove the lid and bake for an additional 10 minutes, or until the cheese is melted and bubbly. Garnish with fresh parsley if desired before serving.
Extra Tips:
For added flavor, consider adding some chopped herbs like basil or cilantro to the filling. You can also experiment with different types of cheese or add in vegetables like corn or zucchini for extra nutrition.
If you have leftover filling, it can be baked in a small dish separately or served as a side dish. Make sure to adjust the cooking time based on the size of your bell peppers; larger ones may require a few extra minutes in the oven. Enjoy your delicious stuffed bell peppers!
Chocolate Chip Cookie Skillet
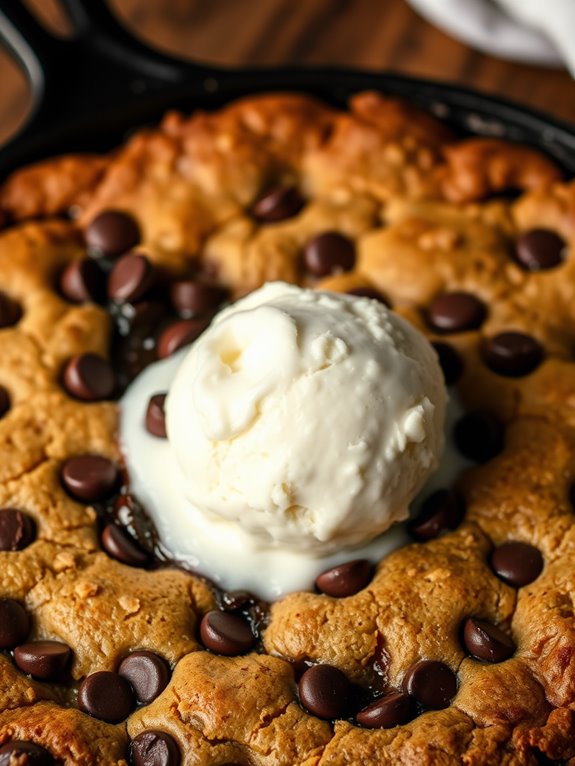
There's nothing quite like a warm chocolate chip cookie, and making it in a cast iron skillet takes this classic treat to a whole new level. The skillet not only gives the cookie a beautifully golden crisp on the outside, but it also makes for an impressive presentation when serving straight out of the oven.
Perfect for gatherings or a cozy night in, this Chocolate Chip Cookie Skillet is sure to please everyone around. This one-pan dessert isn't only easy to prepare, but it also requires minimal cleanup, allowing you to focus on enjoying your delicious creation.
With gooey chocolate chips melting into a soft, buttery cookie base, each bite is a comforting reminder of home-baked goodness. Serve it warm with a scoop of ice cream on top for an indulgent finish that will have your guests begging for seconds.
Ingredients:
- 1 cup unsalted butter, softened
- 3/4 cup brown sugar, packed
- 1/2 cup granulated sugar
- 1 large egg
- 1 teaspoon vanilla extract
- 2 1/4 cups all-purpose flour
- 1 teaspoon baking soda
- 1/2 teaspoon salt
- 1 cup semisweet chocolate chips
- 1/2 cup chopped nuts (optional)
Instructions:
Preheat your oven to 350°F (175°C). In a large bowl, cream together the softened butter, brown sugar, and granulated sugar until light and fluffy. Beat in the egg and vanilla extract until well combined.
In a separate bowl, whisk together the flour, baking soda, and salt. Gradually add this dry mixture to the wet ingredients, mixing until just combined. Fold in the chocolate chips and nuts, if using.
Grease your cast iron skillet lightly with butter or cooking spray. Pour the cookie dough into the skillet, spreading it evenly. Bake in the preheated oven for 25-30 minutes, or until the edges are golden brown and the center is set but still slightly soft.
Allow the skillet to cool for a few minutes before serving. Enjoy warm, preferably with a scoop of vanilla ice cream on top.
Extra Tips:
For a delightful twist, try adding different types of chocolate chips or even a sprinkle of sea salt on top before baking to enhance the flavor.
If you're looking to make this cookie even more decadent, consider drizzling some caramel sauce over the top just before serving. Remember, cast iron retains heat well, so keep an eye on the baking time to avoid overcooking!
Vegetable Frittata

A vegetable frittata is a versatile and satisfying dish that can be enjoyed for breakfast, lunch, or dinner. This Italian-inspired egg-based meal is perfect for using up leftover vegetables and can be customized with your favorite ingredients. Cooking it in a cast iron skillet guarantees even heat distribution and a beautifully cooked frittata with a golden crust.
The beauty of a frittata lies in its simplicity, and it can be on your table in no time. Packed with protein and nutrients, this dish isn't only delicious but also a healthy option for anyone looking to add more vegetables to their diet. Whether served warm or at room temperature, a vegetable frittata is sure to be a crowd-pleaser.
Ingredients:
- 6 large eggs
- 1 cup of chopped vegetables (e.g., bell peppers, spinach, onions, zucchini)
- 1/2 cup of shredded cheese (e.g., cheddar, feta, or mozzarella)
- 1/4 cup of milk
- Salt and pepper to taste
- 2 tablespoons of olive oil or butter
- Fresh herbs for garnish (optional)
Cooking Instructions:
- Preheat your oven to 375°F (190°C). In a large bowl, whisk together the eggs, milk, salt, and pepper until well combined. Stir in the cheese and set aside.
- Heat the olive oil or butter in a cast iron skillet over medium heat. Add the chopped vegetables and sauté for about 5-7 minutes, or until they're tender and slightly caramelized.
- Pour the egg mixture over the sautéed vegetables in the skillet, guaranteeing an even distribution. Cook on the stovetop for about 3-5 minutes, until the edges begin to set.
- Transfer the skillet to the preheated oven and bake for 15-20 minutes, or until the frittata is puffed and golden brown in the center. Let it cool slightly before slicing and serving.
Extra Tips:
For the best results, make sure your cast iron skillet is well-seasoned to prevent sticking. Feel free to experiment with different vegetables, herbs, or cheeses based on what you have on hand. You can also add cooked meats like bacon or sausage for extra flavor.
Leftovers can be stored in the fridge and enjoyed cold or reheated the next day, making this dish a meal prep favorite!
Frequently Asked Questions
Can I Use a Regular Baking Dish Instead of a Cast Iron Skillet?
Yes, you can use a regular baking dish instead of a cast iron skillet. Just keep in mind that cooking times and heat distribution might vary, so adjust accordingly for the best results. Enjoy your cooking!
How Do I Properly Season My Cast Iron Skillet?
To properly season your cast iron skillet, clean it thoroughly, apply a thin layer of vegetable oil, and bake it upside down in the oven at 350°F for an hour. Repeat as needed for best results.
What's the Best Way to Clean a Cast Iron Skillet?
Did you know properly maintained cast iron skillets can last over a century? To clean yours, avoid soap. Instead, scrub with hot water and a stiff brush. Dry it immediately to prevent rust. Season it afterward!
Can I Make These Recipes Ahead of Time?
Absolutely, you can prepare these recipes ahead of time! Just assemble them, cover tightly, and refrigerate. When you're ready, pop them in the oven, and enjoy the delicious results without the last-minute rush!
Are There Any Vegetarian Options for These Recipes?
You can explore a variety of vegetarian options that are both delicious and satisfying. Incorporate ingredients like seasonal vegetables, beans, and grains to create hearty dishes everyone will love. Enjoy experimenting with flavors!