As an affiliate, we may earn a commission from qualifying purchases. We get commissions for purchases made through links on this website from Amazon and other third parties.
Did you know that cast iron cookware can last for generations if properly cared for? Your gem pan is a versatile tool that can transform everyday ingredients into delightful dishes. From savory breakfasts to sweet desserts, there's a world of possibilities waiting for you. Curious about how to make the most of your gem pan? Let's explore some unique recipes that will elevate your culinary creations.
Key Takeaways
- Mini frittatas can be customized with fresh vegetables and cooked in a cast iron gem pan for a nutritious bite-sized meal.
- Cornbread muffins baked in a cast iron gem pan achieve a crisp exterior and moist interior, perfect for snacks or sides.
- Skillet pizza offers a simple, creative way to enjoy homemade pizza with customizable toppings, utilizing a cast iron skillet for a crispy crust.
- Individual berry cobblers showcase seasonal berries with a tender biscuit topping, making them an appealing dessert served in individual portions.
- Crispy potato gems, made from leftover potatoes, provide a crunchy side dish that can be flavored with various herbs and spices.
Mini Frittatas With Fresh Vegetables
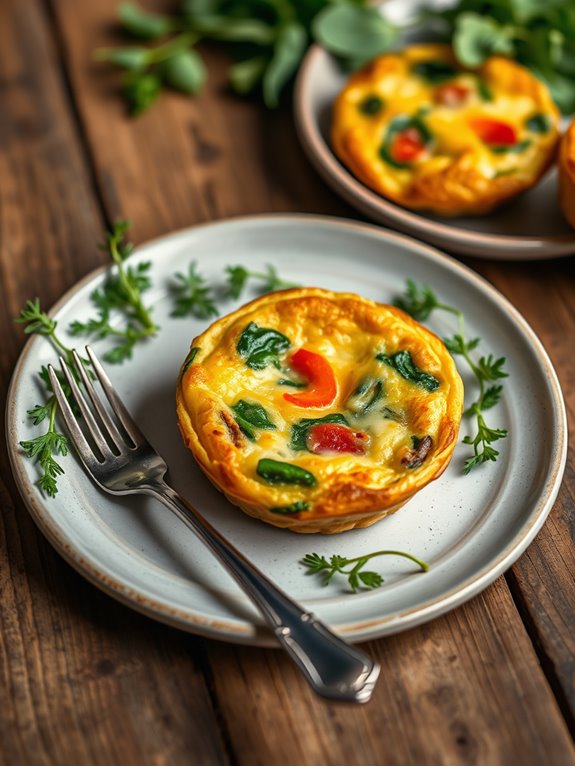
Mini frittatas are a delightful and versatile dish that can be enjoyed for breakfast, brunch, or even a light dinner. They're perfect for utilizing any fresh vegetables you have on hand, allowing you to customize them to your taste. Cooking them in a cast iron gem pan gives them a beautifully golden crust while guaranteeing they cook evenly.
With their bite-sized portions, mini frittatas are also great for entertaining and can be prepared ahead of time. This recipe focuses on a colorful combination of fresh vegetables, which not only add flavor but also a burst of nutrients to your meal.
Whether you choose to use bell peppers, spinach, onions, or any other seasonal veggies, these mini frittatas are sure to be a hit with family and friends. Let's get cooking!
Ingredients:
- 6 large eggs
- 1/2 cup milk
- 1 cup chopped fresh vegetables (bell peppers, spinach, onions, etc.)
- 1/2 cup shredded cheese (cheddar, feta, or your favorite)
- 1/2 teaspoon salt
- 1/4 teaspoon black pepper
- 1 tablespoon olive oil (for greasing the pan)
- Fresh herbs (optional, for garnish)
Cooking Instructions:
Preheat your oven to 375°F (190°C) and lightly grease your cast iron gem pan with olive oil. In a large mixing bowl, whisk together the eggs and milk until well combined.
Add in the salt, pepper, and any fresh herbs you choose, then stir in the chopped vegetables and shredded cheese. Mix well to guarantee all ingredients are evenly distributed.
Pour the egg mixture into the greased gem pan, filling each cavity about three-quarters full. Bake in the preheated oven for 15-20 minutes or until the frittatas are puffed and golden brown. A toothpick inserted into the center should come out clean.
Allow them to cool for a few minutes before gently removing them from the pan.
Extra Tips:
For an extra layer of flavor, consider sautéing your vegetables in the pan for a few minutes before adding them to the egg mixture. This will enhance their sweetness and add depth to your frittatas.
Additionally, feel free to experiment with different cheeses or spices to suit your preference. Mini frittatas can be stored in the refrigerator for up to three days, making them a convenient meal prep option!
Cornbread Muffins With Honey Butter
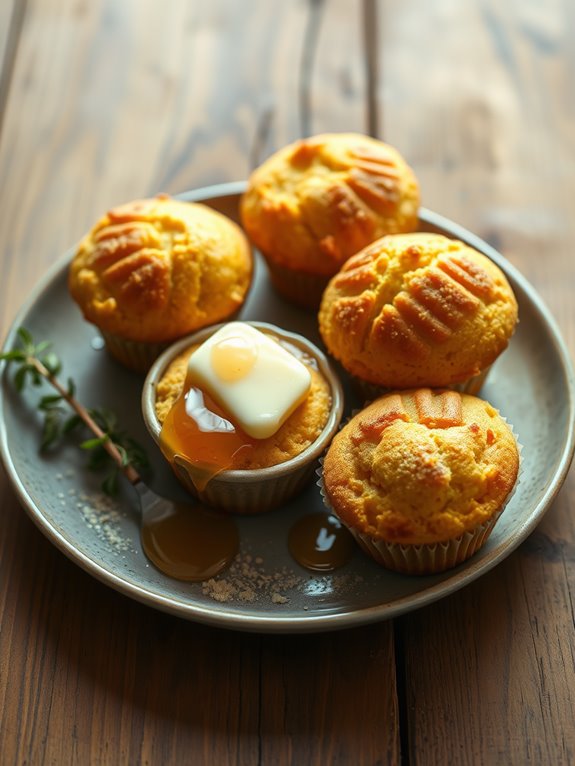
Cornbread muffins are a delightful addition to any meal, offering a perfect balance of sweetness and savory flavor. When baked in a cast iron gem pan, they achieve a beautifully crisp exterior while remaining tender and moist on the inside. The honey butter elevates these muffins to another level, providing a deliciously sweet and creamy topping that complements the cornbread perfectly.
Whether served alongside chili, barbecued meats, or simply enjoyed on their own, these cornbread muffins are sure to be a hit. Making cornbread muffins with honey butter is simple and requires minimal ingredients, making it a great choice for a quick snack or a side dish for your next gathering.
The charm of using a cast iron gem pan lies in the even heat distribution, which results in evenly baked muffins with a lovely golden-brown crust. Gather your ingredients and get ready to whip up these delightful treats!
Ingredients:
- 1 cup cornmeal
- 1 cup all-purpose flour
- 1/4 cup granulated sugar
- 1 tablespoon baking powder
- 1/2 teaspoon salt
- 1 cup milk
- 1/3 cup vegetable oil
- 2 large eggs
- 1/4 cup honey
For the honey butter:
- 1/2 cup unsalted butter, softened
- 1/4 cup honey
- Pinch of salt
To prepare the cornbread muffins, preheat your oven to 400°F (200°C) and grease your cast iron gem pan with a little oil or butter. In a large mixing bowl, combine the cornmeal, flour, sugar, baking powder, and salt.
In a separate bowl, whisk together the milk, vegetable oil, eggs, and honey until well combined. Gradually add the wet ingredients to the dry ingredients, stirring until just combined. Be careful not to overmix; a few lumps are fine.
Spoon the batter into the prepared gem pan, filling each cavity about two-thirds full. Bake for 15-18 minutes or until the tops are golden and a toothpick inserted into the center comes out clean.
While the muffins are baking, prepare the honey butter by mixing the softened butter, honey, and a pinch of salt in a small bowl until smooth and creamy. Once the muffins are done, let them cool for a few minutes before removing them from the pan. Serve warm with the honey butter.
Extra Tips: To enhance the flavor of your cornbread muffins, consider adding mix-ins such as shredded cheese, jalapeños, or cooked bacon bits. You can also experiment with different types of cornmeal for varying textures.
For an extra touch of sweetness, drizzle additional honey over the muffins before serving. Enjoy your freshly baked cornbread muffins at any gathering or as a comforting snack!
Skillet Pizza With Your Favorite Toppings

Making a skillet pizza isn't only simple but also a great way to get creative in the kitchen. As the pizza bakes in the oven, the cast iron skillet retains heat, ensuring that the crust becomes beautifully golden and crisp. In just a few steps, you can serve up a delightful dish that will make pizza night a weekly tradition!
Ingredients:
- 1 pre-made pizza dough
- 1 cup pizza sauce
- 1 ½ cups shredded mozzarella cheese
- ½ cup sliced pepperoni (or your choice of toppings)
- ½ cup sliced bell peppers
- ¼ cup sliced black olives
- 1 teaspoon dried oregano
- Olive oil (for greasing)
Cooking Instructions:
Preheat your oven to 475°F (245°C). Begin by greasing your cast iron skillet with a little olive oil to prevent sticking.
Roll out the pizza dough to fit the size of your skillet, then press it into the bottom and up the sides of the skillet. Spread the pizza sauce evenly across the dough, leaving a little edge for the crust.
Next, sprinkle the shredded mozzarella cheese liberally over the sauce followed by your desired toppings, such as pepperoni, bell peppers, and olives. Finally, sprinkle the dried oregano over the top for added flavor.
Place the skillet in the preheated oven and bake for 15-20 minutes or until the cheese is bubbly and the crust is golden brown. Once done, remove from the oven and let it cool for a few minutes before slicing. Serve hot and enjoy!
Extra Tips:
For an extra crispy crust, consider preheating the skillet in the oven for a few minutes before adding the dough. This helps to create a nice sear on the bottom of the pizza.
Additionally, feel free to experiment with different cheeses or sauces to create your perfect combination. Leftover pizza can be stored in the fridge and reheated in the skillet for a quick and tasty meal!
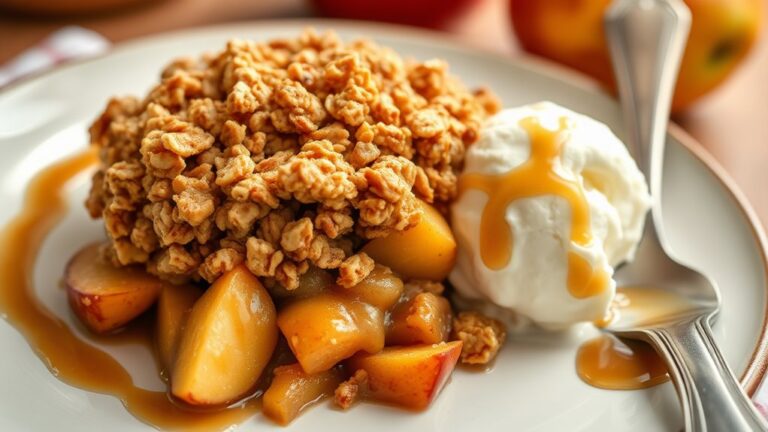
Individual Berry Cobblers

This recipe allows you to use a mix of your favorite berries, such as blueberries, raspberries, or blackberries, creating a colorful and delicious dessert. The contrasting textures of the juicy berries and the tender biscuit topping make each bite a satisfying experience.
Let's explore the ingredients and get ready to bake these charming individual cobblers!
Ingredients:
- 2 cups mixed berries (fresh or frozen)
- 1/4 cup granulated sugar
- 1 tablespoon cornstarch
- 1 teaspoon vanilla extract
- 1 teaspoon lemon juice
- 1 cup all-purpose flour
- 1/4 cup granulated sugar (for topping)
- 1/2 teaspoon baking powder
- 1/4 teaspoon salt
- 1/4 cup unsalted butter, melted
- 1/2 cup milk
Instructions:
Preheat your oven to 375°F (190°C). In a medium bowl, combine the mixed berries, 1/4 cup of sugar, cornstarch, vanilla extract, and lemon juice. Gently toss the mixture to coat the berries evenly, then set aside to let the flavors meld.
Meanwhile, in another bowl, whisk together the flour, 1/4 cup of sugar, baking powder, and salt. Add the melted butter and milk to the dry ingredients, stirring until just combined.
Grease your cast iron gem pan with a bit of butter or cooking spray. Spoon a generous tablespoon of the berry mixture into each greased cup of the gem pan. Then, dollop the biscuit batter on top of the berries, filling each cup about three-quarters full.
Bake for 18-20 minutes, or until the tops are golden brown and a toothpick inserted into the biscuit topping comes out clean. Allow the cobblers to cool for a few minutes before serving.
Extra Tips:
For an extra touch of flavor, consider adding a pinch of cinnamon or nutmeg to the biscuit batter. You can also serve these individual berry cobblers with a scoop of vanilla ice cream or a dollop of whipped cream for a delightful contrast.
If you have leftover cobblers, store them in an airtight container in the fridge for up to three days; simply reheat them in the oven for a few minutes before enjoying!
Savory Cheese and Herb Scones
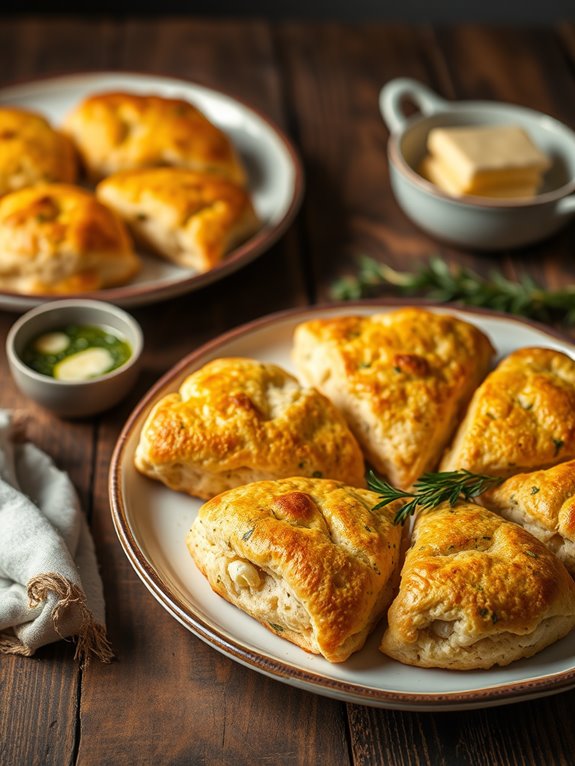
These scones are quick to prepare and can be customized according to your taste preferences. Feel free to experiment with different types of cheese or herbs to create your own unique flavor combinations. Enjoy these scones warm from the oven for the best experience!
Ingredients:
- 2 cups all-purpose flour
- 1 tablespoon baking powder
- 1/2 teaspoon salt
- 1/4 cup cold unsalted butter, cubed
- 1 cup shredded sharp cheddar cheese
- 1/4 cup chopped fresh herbs (such as chives, parsley, or thyme)
- 3/4 cup whole milk
- 1 large egg
Instructions:
- Preheat your oven to 400°F (200°C). In a large mixing bowl, whisk together the flour, baking powder, and salt. Add the cold butter and, using your fingers or a pastry cutter, work it into the flour until the mixture resembles coarse crumbs.
- Stir in the cheese and herbs until evenly distributed. In a separate bowl, whisk together the milk and egg. Gradually pour this mixture into the dry ingredients, stirring gently until a soft dough forms.
- Turn the dough out onto a lightly floured surface and knead gently just until combined. Roll or pat the dough to about 1-inch thickness. Cut out rounds with a biscuit cutter or knife, and place them into the cast iron gem pan.
- Bake for 15-20 minutes, or until the scones are golden brown and a toothpick inserted into the center comes out clean.
Extra Tips:
For an extra touch of flavor, you can brush the tops of the scones with melted butter or sprinkle some extra cheese on top before baking.
Additionally, these scones can be made ahead of time and frozen; just bake them straight from the freezer, adding a few extra minutes to the cooking time.
For the best texture, avoid overworking the dough and enjoy them fresh from the oven!
Stuffed Mushrooms With Garlic and Parmesan
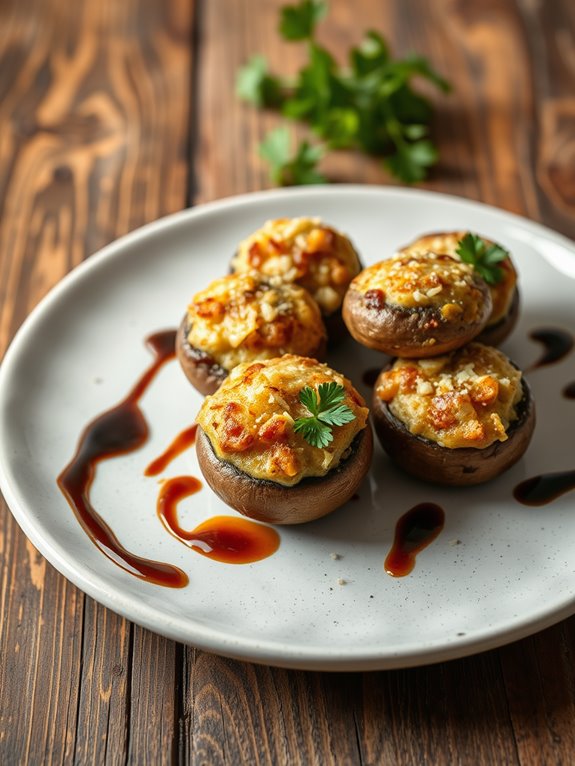
These stuffed mushrooms can be customized to suit your taste. You can add various ingredients such as herbs, spices, or even a bit of sausage for extra flavor. The key is to guarantee that the mushrooms are fresh and firm, as this will enhance the overall texture of the dish.
Let's plunge into the recipe!
Ingredients:
- 12 large mushrooms, stems removed
- 1 cup breadcrumbs
- 1/2 cup grated Parmesan cheese
- 3 cloves garlic, minced
- 2 tablespoons fresh parsley, chopped
- 1/4 cup olive oil
- Salt and pepper to taste
- Optional: 1/2 cup cooked sausage or bacon, crumbled
Cooking Instructions:
Preheat your oven to 375°F (190°C). In a mixing bowl, combine the breadcrumbs, grated Parmesan cheese, minced garlic, chopped parsley, olive oil, and salt and pepper.
If you're using sausage or bacon, mix that in as well. Stir until well combined, making sure the mixture is moist but not too wet.
Place the mushroom caps in your cast iron gem pan and fill each cap generously with the stuffing mixture. Bake in the preheated oven for 20-25 minutes, or until the mushrooms are tender and the tops are golden brown.
Serve warm and enjoy the delightful flavors of your stuffed mushrooms!
Extra Tips:
For an added burst of flavor, consider drizzling a little balsamic glaze over the stuffed mushrooms before serving.
You can also experiment with different cheeses, such as mozzarella or feta, for a unique twist. Make certain not to overcrowd the pan, as this will allow the mushrooms to cook evenly and get that perfect crispy topping.
Enjoy your culinary creation!
Cast Iron Gem Pancakes
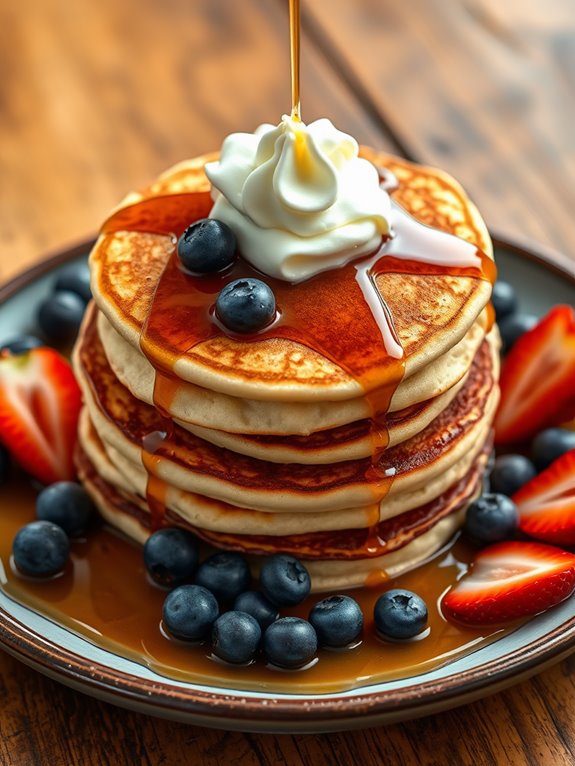
Cooking with a cast iron gem pan guarantees even heat distribution, which helps achieve that golden-brown crust.
The small size of the pancakes allows for quick cooking time, so you can whip up a batch in no time. Serve them warm with maple syrup, fresh fruit, or a dollop of whipped cream for a breakfast treat that everyone will love.
Ingredients:
- 1 cup all-purpose flour
- 2 tablespoons sugar
- 1 teaspoon baking powder
- 1/2 teaspoon baking soda
- 1/4 teaspoon salt
- 1 cup buttermilk
- 1 large egg
- 2 tablespoons melted butter
- 1 teaspoon vanilla extract
Cooking Instructions:
1. Preheat your cast iron gem pan over medium heat. To guarantee the pancakes don't stick, lightly grease each mold with butter or cooking spray.
2. In a large mixing bowl, whisk together the flour, sugar, baking powder, baking soda, and salt. In another bowl, combine the buttermilk, egg, melted butter, and vanilla extract.
Pour the wet ingredients into the dry ingredients and mix until just combined; it's okay if there are some lumps.
3. Using a ladle or a small cup, pour the batter into each mold of the gem pan, filling them about halfway. Cook for 2-3 minutes or until small bubbles form on the surface, then carefully flip each pancake and cook for another 1-2 minutes until golden brown.
Extra Tips:
For even more flavor, consider adding a pinch of cinnamon or nutmeg to the batter.
You can also fold in chocolate chips, blueberries, or chopped nuts for added texture and taste. Always guarantee the pan is well greased before pouring in the batter, and be mindful of the cooking time to avoid overcooking.
Enjoy experimenting with different toppings to make each batch unique!
Chocolate Lava Cakes
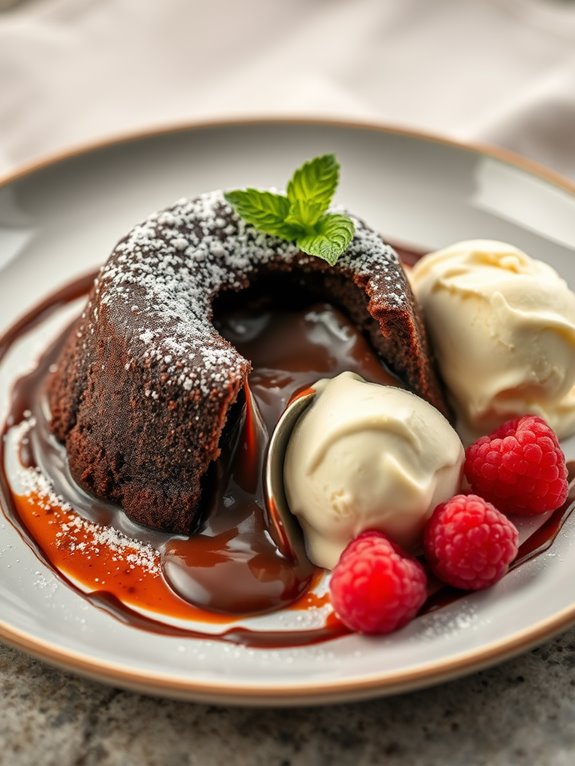
Making chocolate lava cakes in a cast iron gem pan will guarantee that each cake is perfectly portioned and bakes evenly, resulting in a delightful treat that's both warm and satisfying. With just a few ingredients, you can whip up these luscious cakes in no time, making them an excellent option for any occasion or simply as a sweet end to your day.
Ingredients:
- 1/2 cup unsalted butter
- 1 cup semi-sweet chocolate chips
- 1 cup powdered sugar
- 2 large eggs
- 2 large egg yolks
- 1 teaspoon vanilla extract
- 1/2 cup all-purpose flour
- Pinch of salt
- Optional: cocoa powder for dusting
Instructions:
Begin by preheating your oven to 425°F (220°C). In a microwave-safe bowl, combine the unsalted butter and semi-sweet chocolate chips. Microwave in 30-second intervals, stirring in between until the mixture is fully melted and smooth.
Once melted, whisk in the powdered sugar until well blended. Add the eggs, egg yolks, and vanilla extract, mixing until combined. Finally, fold in the flour and a pinch of salt until the batter is smooth.
Grease the cavities of your cast iron gem pan with butter and dust lightly with cocoa powder if desired. Pour the batter into each cavity, filling them about 3/4 full. Bake for 12-14 minutes, or until the edges are firm but the center remains soft.
Remove from the oven and let the cakes sit for 1 minute before carefully inverting them onto serving plates. Serve immediately with a scoop of vanilla ice cream or a dollop of whipped cream.
Extra Tips:
For the best results, make sure not to overbake the lava cakes; the center should be soft and gooey. You can prepare the batter ahead of time and refrigerate it for up to 24 hours before baking.
Just remember to bring it to room temperature before pouring it into the pan and baking. Additionally, feel free to experiment by adding a pinch of espresso powder to enhance the chocolate flavor or incorporating a raspberry or caramel center for a delicious twist. Enjoy your decadent creations!
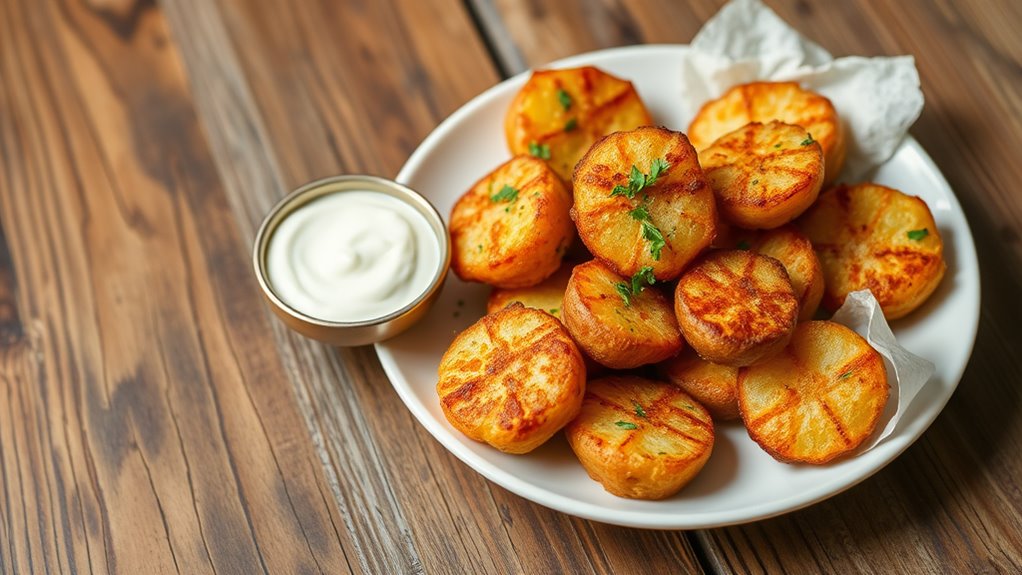
Crispy Potato Gems With Herbs
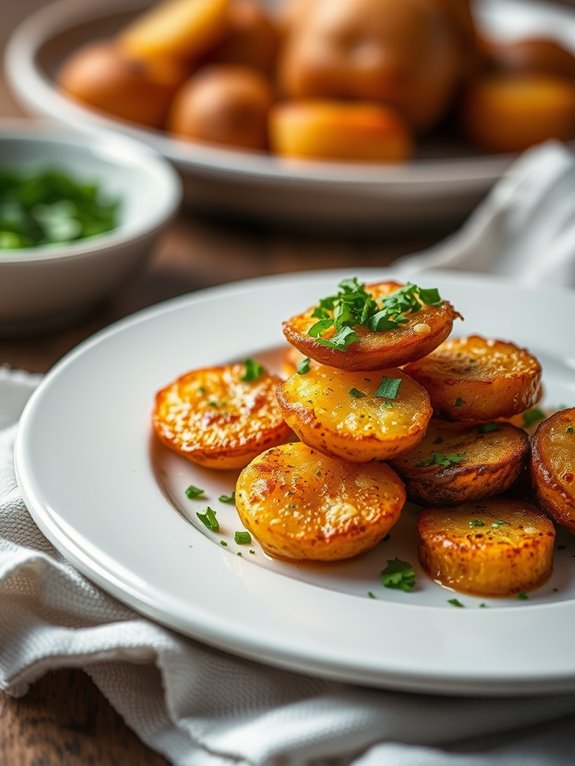
Crispy Potato Gems with Herbs are the perfect addition to any meal, bringing a delightful crunch and a burst of flavor to your table. These little gems aren't only easy to make but also an excellent way to use up leftover potatoes.
With a blend of fresh herbs and a touch of seasoning, you can elevate simple ingredients into a tasty treat that will impress your family and friends. Using a cast iron gem pan, you'll achieve that perfect crispy texture on the outside while keeping the insides fluffy and tender.
This recipe is versatile as you can customize it with your favorite herbs or spices. Serve them as a side dish, snack, or appetizer, and watch them disappear in no time.
Ingredients:
- 4 medium potatoes, peeled and cubed
- 2 tablespoons olive oil
- 1 teaspoon garlic powder
- 1 teaspoon onion powder
- 1 teaspoon paprika
- Salt and pepper to taste
- 2 tablespoons fresh parsley, finely chopped
- 1 tablespoon fresh rosemary, finely chopped
- 1 tablespoon fresh thyme, finely chopped
To begin, boil the cubed potatoes in a pot of salted water until tender, which should take about 15-20 minutes. Drain the potatoes and let them cool slightly.
In a large bowl, mash the potatoes until smooth, then mix in the olive oil, garlic powder, onion powder, paprika, salt, and pepper. Finally, fold in the chopped herbs until evenly distributed.
Preheat your cast iron gem pan over medium heat and lightly grease it with oil. Spoon the potato mixture into each cavity, pressing down firmly and smoothing the tops. Cook for about 5-7 minutes on each side or until golden brown and crispy.
For extra crispy gems, make sure the pan is well-preheated before adding the potato mixture, and don't overcrowd the pan. You can also experiment with different herbs like chives or dill for a unique flavor profile.
Additionally, serving these crispy potato gems with a dipping sauce, such as sour cream or aioli, can enhance the overall experience. Enjoy your homemade crispy potato gems!
Frequently Asked Questions
Can I Use My Cast Iron Gem Pan on Induction Cooktops?
Yes, you can use your cast iron gem pan on induction cooktops. Its magnetic properties allow it to work effectively, so just place it on the burner, and you'll enjoy even cooking in no time!
How Do I Properly Clean and Maintain My Cast Iron Gem Pan?
To clean your cast iron gem pan, avoid soap. Instead, rinse it with hot water and scrub with a brush. Dry it thoroughly, then apply a thin layer of oil to maintain seasoning.
Is It Safe to Use Metal Utensils With a Cast Iron Gem Pan?
When it comes to using metal utensils with your cast iron gem pan, you're walking a fine line. It's generally safe, but be cautious—avoid scraping too hard to protect the seasoning and surface.
What Temperature Should I Preheat My Cast Iron Gem Pan?
You should preheat your cast iron gem pan to around 400°F (204°C) for ideal cooking. This temperature allows your pan to distribute heat evenly, ensuring your food cooks perfectly without sticking or burning.
Can I Bake Desserts in My Cast Iron Gem Pan?
Yes, you can definitely bake desserts in your cast iron gem pan! It heats evenly, creating a perfect texture. Just adjust baking times and temperatures to suit your recipe for delicious results every time. Enjoy!