As an affiliate, we may earn a commission from qualifying purchases. We get commissions for purchases made through links on this website from Amazon and other third parties.
Cooking with cast iron offers a unique way to enhance flavors and textures in your meals. If you're following a keto lifestyle, you'll find that these versatile pans are perfect for whipping up low-carb dishes. From a hearty breakfast skillet to zesty shrimp, there's so much you can create. Curious about how to make the most of your cast iron while sticking to your keto goals? Let's explore some delicious options.
Key Takeaways
- Cast iron skillets retain heat well, providing a perfect sear for meats and creating crispy textures in dishes like Cheesy Cauliflower Hash Browns.
- One-pan meals like Savory Keto Breakfast Skillet and One-Pan Keto Chicken Alfredo simplify cooking and cleanup while adhering to ketogenic guidelines.
- Recipes like Cast Iron Zucchini Fritters and Hearty Beef and Broccoli Stir-Fry leverage the skillet's heat for even cooking and enhanced flavors.
- Keto-Friendly Skillet Pizza allows for creative topping combinations, making it a fun and versatile meal option that caters to diverse tastes.
- Using a cast iron skillet ensures optimal moisture retention and enhances the overall flavor of creamy dishes like Chicken in Creamy Parmesan Sauce.
Savory Keto Breakfast Skillet
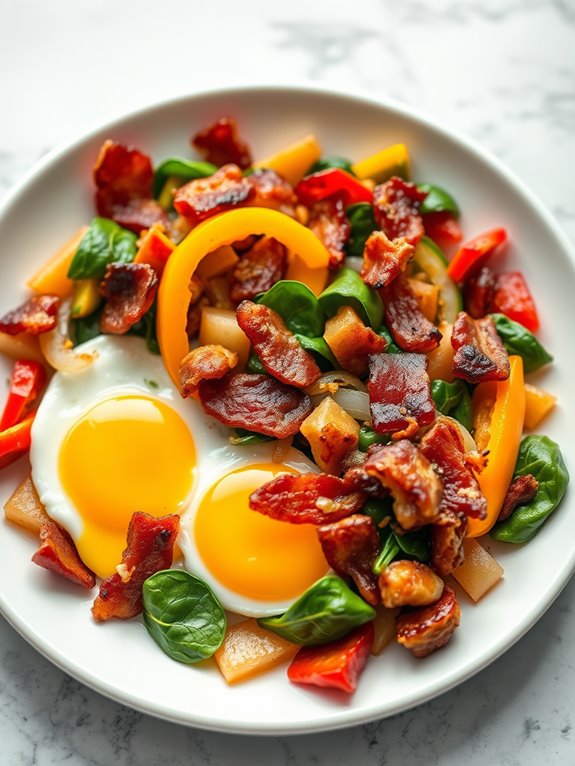
Start your day off right with a savory Keto Breakfast Skillet, a delicious and satisfying way to fuel your morning. This one-pan meal isn't only easy to prepare but also packed with healthy fats and protein, making it perfect for those following a ketogenic diet. The combination of crispy bacon, fresh vegetables, and fluffy eggs creates a delightful medley of flavors that will keep you energized throughout the day.
Cooking in a cast iron skillet enhances the dish by giving it a fantastic sear and flavor that can't be replicated by other cookware. Plus, one of the best things about this recipe is its versatility; you can easily customize it with your favorite veggies or protein sources. Whether you're cooking for yourself or the whole family, this Keto Breakfast Skillet is sure to please everyone at the table.
Ingredients:
- 4 slices of bacon, chopped
- 1 cup of bell peppers, diced (any color)
- 1/2 cup of onion, diced
- 1 cup of fresh spinach
- 4 large eggs
- Salt and pepper to taste
- 1 tablespoon of olive oil (optional)
- Grated cheese (optional, for topping)
Cooking Instructions:
Begin by heating your cast iron skillet over medium heat. Add the chopped bacon and cook until crispy, about 5-7 minutes. Once the bacon is cooked, remove it from the skillet and set aside, leaving the rendered fat in the pan. If necessary, add a tablespoon of olive oil for extra flavor.
Next, add the diced bell peppers and onions to the skillet, sautéing them until they're tender and slightly caramelized, about 3-4 minutes. Stir in the fresh spinach and cook until wilted.
Once the vegetables are cooked, return the bacon to the skillet and stir everything together. Create four small wells in the mixture and crack an egg into each well. Season with salt and pepper. Cover the skillet with a lid and cook for about 5-7 minutes, or until the egg whites are set but the yolks remain runny, or to your desired doneness. If you like, sprinkle some grated cheese on top during the last minute of cooking for a melty finish.
Extra Tips:
For an added burst of flavor, consider incorporating spices such as paprika or garlic powder into the vegetable mix. You can also experiment with different vegetables like zucchini, mushrooms, or even avocado for a unique twist.
If you prefer a heartier meal, add in some cooked sausage or ground beef. This dish isn't only great for breakfast but can be enjoyed for lunch or dinner as well, making it a versatile addition to your meal planning.
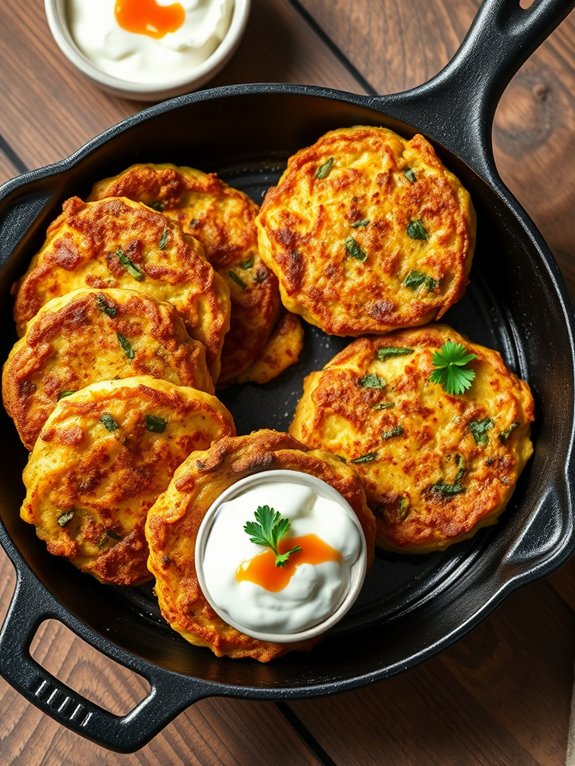
Cheesy Cauliflower Hash Browns
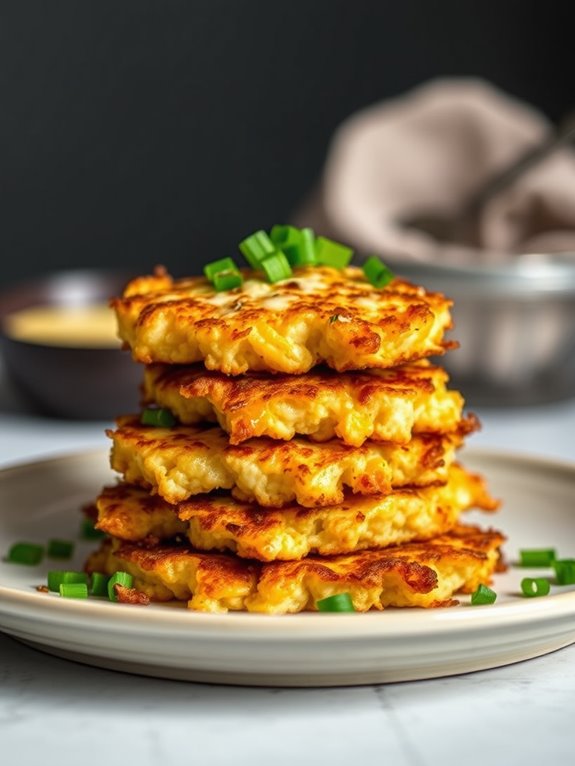
Cheesy cauliflower hash browns are a delightful low-carb alternative to traditional hash browns, perfect for a keto-friendly breakfast or side dish. These crispy, cheesy bites are made from finely grated cauliflower, which gives them a satisfying texture while keeping the carb count low. The addition of cheese not only enhances the flavor but also helps bind the ingredients together, creating a deliciously satisfying dish that will please both keto dieters and non-dieters alike.
Cast iron cooking is ideal for achieving that perfect golden crust on these hash browns. The even heat distribution of a cast iron skillet allows for a beautifully crisp exterior while keeping the interior tender. Plus, cooking in cast iron imparts a wonderful flavor to the dish. Let's explore making these cheesy cauliflower hash browns that are sure to become a favorite in your keto meal rotation.
Ingredients:
- 1 medium head of cauliflower
- 1 cup shredded cheddar cheese
- 2 large eggs
- 1/4 cup almond flour
- 1/4 teaspoon garlic powder
- 1/4 teaspoon onion powder
- Salt and pepper to taste
- 2 tablespoons olive oil or butter for frying
Cooking Instructions:
Begin by preheating your oven to 400°F (200°C). While the oven is heating, chop the cauliflower into florets and steam them until tender, about 5-7 minutes. Once cooked, let them cool slightly before transferring them to a clean kitchen towel.
Squeeze out as much moisture as possible to prevent soggy hash browns. In a mixing bowl, combine the drained cauliflower, shredded cheddar cheese, eggs, almond flour, garlic powder, onion powder, salt, and pepper. Mix until well combined.
Heat the olive oil or butter in a cast iron skillet over medium heat. Using your hands, form the cauliflower mixture into small patties and carefully place them in the hot skillet. Cook for about 4-5 minutes on each side until golden brown and crispy. You may need to work in batches to avoid overcrowding the skillet.
Once cooked, transfer the hash browns to a baking sheet and keep them warm in the oven while you finish the rest.
Extra Tips:
For added flavor, consider mixing in some cooked bacon bits or finely chopped green onions into the cauliflower mixture. If you're looking for a spicier kick, add a pinch of cayenne pepper or some crushed red pepper flakes.
Make sure to thoroughly squeeze out the moisture from the cauliflower to achieve maximum crispiness; this is an essential step for perfect hash browns. Enjoy your cheesy cauliflower hash browns as a tasty breakfast or a side dish at dinner!
Lemon Garlic Butter Shrimp
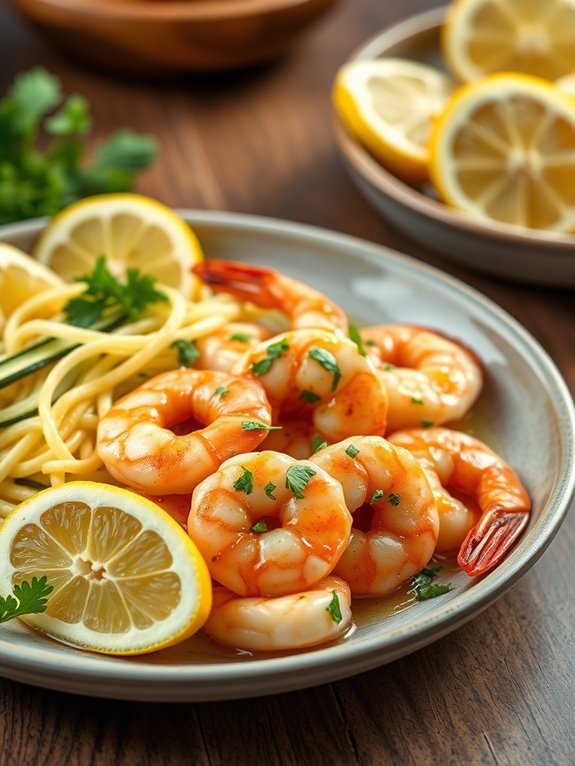
This recipe isn't only easy to prepare but also allows for a variety of adaptations. You can serve it over zucchini noodles or cauliflower rice for a complete meal, or enjoy it as a standalone dish with a side of steamed vegetables.
The vibrant flavors are sure to impress, whether you're cooking for yourself or entertaining guests.
Ingredients:
- 1 lb large shrimp, peeled and deveined
- 4 tablespoons unsalted butter
- 4 cloves garlic, minced
- Juice of 1 lemon
- Zest of 1 lemon
- Salt and pepper, to taste
- Fresh parsley, chopped (for garnish)
- Lemon wedges (for serving)
Cooking Instructions:
- Heat a cast iron skillet over medium-high heat and melt the butter. Once the butter is bubbling, add the minced garlic and sauté for about 30 seconds until fragrant, being careful not to burn it.
- Add the shrimp to the skillet in a single layer. Season with salt and pepper and cook for about 2-3 minutes on one side until they turn pink. Flip the shrimp over and cook for an additional 1-2 minutes until fully cooked.
- Squeeze the lemon juice over the shrimp and add the lemon zest, tossing to combine. Cook for an additional minute to let the flavors meld together. Remove from heat and garnish with fresh parsley. Serve with lemon wedges on the side.
Extra Tips:
When cooking shrimp, be mindful not to overcook them as they can become rubbery. Fresh shrimp is ideal for this recipe, but if you're using frozen shrimp, make sure to thaw them completely and pat them dry before cooking.
Adjust the amount of garlic and lemon to suit your taste; a little extra zest can add an invigorating kick!
One-Pan Keto Chicken Alfredo
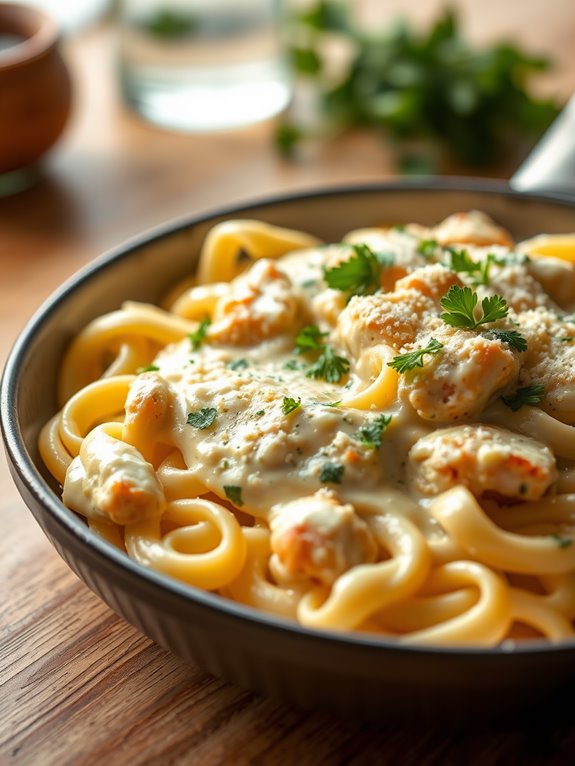
This recipe highlights the use of keto-friendly ingredients, including heavy cream and parmesan cheese, to create a rich and creamy sauce without the carbs.
You can easily customize the dish by adding your favorite low-carb vegetables, such as spinach or broccoli, to boost the nutritional value. Get ready to impress your family and friends with this one-pan wonder that maintains your keto goals in check!
Ingredients:
- 1 pound boneless, skinless chicken breasts
- 2 tablespoons olive oil
- Salt and pepper, to taste
- 3 cloves garlic, minced
- 1 cup heavy cream
- 1 cup grated parmesan cheese
- 1 teaspoon Italian seasoning
- Fresh parsley, chopped (for garnish)
Instructions:
- Heat the olive oil in a large cast iron skillet over medium-high heat. Season the chicken breasts with salt and pepper, then add them to the skillet. Cook for about 5-7 minutes on each side or until the chicken is cooked through and has a golden brown crust. Remove the chicken from the skillet and set aside.
- In the same skillet, add the minced garlic and sauté for about 1 minute until fragrant. Pour in the heavy cream, and bring to a simmer. Stir in the parmesan cheese and Italian seasoning, mixing well until the cheese melts and the sauce thickens.
Slice the cooked chicken and return it to the skillet, coating it with the creamy sauce. Garnish with fresh parsley before serving.
Extra Tips:
For an added depth of flavor, consider marinating the chicken in olive oil, garlic, and Italian herbs for a couple of hours before cooking. This step infuses the chicken with deliciousness and guarantees it remains moist.
Additionally, be mindful of the heat when adding the cream; keep it at a low simmer to avoid curdling. If you're looking for a little extra texture, you can toss in some sautéed mushrooms or zucchini noodles to the dish for a delightful twist!
Cast Iron Zucchini Fritters
These fritters are made with fresh zucchini, which is naturally low in carbohydrates and high in water content, keeping them light and invigorating. The addition of cheese and herbs adds depth to the flavor, while almond flour keeps them keto-friendly. You can serve these fritters with a dollop of sour cream or a drizzle of your favorite keto-friendly sauce for extra zing.
Ingredients:
- 2 medium zucchinis, grated
- 1 teaspoon salt
- 1/2 cup almond flour
- 1/2 cup grated Parmesan cheese
- 2 large eggs
- 1 teaspoon garlic powder
- 1 teaspoon onion powder
- 1/4 teaspoon black pepper
- 1 tablespoon fresh parsley, chopped (optional)
- Coconut oil or olive oil for frying
Instructions:
Start by grating the zucchinis and placing them in a clean kitchen towel. Sprinkle the salt over the grated zucchini and let it sit for about 10-15 minutes. This process will help draw out excess moisture.
Once the time is up, wring the towel tightly to remove as much liquid as possible from the zucchini. In a mixing bowl, combine the drained zucchini, almond flour, Parmesan cheese, eggs, garlic powder, onion powder, black pepper, and parsley. Mix until well combined.
Heat a cast iron skillet over medium heat and add enough oil to coat the bottom. Once the oil is hot, scoop about 2-3 tablespoons of the zucchini mixture and flatten it into a patty before placing it in the skillet. Cook for about 3-4 minutes on each side, or until golden brown and crispy.
Remove the fritters from the skillet and place them on a paper towel-lined plate to absorb any excess oil. Repeat until all the mixture is used up.
Extra Tips:
For an even more flavorful twist, consider adding other herbs or spices to the batter, such as smoked paprika or Italian seasoning.
Confirm your skillet is sufficiently heated before adding the fritters to achieve that desirable crispiness. If you prefer a lighter version, you can bake the fritters in the oven at 400°F (200°C) for about 20 minutes, flipping halfway through.
Enjoy experimenting with different dipping sauces to find your favorite accompaniment!
Hearty Beef and Broccoli Stir-Fry
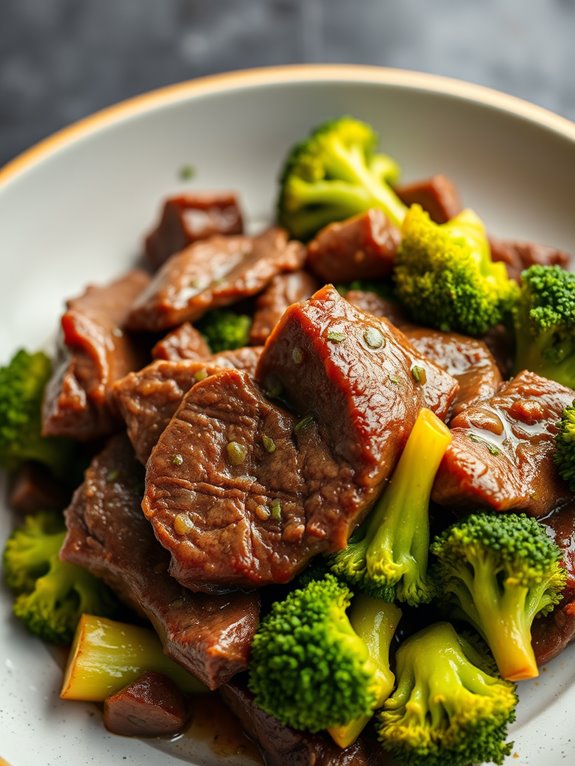
The beauty of a stir-fry lies in its versatility; you can customize it with your favorite low-carb vegetables or adjust the seasoning to suit your taste. In this recipe, we'll focus on the essentials to create a hearty and delicious beef and broccoli stir-fry that's sure to please everyone at the table, while keeping it keto-friendly.
Ingredients:
- 1 pound flank steak, sliced thinly against the grain
- 2 cups broccoli florets
- 3 tablespoons soy sauce or tamari (for gluten-free)
- 2 tablespoons sesame oil
- 1 tablespoon minced garlic
- 1 tablespoon minced ginger
- 1 tablespoon rice vinegar
- 1 teaspoon red pepper flakes (optional)
- Salt and pepper to taste
- 2 tablespoons olive oil (for cooking)
Cooking Instructions:
- Begin by marinating the sliced flank steak in a bowl with the soy sauce, sesame oil, minced garlic, minced ginger, rice vinegar, and red pepper flakes. Allow the beef to marinate for at least 15-30 minutes to absorb the flavors.
- While the beef is marinating, heat your cast iron skillet over medium-high heat and add the olive oil. Once the oil is hot, add the broccoli florets and stir-fry for about 3-4 minutes until they're bright green and slightly tender. Remove the broccoli from the skillet and set aside.
- In the same skillet, add the marinated beef in a single layer and cook for about 2-3 minutes on each side until browned and cooked through. Return the broccoli to the skillet, toss everything together, and stir-fry for an additional minute to combine the flavors. Season with salt and pepper to taste before serving.
Extra Tips:
For an extra layer of flavor, consider adding a sprinkle of toasted sesame seeds on top just before serving.
If you prefer your broccoli to have more crunch, you can add it to the skillet later during the cooking process.
Additionally, you can swap the flank steak for other cuts like sirloin or ribeye, depending on your preference.
Enjoy your hearty beef and broccoli stir-fry as a satisfying main dish or serve it over a bed of cauliflower rice for a complete keto meal!
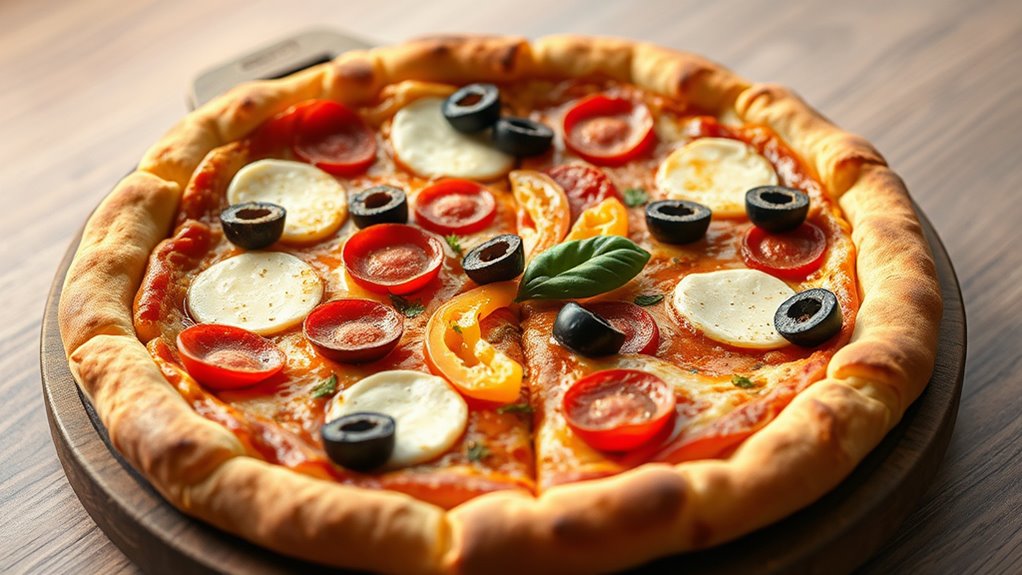
Keto-Friendly Skillet Pizza
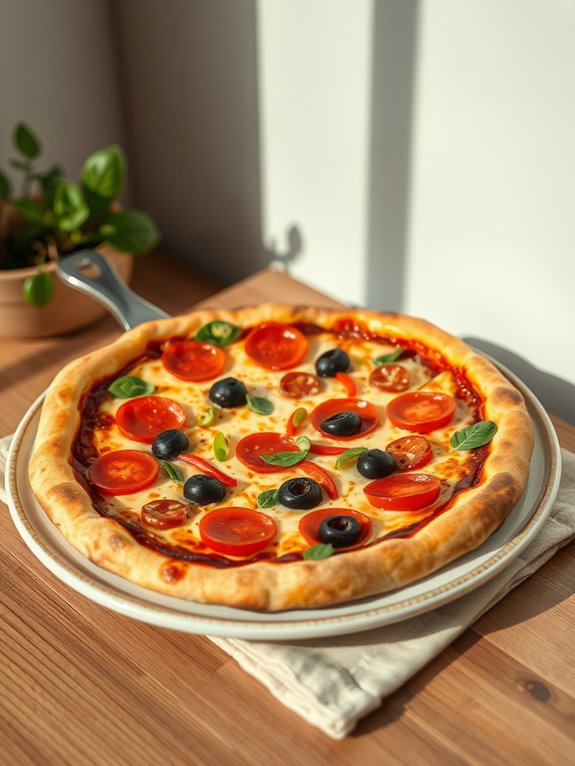
Keto-friendly skillet pizza is a delightful way to enjoy a classic favorite without straying from your low-carb lifestyle. Using a cast iron skillet gives the pizza a beautifully crispy crust while keeping the toppings perfectly melted and flavorful. With a few simple ingredients, you can whip up a delicious pizza that satisfies your cravings without the carbs.
This recipe allows you to customize your toppings, making it versatile for any palate. Whether you prefer traditional pepperoni, veggies, or even a white sauce base, the possibilities are endless. Gather your ingredients and get ready to enjoy this quick and easy meal that's perfect for a weeknight dinner or a special gathering with friends.
Ingredients:
- 1 cup almond flour
- 1/2 cup shredded mozzarella cheese
- 1/4 cup cream cheese
- 1 large egg
- 1 teaspoon baking powder
- 1 teaspoon garlic powder
- 1/2 teaspoon Italian seasoning
- 1/2 cup pizza sauce (sugar-free)
- 1 cup shredded mozzarella cheese (for topping)
- Your choice of toppings (pepperoni, bell peppers, olives, etc.)
- Olive oil (for greasing)
Cooking Instructions:
Preheat your oven to 425°F (220°C). In a large mixing bowl, combine almond flour, shredded mozzarella cheese, cream cheese, egg, baking powder, garlic powder, and Italian seasoning. Mix until a dough forms.
Grease your cast iron skillet with olive oil and spread the dough evenly across the bottom and up the sides of the skillet to form a crust. Bake the crust in the preheated oven for about 10-12 minutes, or until it's golden and firm.
Once the crust is baked, remove it from the oven and spread a layer of sugar-free pizza sauce over the top. Sprinkle shredded mozzarella cheese and add your desired toppings.
Return the skillet to the oven and bake for an additional 5-7 minutes or until the cheese is bubbly and golden. Allow the pizza to cool slightly before slicing and serving.
Extra Tips:
For an even crispier crust, you can preheat the cast iron skillet in the oven before adding the dough. Additionally, feel free to experiment with different cheeses or herbs to enhance the flavor profile.
If you're feeling adventurous, try incorporating cauliflower or zucchini into the crust for added nutrients. Enjoy customizing your skillet pizza to make it uniquely yours!
Frequently Asked Questions
Can I Use Non-Stick Spray on My Cast Iron Skillet?
Certainly, using non-stick spray can seem convenient, but it's counterproductive. Instead, embrace the enduring essence of cast iron's seasoning. You'll guarantee better flavor and functionality, keeping your skillet in peak performance for perfect dishes.
How Do I Properly Season My Cast Iron Pan?
To properly season your cast iron pan, clean it thoroughly, apply a thin layer of vegetable oil, and bake it upside down in the oven at 375°F for an hour. Let it cool before using.
Is Cast Iron Cooking Safe for Acidic Foods?
Imagine making a delicious tomato sauce in your skillet. Cooking acidic foods in cast iron's generally safe if your pan's well-seasoned. It prevents rusting and flavor absorption, ensuring your dish tastes just right.
What's the Best Way to Clean My Cast Iron Skillet?
To clean your cast iron skillet, scrub it with a stiff brush and hot water immediately after use. If necessary, use a small amount of mild soap. Dry it thoroughly and apply a light coat of oil.
Can I Cook on High Heat With Cast Iron?
Picture a roaring campfire; that's the heat your cast iron skillet loves! You can cook on high heat, but remember to preheat it slowly. This way, you'll achieve that perfect sear without damaging the seasoning.