As an affiliate, we may earn a commission from qualifying purchases. We get commissions for purchases made through links on this website from Amazon and other third parties.
The Instant Pot isn't just for savory dishes; it can whip up impressive desserts too. Imagine sinking your fork into a warm Chocolate Lava Cake or enjoying a slice of creamy Cheesecake, all prepared with minimal effort. If you're curious about how this versatile kitchen gadget can transform your sweet cravings into reality, you'll want to explore these 15+ delightful recipes. They might just inspire your next dessert adventure.
Key Takeaways
- Discover a variety of Instant Pot desserts, including classic favorites like chocolate lava cake and creamy cheesecake for special occasions.
- Indulge in fruity delights such as strawberry shortcake and coconut rice pudding, perfect for summer gatherings or refreshing treats.
- Explore seasonal recipes like luscious lemon bars and easy apple crisp, balancing flavors that are ideal for any time of year.
- Try unique dipping creations like gooey s'mores dip and berry compote, enhancing desserts or serving as standalone treats.
- Each recipe features quick cooking times and simple ingredients, making dessert preparation easy and enjoyable with your Instant Pot.
Decadent Chocolate Lava Cake
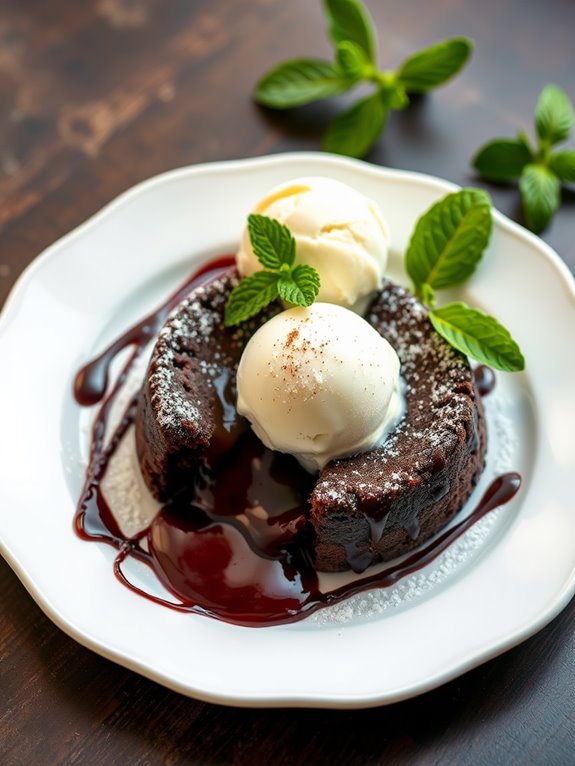
Indulging in a decadent chocolate lava cake is one of life's sweetest pleasures. With the Instant Pot, you can achieve that gooey, molten center without the fuss of a traditional oven. The pressure cooker helps to create a moist and rich cake that will impress family and friends alike. This recipe isn't only simple but also allows you to have a restaurant-quality dessert right at home!
Creating this delightful dessert is quick and easy, making it perfect for special occasions or a cozy night in. The combination of high-quality chocolate and a few pantry staples results in a dessert that's sure to satisfy chocolate cravings. So, let's explore the ingredients and get ready to whip up this luscious treat!
Ingredients:
- 1/2 cup (1 stick) unsalted butter
- 1 cup semi-sweet chocolate chips
- 2 large eggs
- 2 large egg yolks
- 1/4 cup granulated sugar
- 2 tablespoons all-purpose flour
- 1 teaspoon vanilla extract
- Pinch of salt
- Cooking spray (for greasing ramekins)
Instructions:
- Start by greasing four ramekins with cooking spray and place them on a trivet inside the Instant Pot. Next, melt the butter and chocolate chips together in a microwave-safe bowl. Heat in short bursts, stirring in between, until fully melted and smooth.
- In a separate bowl, whisk together the eggs, egg yolks, and sugar until well combined and slightly frothy. Gradually add the melted chocolate mixture to the egg mixture, stirring continuously. Once combined, fold in the flour, vanilla extract, and salt until just mixed.
- Divide the batter evenly among the prepared ramekins. Add 1 cup of water to the Instant Pot and place the trivet with the ramekins inside. Close the lid and set the valve to sealing. Cook on high pressure for 10 minutes, and then allow for a natural pressure release for 5 minutes before carefully releasing any remaining pressure.
For the best results, serve the chocolate lava cake immediately after cooking. You can run a knife around the edges of the ramekins to help release the cakes, then invert them onto plates. Top with a scoop of vanilla ice cream or a dollop of whipped cream for an extra touch of indulgence.
Extra Tips:
To guarantee that your lava cakes have that signature molten center, be careful not to overcook them. Each Instant Pot may vary slightly in cooking times, so keep an eye on them during the cooking process.
If you're preparing the cakes in advance, you can refrigerate the batter in the ramekins and cook them fresh when ready to serve. Enjoy this delightful dessert, and don't forget to impress your guests with the warm, flowing chocolate center!
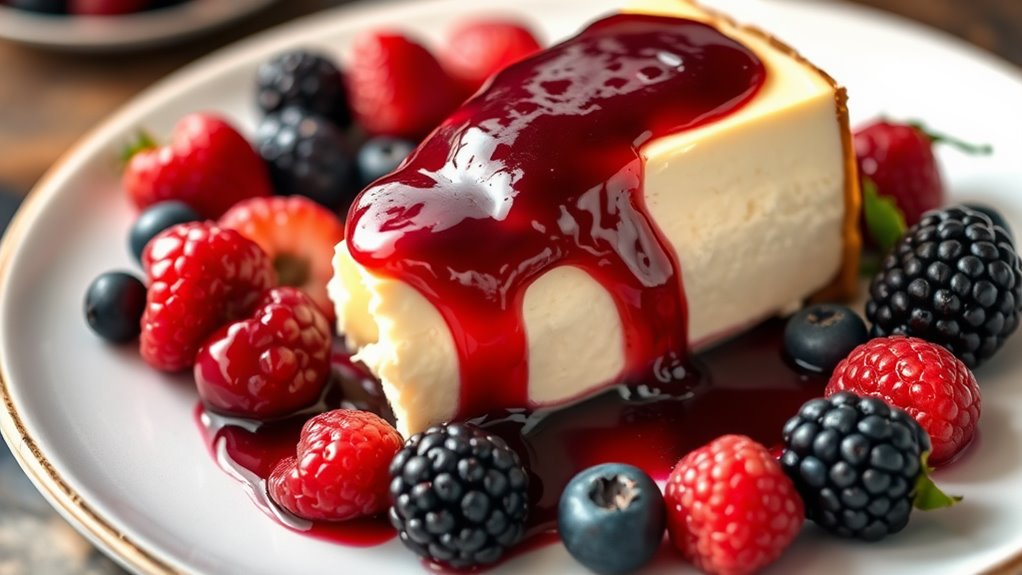
Creamy Instant Pot Cheesecake

Making a creamy Instant Pot cheesecake is an excellent way to enjoy a delicious dessert without the hassle of a traditional water bath. The Instant Pot allows for even cooking and a rich, velvety texture that's hard to achieve with conventional baking methods. This recipe is simple yet results in a show-stopping dessert that's perfect for any occasion, whether it's a family gathering or a special celebration.
With a few basic ingredients and a little bit of time, you can whip up a cheesecake that rivals your favorite bakery. The pressure cooking method guarantees that the cheesecake remains moist and creamy, while the crust adds that delightful crunch. Here's how to create your own creamy Instant Pot cheesecake.
Ingredients:
- 1 ½ cups graham cracker crumbs
- ½ cup unsalted butter, melted
- 2 cups cream cheese, softened
- 1 cup granulated sugar
- 1 teaspoon vanilla extract
- 3 large eggs
- 1 cup sour cream
Cooking Instructions:
- Start by preparing the crust. In a medium bowl, combine the graham cracker crumbs and melted butter until well mixed. Press this mixture firmly into the bottom of a 7-inch springform pan to form a crust. Set aside.
- In a large mixing bowl, beat the softened cream cheese with an electric mixer until smooth. Gradually add the granulated sugar and continue to beat until combined. Add the vanilla extract and mix well. Then, add the eggs one at a time, mixing on low speed until just incorporated. Finally, fold in the sour cream until smooth.
- Pour the cream cheese mixture over the prepared crust in the springform pan. Cover the pan tightly with aluminum foil to prevent moisture from getting in during cooking. Pour 1 cup of water into the Instant Pot and place the trivet inside. Carefully place the springform pan on top of the trivet.
- Close the lid and set the Instant Pot to high pressure for 35 minutes. Once the cooking time is completed, allow the pressure to release naturally for 10 minutes before performing a quick release. Carefully remove the cheesecake from the Instant Pot and let it cool at room temperature for about 30 minutes. Transfer it to the refrigerator for at least 4 hours, or overnight, to fully set.
Extra Tips:
When making cheesecake in the Instant Pot, it's important to allow it to cool completely before refrigerating, as this helps to achieve the ideal texture.
Additionally, you can experiment with different flavorings or toppings, such as fruit compote or chocolate ganache, to enhance your cheesecake.
If you plan to store leftovers, cover the cheesecake tightly with plastic wrap or aluminum foil to maintain its freshness. Enjoy your creamy cheesecake!
Soft and Fluffy Vanilla Pudding

Soft and fluffy vanilla pudding is a delightful dessert that's both comforting and elegant. Made with simple ingredients, this pudding can be prepared quickly in your Instant Pot, allowing you to whip up a delicious treat in no time. The rich vanilla flavor combined with its creamy texture makes it a perfect choice for any occasion, whether it's a family gathering or a cozy night in.
Using the Instant Pot not only speeds up the cooking process but also guarantees that your vanilla pudding comes out perfectly every time. The pressure cooking method helps to create a smooth and luscious consistency, eliminating any lumps that may occur with traditional stovetop methods. Plus, the Instant Pot's ability to maintain even heat guarantees that your pudding cooks uniformly, resulting in a dessert that's sure to impress.
Ingredients:
- 2 cups whole milk
- ½ cup granulated sugar
- ¼ cup cornstarch
- ¼ teaspoon salt
- 2 teaspoons vanilla extract
- 2 tablespoons unsalted butter
- 2 large egg yolks
Cooking Instructions:
Start by whisking together the sugar, cornstarch, and salt in a medium-sized bowl. In another bowl, combine the milk and egg yolks, then slowly whisk in the dry ingredients until smooth.
Pour this mixture into the Instant Pot and secure the lid. Set the Instant Pot to the "Porridge" setting for 10 minutes. Once the cooking time is complete, carefully do a quick release to release the pressure.
After the pressure is released, open the lid and stir in the vanilla extract and butter until fully incorporated. If you prefer a thicker pudding, you can use the "Sauté" function for a few minutes while stirring constantly.
Once it reaches your desired thickness, remove it from the pot and transfer the pudding into serving dishes. Allow it to cool slightly before refrigerating for at least 2 hours to fully set.
Extra Tips:
For an extra touch of flavor, consider adding a pinch of cinnamon or nutmeg to the pudding mixture before cooking. You can also garnish your vanilla pudding with whipped cream, fresh fruits, or chocolate shavings once it's chilled.
Always confirm that you stir well after cooking to achieve that perfect creamy texture. If you find your pudding is too thick, simply whisk in a bit more milk to reach your desired consistency before serving. Enjoy your delicious homemade vanilla pudding!
Rich and Moist Red Velvet Cake

Indulging in a rich and moist red velvet cake is a delightful experience, especially when it's made in an Instant Pot. This recipe takes advantage of the pressure cooker's ability to create a perfectly moist cake without the risk of drying it out. The vibrant color and velvety texture of the cake, combined with a cream cheese frosting, make it an irresistible dessert for any occasion.
Making red velvet cake in the Instant Pot isn't only easy but also quick, allowing you to enjoy this classic treat without spending hours in the kitchen. The cake is soft and fluffy, with a subtle hint of cocoa and a beautiful red hue, making it a stunning centerpiece for celebrations or a sweet ending to a family meal.
Ingredients:
- 2 cups all-purpose flour
- 1 ½ cups granulated sugar
- 1 teaspoon baking soda
- 1 teaspoon salt
- 1 teaspoon cocoa powder
- 1 cup vegetable oil
- 1 cup buttermilk, room temperature
- 2 large eggs
- 2 tablespoons red food coloring
- 1 teaspoon vanilla extract
- 1 teaspoon white vinegar
Instructions:
- In a mixing bowl, sift together the flour, sugar, baking soda, salt, and cocoa powder.
- In another bowl, whisk together the vegetable oil, buttermilk, eggs, food coloring, vanilla extract, and vinegar until well combined.
- Gradually add the dry ingredients to the wet ingredients, mixing until just combined and smooth.
- Grease a 7-inch round cake pan that fits inside your Instant Pot. Pour the batter into the pan and cover it tightly with aluminum foil to prevent condensation from dripping onto the cake.
- Add 1 cup of water to the Instant Pot, place the trivet inside, and carefully lower the cake pan onto the trivet.
- Close the lid, set the valve to sealing, and cook on high pressure for 30 minutes. Once done, allow natural pressure release for 10 minutes before manually releasing the remaining pressure.
- Carefully remove the cake pan from the Instant Pot and let the cake cool in the pan for about 10 minutes before inverting it onto a wire rack to cool completely.
- Once cooled, frost with your favorite cream cheese frosting.
Extra Tips:
For a more intense flavor, consider adding a teaspoon of almond extract to the batter.
Make sure your ingredients are at room temperature for better mixing.
If you want to make a layered cake, you can double the recipe and bake two layers, stacking them with frosting in between.
Also, keep an eye on the cooking time as different Instant Pot models may vary slightly.
Enjoy your moist and delicious red velvet cake!
Classic Bread Pudding With Raisins
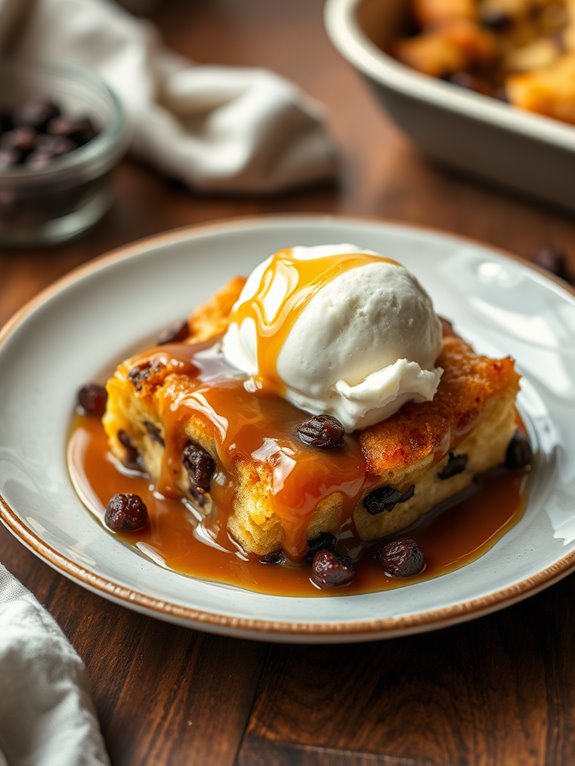
Classic Bread Pudding with Raisins is a timeless dessert that brings warmth and comfort to any table. This delightful dish combines soft, buttery bread with sweet, custardy goodness, all accented by the subtle chewiness of raisins. Cooking it in an Instant Pot not only saves time but also guarantees that the bread pudding emerges perfectly moist and flavorful.
This recipe is simple and straightforward, making it ideal for both novice and experienced cooks. With just a few pantry staples and some leftover bread, you can whip up this delectable treat in no time. Serve it warm, topped with a drizzle of caramel sauce or a scoop of vanilla ice cream, and watch it disappear quickly from your dessert table.
Ingredients:
- 6 cups of day-old bread, cubed (French or challah works well)
- 1 cup of raisins
- 4 large eggs
- 2 cups of milk
- 1 cup of granulated sugar
- 1 teaspoon of vanilla extract
- 1 teaspoon of ground cinnamon
- 1/4 teaspoon of salt
- 2 tablespoons of unsalted butter, melted
Cooking Instructions:
Start by greasing the inner pot of your Instant Pot with butter to prevent sticking. In a large mixing bowl, combine the cubed bread and raisins, tossing gently to guarantee they're evenly distributed.
In another bowl, whisk together the eggs, milk, sugar, vanilla extract, cinnamon, and salt until well blended. Pour this custard mixture over the bread and raisins, guaranteeing that all the bread is soaked. Allow it to sit for about 15 minutes, giving the bread a chance to absorb the liquid.
Next, pour 1 cup of water into the bottom of the Instant Pot and place the trivet inside. Transfer the bread pudding mixture into a greased, oven-safe baking dish that fits inside the Instant Pot. Cover the dish tightly with aluminum foil to prevent condensation from dripping onto the pudding.
Carefully place the dish on the trivet, close the lid of the Instant Pot, and set it to cook on high pressure for 30 minutes. Once the cooking time is complete, allow for a natural pressure release for about 10 minutes before carefully releasing any remaining pressure. Let the bread pudding cool for a few minutes before serving.
Extra Tips:
For added flavor, consider mixing in some chopped nuts or a splash of bourbon or rum into the custard mixture. If you prefer a creamier texture, feel free to increase the amount of milk or add a splash of heavy cream.
Leftover bread pudding can be stored in the refrigerator for a few days and reheated gently in the microwave for a quick treat. Enjoy your delicious homemade bread pudding!
Fruity Strawberry Shortcake

Fruity Strawberry Shortcake is a delightful and rejuvenating dessert that captures the essence of summer in every bite. This recipe allows you to whip up a quick and easy version using the Instant Pot, making it perfect for those hot days when you want to enjoy a sweet treat without heating up the kitchen.
Layered with fluffy vanilla cake, fresh strawberries, and whipped cream, this dessert is sure to impress family and friends alike. The versatility of strawberry shortcake means you can customize it to your liking.
Whether you prefer a lighter sponge or a biscuit-style cake, this Instant Pot recipe delivers a moist and flavorful cake that pairs beautifully with the juicy strawberries. So grab your Instant Pot and let's get started on this scrumptious dessert.
Ingredients:
- 1 ½ cups all-purpose flour
- ½ cup granulated sugar
- 2 tsp baking powder
- ½ tsp salt
- ½ cup unsalted butter, softened
- 2 large eggs
- 1 tsp vanilla extract
- ½ cup milk
- 2 cups fresh strawberries, hulled and sliced
- 1 cup heavy whipping cream
- 2 tbsp powdered sugar
Instructions:
- In a mixing bowl, combine the flour, granulated sugar, baking powder, and salt. In another bowl, cream together the softened butter, eggs, vanilla extract, and milk until smooth.
- Gradually mix in the dry ingredients until just combined. Be careful not to overmix.
- Pour the batter into a greased 7-inch round cake pan that fits into your Instant Pot. Place a trivet in the pot, add 1 cup of water, and carefully set the cake pan on top of the trivet.
- Close the lid, set the valve to sealing, and cook on high pressure for 30 minutes. Once done, allow for a natural release for 10 minutes before performing a quick release.
- While the cake is cooling, whip the heavy cream with powdered sugar until soft peaks form. Once the cake has cooled, slice it in half horizontally.
- Layer fresh strawberries and whipped cream between the slices and on top. Serve immediately.
Extra Tips:
For the best flavor, use ripe strawberries and feel free to add a splash of lemon juice or zest to the strawberries for an extra zing.
You can also substitute the whipped cream with a store-bought version if you're short on time. If you wish to make this dessert ahead of time, prepare the cake and strawberries separately and assemble just before serving for maximum freshness.
Enjoy your delicious Fruity Strawberry Shortcake!
Gooey S'mores Dip

Gooey S'mores Dip is the ultimate dessert for any gathering or cozy night in. This delightful treat combines the classic flavors of s'mores—chocolate, marshmallows, and graham crackers—into a warm, gooey dip that's perfect for sharing.
The Instant Pot makes it easy to whip up this delicious dessert in no time, ensuring that every bite is rich and satisfying. Gather your friends and family around for this indulgent experience that will surely impress.
This dip isn't only quick and simple to make, but it also allows for some creative variations. You can customize it by adding different types of chocolate or even peanut butter for an extra twist. Serve it with graham crackers, fruit, or pretzels for dipping, and watch as everyone digs in, savoring the nostalgic flavors of a traditional campfire treat—all without the need for an actual fire!
Ingredients:
- 1 cup chocolate chips (semisweet or milk chocolate)
- 1 cup mini marshmallows
- 1 tablespoon butter
- 1 teaspoon vanilla extract
- 1/4 cup heavy cream
- Graham crackers (for dipping)
Instructions:
- Begin by adding the chocolate chips, butter, heavy cream, and vanilla extract to a heat-proof dish that fits inside your Instant Pot. Stir the ingredients together until well combined.
- Then, sprinkle the mini marshmallows evenly on top of the chocolate mixture.
- Pour 1 cup of water into the Instant Pot and place a trivet inside. Carefully lower the dish with the chocolate mixture onto the trivet.
- Close the lid and set the valve to sealing. Cook on high pressure for 5 minutes.
- Once the cooking time is up, perform a quick release of the pressure. Carefully remove the dish (it will be hot) and give the dip a gentle stir to combine the melted chocolate and marshmallows.
Extra Tips:
For an even richer flavor, consider using flavored chocolate chips such as dark chocolate, caramel, or even white chocolate.
If you want a toasted marshmallow flavor, you can briefly broil the dip after cooking by transferring it to an oven-safe dish and putting it under the broiler for a minute or two—just keep a close eye on it to prevent burning.
Enjoy your gooey s'mores dip with a variety of dippers for an unforgettable dessert experience!
Luscious Lemon Bars
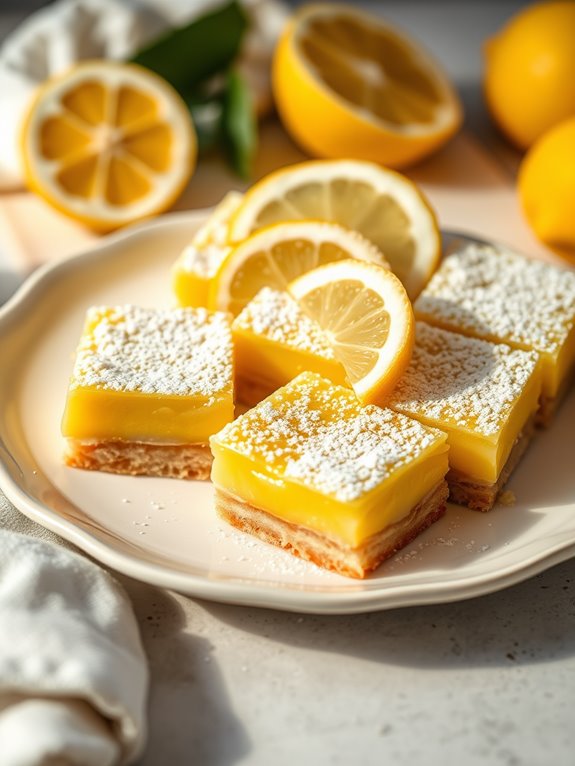
Luscious lemon bars are a delightful dessert that perfectly balances tangy and sweet flavors, making them an ideal treat for any occasion. The creamy lemon filling atop a buttery shortbread crust is sure to impress family and friends alike.
With the help of your Instant Pot, preparing these delicious bars becomes a breeze, allowing you to enjoy homemade lemon bars without the hassle of traditional baking methods. This recipe utilizes the Instant Pot's steam function to create a moist and flavorful lemon filling that sets beautifully.
Whether served at a summer gathering or as a revitalizing dessert after dinner, these luscious lemon bars are a crowd-pleaser. Get ready to indulge in this zesty treat that's both easy to make and incredibly satisfying!
Ingredients:
- 1 cup all-purpose flour
- 1/4 cup powdered sugar
- 1/2 cup unsalted butter, softened
- 2 large eggs
- 1 cup granulated sugar
- 1/4 cup freshly squeezed lemon juice
- Zest of 1 lemon
- 1/4 teaspoon salt
- 1/2 teaspoon baking powder
Cooking Instructions:
- Begin by preparing the crust. In a mixing bowl, combine the all-purpose flour, powdered sugar, and softened butter. Mix until the mixture resembles coarse crumbs. Press this mixture into the bottom of a greased 7-inch round cake pan to form an even layer for the crust. Set aside.
- In another bowl, whisk together the eggs, granulated sugar, lemon juice, lemon zest, salt, and baking powder until well blended. Pour this lemon filling over the crust in the cake pan.
- Pour 1 cup of water into the Instant Pot and place the trivet inside. Carefully lower the cake pan onto the trivet. Close the lid and set the Instant Pot to Manual mode for 25 minutes. Once the cooking time is complete, allow for a natural pressure release for about 10 minutes before carefully releasing any remaining pressure.
- Remove the cake pan from the Instant Pot and let the lemon bars cool completely at room temperature. Once cooled, refrigerate for at least 2 hours before slicing into squares and serving.
Extra Tips:
When making luscious lemon bars, it's important to use fresh lemon juice and zest for the best flavor. You can also dust the tops of the bars with additional powdered sugar before serving for an elegant touch.
If you prefer a firmer texture, you can adjust the cooking time slightly. Finally, make sure to allow the bars to cool completely before slicing them; this will help them hold their shape better. Enjoy your delicious lemon bars!
Easy Apple Crisp
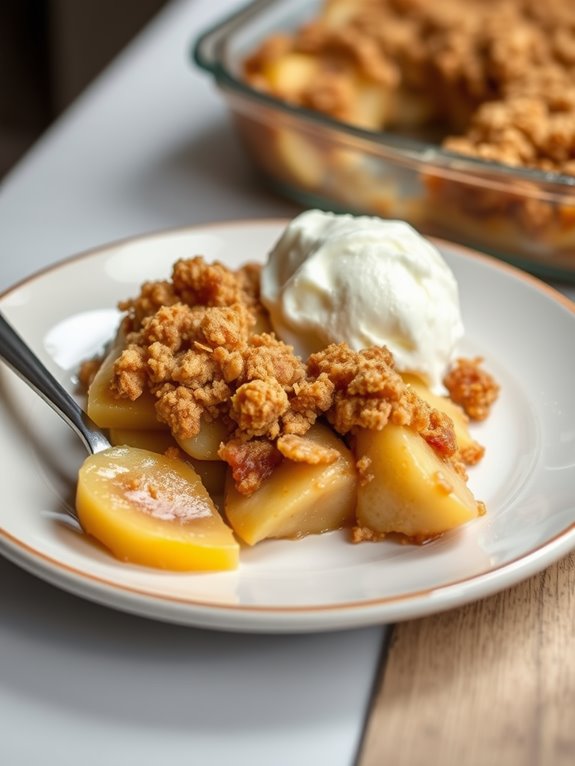
This dessert isn't only quick to prepare, but it also makes use of fresh ingredients that you may already have in your pantry. Perfect for using up those extra apples, the Easy Apple Crisp is sure to become a favorite in your household.
Serve it warm with a scoop of vanilla ice cream or a dollop of whipped cream for an extra indulgent experience.
Ingredients:
- 4 medium apples, peeled and sliced
- 1 tablespoon lemon juice
- 1 cup rolled oats
- 1/2 cup brown sugar
- 1/2 cup all-purpose flour
- 1 teaspoon cinnamon
- 1/2 teaspoon nutmeg
- 1/4 cup unsalted butter, melted
- 1/4 teaspoon salt
Cooking Instructions:
Start by placing the sliced apples in a mixing bowl and tossing them with lemon juice to prevent browning.
In another bowl, combine the oats, brown sugar, flour, cinnamon, nutmeg, melted butter, and salt to create the crumble topping.
Layer the apples in the bottom of the Instant Pot, then sprinkle the oat mixture evenly over the apples.
Add 1 cup of water to the inner pot of the Instant Pot and secure the lid. Set the Instant Pot to manual high pressure for 8 minutes.
Once the cooking time is complete, allow for a natural pressure release for 5 minutes before carefully performing a quick release to let out any remaining steam.
Open the lid and check that the apples are tender and the topping is golden.
Extra Tips:
For added flavor, consider mixing in some chopped nuts or dried fruits into the crumble mixture.
You can also adjust the sweetness by using different types of apples or adding a bit more sugar if desired.
If you prefer a crispier topping, you can place the cooked apple crisp under a broiler for a couple of minutes after serving to achieve that perfect golden brown finish.
Enjoy your delicious Easy Apple Crisp!
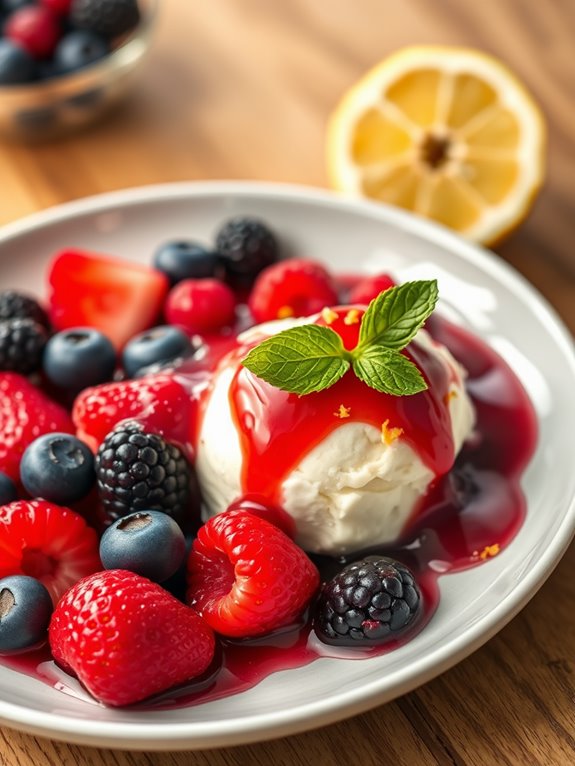
Velvety Chocolate Mousse

Making chocolate mousse in the Instant Pot is a breeze, and the result is nothing short of decadent. You can easily customize this recipe by using different types of chocolate, such as dark, milk, or even white chocolate, depending on your preference.
Serve it in individual cups, topped with whipped cream and fresh berries for a stunning presentation that will impress your guests.
Ingredients:
- 1 cup heavy cream
- 1 cup semi-sweet chocolate chips
- 2 large eggs
- 1/4 cup granulated sugar
- 1 teaspoon vanilla extract
- Pinch of salt
Cooking Instructions:
1. Begin by melting the chocolate chips in a heatproof bowl over a pot of simmering water, stirring until smooth. Alternatively, you can melt them in the microwave in 30-second intervals, stirring in between until fully melted.
Once melted, allow the chocolate to cool slightly.
2. In a separate bowl, whip the heavy cream until soft peaks form. Be careful not to overwhip. In another bowl, beat the eggs, sugar, vanilla extract, and salt until pale and frothy.
Gently fold the melted chocolate into the egg mixture, then carefully fold in the whipped cream until fully incorporated, creating a light and airy mousse.
3. Divide the mousse into individual serving cups or bowls, and cover them with plastic wrap. Place the cups on the trivet inside the Instant Pot.
Add 1 cup of water to the bottom of the pot, then secure the lid and set the pressure to high for 5 minutes. Once the cooking time is complete, allow the pressure to release naturally for 10 minutes before manually releasing any remaining pressure.
4. Cool the mousse in the refrigerator for at least 2 hours before serving. Top with additional whipped cream or chocolate shavings if desired.
Extra Tips:
For an even richer flavor, consider adding a splash of coffee or espresso powder to the chocolate mixture. This enhances the chocolate taste without making the mousse taste like coffee.
Additionally, verify your bowl and utensils are completely dry when whipping the cream to achieve the best volume. If you want to make this dessert ahead of time, the mousse can be prepared a day in advance and stored in the refrigerator until you're ready to serve.
Enjoy your indulgently smooth chocolate mousse!
Coconut Rice Pudding
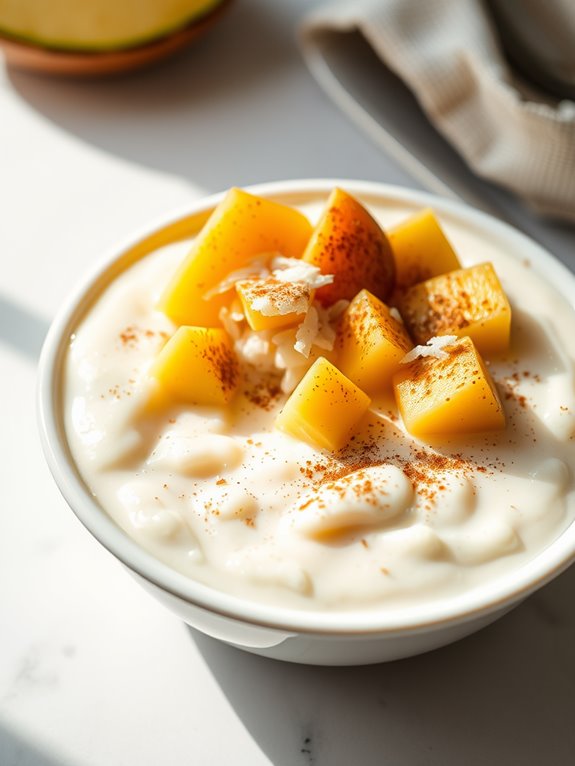
Coconut rice pudding is a creamy and delightful dessert that brings the tropical flavors of coconut to your table. This dish isn't only easy to prepare but also incredibly satisfying, making it the perfect treat for any occasion.
Using the Instant Pot to make coconut rice pudding simplifies the cooking process, allowing you to enjoy a warm and comforting dessert in no time. The combination of coconut milk, rice, and sweeteners creates a luscious texture that pairs well with various toppings such as fresh fruit, shredded coconut, or a sprinkle of cinnamon.
Whether you're serving it warm or chilled, coconut rice pudding is sure to impress your family and friends with its rich, velvety flavor.
Ingredients:
- 1 cup Arborio rice
- 1 can (13.5 oz) coconut milk
- 2 cups water
- 1/2 cup sugar (or to taste)
- 1 teaspoon vanilla extract
- 1/4 teaspoon salt
- Optional toppings: shredded coconut, fresh fruit, cinnamon
To prepare the coconut rice pudding, start by rinsing the Arborio rice under cold water until the water runs clear. This step helps remove excess starch, ensuring a creamy consistency.
Next, combine the rinsed rice, coconut milk, water, sugar, vanilla extract, and salt in the Instant Pot. Stir the mixture well to combine all the ingredients evenly.
Close the lid and set the Instant Pot to cook on high pressure for 10 minutes. Once the cooking time is complete, allow for a natural release of pressure for about 10 minutes before carefully turning the valve to release any remaining steam.
Open the lid, stir the pudding to incorporate any rice that may have settled, and let it cool for a few minutes before serving. You can enjoy it warm or refrigerate it for later.
For the best results, consider adjusting the sweetness according to your preference. Adding a pinch of cinnamon or nutmeg can enhance the flavor even further.
Additionally, feel free to experiment with different toppings; fresh mango or pineapple can add a rejuvenating touch, while toasted coconut brings an extra layer of texture and flavor. Enjoy your delicious coconut rice pudding!
Delightful Pumpkin Pie

Not only does the Instant Pot streamline the cooking process, but it also allows for a beautifully textured pie that rivals traditional oven-baked versions.
Serve it warm or chilled, topped with whipped cream or a scoop of vanilla ice cream, and watch it disappear at your next gathering. Here's how to make this delicious pumpkin pie in your Instant Pot.
Ingredients:
- 1 ½ cups pumpkin puree
- ¾ cup sweetened condensed milk
- ½ cup brown sugar
- 2 large eggs
- 1 teaspoon vanilla extract
- 1 teaspoon ground cinnamon
- ½ teaspoon ground nutmeg
- ¼ teaspoon ground ginger
- ¼ teaspoon salt
- 1 pre-made pie crust (9-inch)
Instructions:
- In a mixing bowl, combine the pumpkin puree, sweetened condensed milk, brown sugar, eggs, vanilla extract, cinnamon, nutmeg, ginger, and salt. Whisk together until smooth and well-combined.
- Roll out the pre-made pie crust and fit it into a 7-inch round cake pan or springform pan. Pour the pumpkin filling into the crust, smoothing the top with a spatula.
- Pour 1 cup of water into the Instant Pot and place the trivet inside. Carefully lower the cake pan onto the trivet. Close the lid, set the pressure valve to sealing, and cook on high pressure for 35 minutes.
- Once the cooking time is complete, let the pressure release naturally for about 10 minutes before performing a quick release for any remaining pressure. Remove the lid and carefully lift the cake pan out of the Instant Pot.
Extra Tips:
For the best results, verify the pumpkin puree is well-mixed to avoid lumps in your filling.
If you prefer a firmer pie, you can adjust the cooking time slightly; an additional 5 minutes under pressure may help.
Let the pie cool completely before slicing to allow it to set properly.
Additionally, feel free to add a dash of cloves for an extra layer of flavor, or experiment with a homemade crust for a personal touch. Enjoy your delightful pumpkin pie!
Elegant Tiramisu

In this recipe, you'll learn how to make a luscious tiramisu that's perfect for any occasion, whether it's a dinner party or a cozy night in.
The Instant Pot not only helps you create the creamy filling but also serves as a steaming method for the layers, keeping everything moist and tender.
Follow this recipe to impress your guests with your culinary skills and indulge in the delightful flavors of this timeless dessert.
Ingredients:
- 1 cup strong brewed coffee, cooled
- 2 tablespoons coffee liqueur (optional)
- 3 large egg yolks
- 1/2 cup granulated sugar
- 1 cup mascarpone cheese
- 1 cup heavy whipping cream
- 1 teaspoon vanilla extract
- 24 ladyfinger cookies
- Unsweetened cocoa powder, for dusting
Instructions:
In a mixing bowl, whisk together the egg yolks and sugar until they become pale and creamy.
Add the mascarpone cheese and vanilla extract, mixing gently until smooth and well combined.
In a separate bowl, whip the heavy cream to soft peaks and then fold it into the mascarpone mixture, being careful not to deflate the whipped cream.
In a shallow dish, combine the cooled coffee and coffee liqueur.
Quickly dip each ladyfinger into the coffee mixture, ensuring they're soaked but not overly soggy.
Layer half of the soaked ladyfingers in the bottom of a round baking dish or a trifle dish.
Spread half of the mascarpone mixture over the ladyfingers, then repeat with another layer of soaked ladyfingers and the remaining mascarpone filling.
Cover the dish with foil and place it on the trivet in the Instant Pot with a cup of water.
Set the Instant Pot to manual high pressure for 25 minutes, then allow for a natural release.
Once done, chill the tiramisu in the refrigerator for at least 4 hours before serving.
Dust with cocoa powder just before serving.
Extra Tips:
For the best flavor, make your tiramisu a day in advance to allow the flavors to meld beautifully.
Additionally, feel free to experiment with different coffee liqueurs or even flavored syrups to create your own unique twist on this classic dessert.
Always remember to serve chilled for a revitalizing treat that will leave everyone wanting more!
Sweet and Tangy Berry Compote
Sweet and Tangy Berry Compote is a delightful treat that can elevate any dessert to the next level. This versatile sauce can be used to top pancakes, ice cream, yogurt, or even cheesecake, making it a must-have in your Instant Pot recipe repertoire.
With a medley of berries, a hint of sweetness, and a touch of acidity, this compote is perfect for satisfying your sweet tooth while still providing a burst of fresh fruit flavor.
Cooking this berry compote in an Instant Pot not only saves time but also retains the vibrant colors and flavors of the berries. The pressure cooking method helps the fruits break down quickly while melding their juices, resulting in a luscious sauce that can be enjoyed warm or chilled.
Whether you're hosting a brunch or simply indulging in a cozy night at home, this berry compote will surely impress your family and friends.
Ingredients:
- 2 cups mixed berries (strawberries, blueberries, raspberries, blackberries)
- 1/4 cup granulated sugar (adjust to taste)
- 1 tablespoon lemon juice
- 1 teaspoon vanilla extract
- 1 tablespoon cornstarch (optional, for thickening)
- 2 tablespoons water (if using cornstarch)
Cooking Instructions:
- In your Instant Pot, combine the mixed berries, granulated sugar, lemon juice, and vanilla extract. Stir gently to combine, ensuring the berries are coated with the sugar and flavorings.
- Close the lid and set the Instant Pot to manual high pressure for 5 minutes. Once the cooking time is up, allow the pressure to release naturally for 10 minutes before performing a quick release for any remaining pressure.
- If you prefer a thicker compote, dissolve the cornstarch in the 2 tablespoons of water and stir into the compote. Set the Instant Pot to the sauté function and cook for an additional 2-3 minutes, stirring frequently until the desired thickness is reached.
Extra Tips:
Feel free to customize your berry compote by adding spices such as cinnamon or nutmeg for an extra layer of flavor.
You can also experiment with different sweeteners like honey or maple syrup if you prefer a more natural option. Store leftovers in an airtight container in the refrigerator for up to a week, and remember that the compote can be frozen for longer storage, making it a convenient treat to have on hand!
Frequently Asked Questions
Can I Use Frozen Fruit in These Dessert Recipes?
Yes, you can use frozen fruit in dessert recipes. Just remember to adjust cooking times slightly, as frozen fruit may release more moisture. It'll still create delicious, flavorful desserts you'll love! Enjoy experimenting with different combinations.
How Do I Adjust Cooking Times for High-Altitude Baking?
Baking at high altitude can feel like scaling a mountain. To adjust cooking times, decrease them slightly, and increase flour or liquid to maintain moisture. Keep experimenting until you find your perfect balance in the clouds!
Are There Vegan Alternatives for These Dessert Recipes?
Yes, there are plenty of vegan alternatives for dessert recipes! You can substitute eggs with flaxseed meal or applesauce, use plant-based milk, and replace butter with coconut oil or vegan margarine. Enjoy experimenting!
What Can I Substitute for Eggs in Instant Pot Desserts?
If you're baking a cake, try using applesauce instead of eggs. It keeps the dessert moist and adds sweetness. You can substitute a quarter cup of applesauce for each egg in your recipe.
How Do I Clean My Instant Pot After Making Desserts?
To clean your Instant Pot after making desserts, unplug it, remove the inner pot and lid, then wash them with warm, soapy water. Wipe the exterior and steam release valve with a damp cloth.