
As an affiliate, we may earn a commission from qualifying purchases. We get commissions for purchases made through links on this website from Amazon and other third parties.
Imagine a world where every dessert is a slice of heaven, easily crafted in your kitchen. With the Instant Pot, you can transform simple ingredients into extraordinary treats. From the ooey-gooey chocolate lava cake to the velvety cheesecake, the possibilities are endless. You might wonder how these decadent delights can be so effortless. Let's explore some of the most indulgent options that will satisfy even the most discerning sweet tooth.
Key Takeaways
- Discover a variety of indulgent desserts like decadent chocolate lava cake and creamy cheesecake, perfect for satisfying any sweet tooth.
- Instant Pot desserts, such as silky smooth chocolate pudding and irresistible caramel flan, provide restaurant-quality flavors with simplified cooking processes.
- Enjoy unique treats like delightful lemon blueberry cake and mouthwatering chocolate chip cookie cake, ideal for family gatherings or cozy nights.
- Each dessert features minimal ingredients and quick cooking times, ensuring you can effortlessly whip up delicious sweets in no time.
- Enhance flavors with spices, extracts, and toppings, allowing for personalized dessert experiences to suit every palate.
Decadent Chocolate Lava Cake
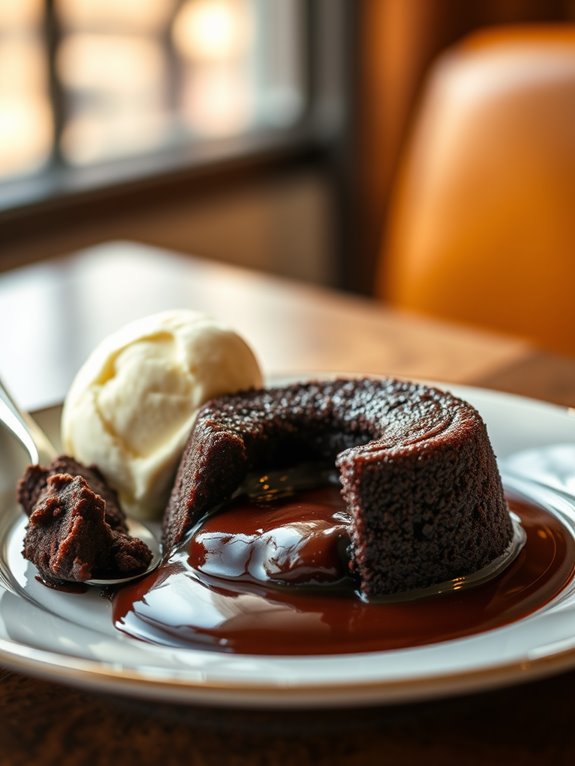
Indulging in a rich and gooey chocolate lava cake is the ultimate dessert experience, and making it in your Instant Pot simplifies the process while delivering a restaurant-quality treat. This recipe results in a warm, molten center that flows out with every bite, enveloped in a soft and decadent chocolate exterior.
Perfect for special occasions or a cozy night in, this delightful dessert comes together quickly and easily, allowing you to impress your family and friends without the hassle of traditional baking methods.
To achieve the perfect chocolate lava cake, you'll need a few key ingredients that come together to create a symphony of flavors and textures. The Instant Pot helps to maintain the ideal moisture levels, ensuring a luscious molten core while keeping the outside beautifully tender. Grab your favorite chocolate and let's get started on this delicious dessert that will surely satisfy any chocolate craving.
Ingredients:
- ½ cup unsalted butter
- 1 cup semi-sweet chocolate chips
- 2 large eggs
- 2 large egg yolks
- ¼ cup granulated sugar
- 2 tablespoons all-purpose flour
- ½ teaspoon vanilla extract
- A pinch of salt
- Cooking spray (for greasing the ramekins)
Cooking Instructions:
Begin by greasing four ramekins with cooking spray and placing them on a trivet inside your Instant Pot.
In a microwave-safe bowl, melt the butter and chocolate chips together until smooth, stirring every 30 seconds to prevent burning. Once melted, allow the mixture to cool slightly.
In a separate bowl, whisk together the eggs, egg yolks, and sugar until well combined. Gradually add the chocolate mixture into the egg mixture, stirring gently until smooth. Finally, fold in the flour, vanilla extract, and salt until just combined.
Divide the batter evenly among the prepared ramekins. Add one cup of water to the Instant Pot, and then place the trivet with the ramekins inside. Close the lid, set the valve to sealing, and cook on high pressure for 10 minutes.
Once the cooking time is up, allow for a natural pressure release for 5 minutes before carefully performing a quick release. Remove the ramekins from the pot, let them cool for a minute, and then invert each onto a plate to reveal the deliciously gooey center.
Extra Tips:
For the best results, make sure to use high-quality chocolate for a richer flavor.
You can also customize your lava cake by adding a teaspoon of espresso powder to enhance the chocolate taste or by including a few raspberries or nuts in the batter for added texture.
If you prefer a slightly less molten center, reduce the cooking time by a minute or two.
Serve your chocolate lava cake with a scoop of vanilla ice cream or a dollop of whipped cream for an extra touch of indulgence!
Creamy Instant Pot Cheesecake
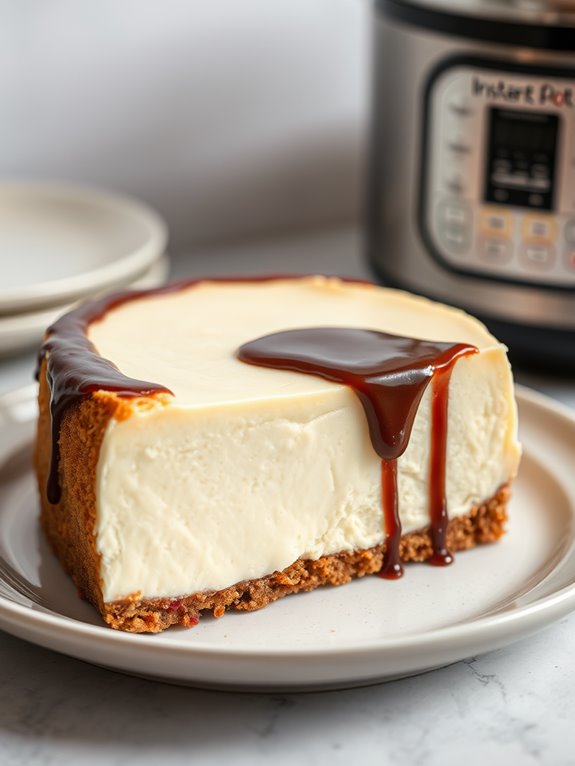
Making a creamy Instant Pot cheesecake is a delightful way to indulge in a classic dessert without the hassle of a traditional baking method. The Instant Pot not only guarantees a perfectly cooked cheesecake with a smooth, creamy texture but also reduces the overall cooking time. This recipe is simple and requires minimal ingredients, making it perfect for both novice bakers and experienced chefs alike.
Once you master this technique, you can experiment with different flavors and toppings to customize your cheesecake to your liking.
To create this decadent dessert, you'll need to prepare a few components: the crust and the filling. The crust is typically made with graham cracker crumbs, which provide a crunchy contrast to the creamy filling. The filling, made with cream cheese, sugar, and eggs, comes together easily and bakes perfectly in the Instant Pot, retaining moisture and flavor.
Follow this recipe for a delicious cheesecake that's sure to impress your friends and family.
Ingredients:
- 1 ½ cups graham cracker crumbs
- ½ cup unsalted butter, melted
- 2 tablespoons sugar
- 16 ounces cream cheese, softened
- ½ cup sugar
- 2 large eggs
- 1 teaspoon vanilla extract
- 1 cup sour cream
- ⅓ cup powdered sugar
Instructions:
- Start by preparing the crust. In a medium bowl, combine the graham cracker crumbs, melted butter, and 2 tablespoons of sugar. Mix until well combined, then press the mixture firmly into the bottom of a 7-inch springform pan to create an even layer. Set aside.
- In a large mixing bowl, beat the softened cream cheese and ½ cup of sugar until smooth and creamy. Add the eggs, one at a time, mixing well after each addition. Stir in the vanilla extract, sour cream, and powdered sugar until the mixture is fully combined.
- Pour the cream cheese mixture over the prepared crust in the springform pan. Cover the pan with aluminum foil to prevent condensation from dripping onto the cheesecake during cooking.
- Pour 1 cup of water into the Instant Pot and place the trivet inside. Carefully lower the springform pan onto the trivet. Close the lid and set the valve to sealing. Select the manual setting and cook on high pressure for 30 minutes. Once the cooking time is complete, allow the pressure to release naturally for 10 minutes before doing a quick release for any remaining pressure.
- Carefully remove the springform pan from the Instant Pot and let the cheesecake cool at room temperature for about 30 minutes. Once cooled, refrigerate for at least 4 hours, or overnight, to set completely before serving.
Extra Tips:
For the best results, make sure that all of your ingredients, especially the cream cheese and eggs, are at room temperature before mixing. This helps create a smoother batter and prevents lumps.
Additionally, you can enhance your cheesecake by adding flavored extracts, citrus zest, or even chocolate chips to the filling. When serving, consider topping the cheesecake with fresh fruit, chocolate ganache, or a drizzle of caramel sauce for an extra touch of decadence.
Silky Smooth Chocolate Pudding

Silky smooth chocolate pudding is a delightful dessert that can be easily made in your Instant Pot. With its rich chocolate flavor and creamy texture, this treat is sure to satisfy any sweet tooth.
Best of all, using the Instant Pot simplifies the process, allowing you to whip up this indulgent dessert in a fraction of the time it would take on the stovetop.
This recipe is perfect for entertaining guests or simply enjoying a quiet evening at home. With just a few simple ingredients, you can create a luscious chocolate pudding that will impress everyone.
Whether served warm or chilled, this dessert is a versatile choice for any occasion.
Ingredients:
- 2 cups whole milk
- 1/2 cup granulated sugar
- 1/3 cup unsweetened cocoa powder
- 1/4 cup cornstarch
- 1/4 teaspoon salt
- 1 teaspoon vanilla extract
- 4 ounces semi-sweet chocolate, chopped
- 1 tablespoon butter
Cooking Instructions:
- In a mixing bowl, whisk together the whole milk, granulated sugar, cocoa powder, cornstarch, and salt until well combined and smooth. This will be your chocolate base.
- Pour the mixture into the Instant Pot. Secure the lid and set the valve to the sealing position. Select the "Porridge" setting and set the timer for 10 minutes. Once the cooking time is complete, let the pressure release naturally for 10 minutes before switching to a quick release.
- Open the lid and stir in the chopped semi-sweet chocolate, vanilla extract, and butter until fully melted and smooth. If the pudding appears too thin, you can set the Instant Pot to the "Sauté" function for a few minutes while stirring until it thickens to your desired consistency.
Extra Tips:
For an extra touch, consider garnishing your silky smooth chocolate pudding with whipped cream, chocolate shavings, or fresh berries before serving.
This dessert can be made ahead of time and stored in the refrigerator for up to three days, making it a convenient option for meal prep or last-minute gatherings. Just remember to allow it to cool completely before chilling and serving!
Rich Bread Pudding With Vanilla Sauce
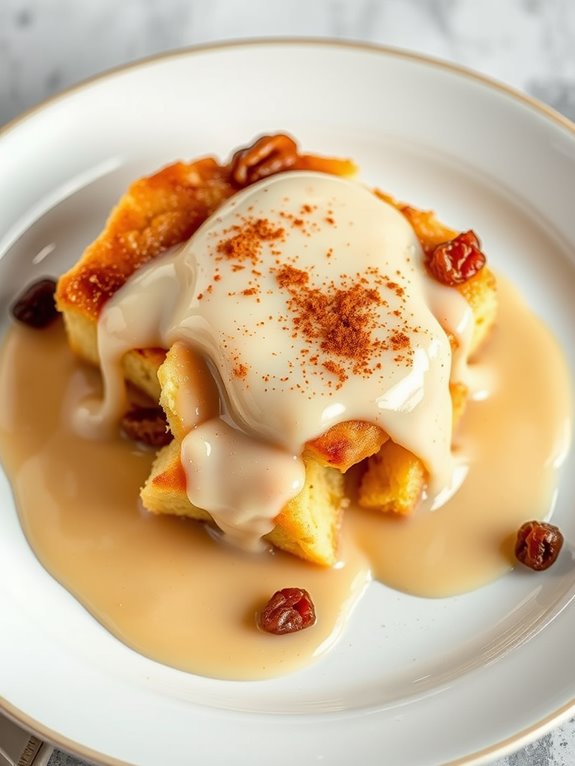
Rich Bread Pudding With Vanilla Sauce is a comforting dessert that combines the warm, custardy goodness of bread pudding with a luscious vanilla sauce. This dish is perfect for using up stale bread and can be customized with your favorite mix-ins like raisins, nuts, or chocolate chips.
The Instant Pot makes it quick and easy, allowing you to enjoy this classic dessert in a fraction of the time it would take to bake it in the oven. With the Instant Pot, you can achieve a perfectly moist and rich bread pudding without the worry of overcooking or drying it out.
The pressure cooking method creates steam that envelops the pudding, resulting in a delightful texture that will have everyone coming back for seconds. Top it off with a drizzle of homemade vanilla sauce, and you have a dessert that's sure to impress.
Ingredients:
- 6 cups of stale bread, cubed (such as brioche or French bread)
- 4 large eggs
- 2 cups of whole milk
- 1 cup of heavy cream
- 3/4 cup of granulated sugar
- 1 tablespoon of vanilla extract
- 1 teaspoon of ground cinnamon
- 1/2 teaspoon of salt
- 1/2 cup of raisins (optional)
- 1/2 cup of chopped pecans or walnuts (optional)
Cooking Instructions:
- In a large mixing bowl, whisk together the eggs, milk, heavy cream, sugar, vanilla extract, cinnamon, and salt until well combined.
- Add the cubed bread to the mixture, gently folding it in until all the bread is soaked. If you're using raisins or nuts, fold them in at this stage.
- Pour the bread mixture into a greased baking dish that fits into your Instant Pot.
- Add 1 cup of water to the Instant Pot and place the trivet inside. Carefully lower the baking dish onto the trivet.
- Secure the lid and set the Instant Pot to cook on high pressure for 30 minutes.
- Once the cooking time is complete, allow for a natural release for 10 minutes before performing a quick release for any remaining pressure.
Extra Tips:
For an extra touch of flavor, consider adding a splash of bourbon or rum to the custard mixture.
You can also serve the bread pudding warm with a scoop of ice cream or a dollop of whipped cream alongside the vanilla sauce for an indulgent treat.
Be sure to store any leftovers in the refrigerator, where they can be reheated for a delicious dessert any time!
Fluffy Instant Pot Rice Pudding
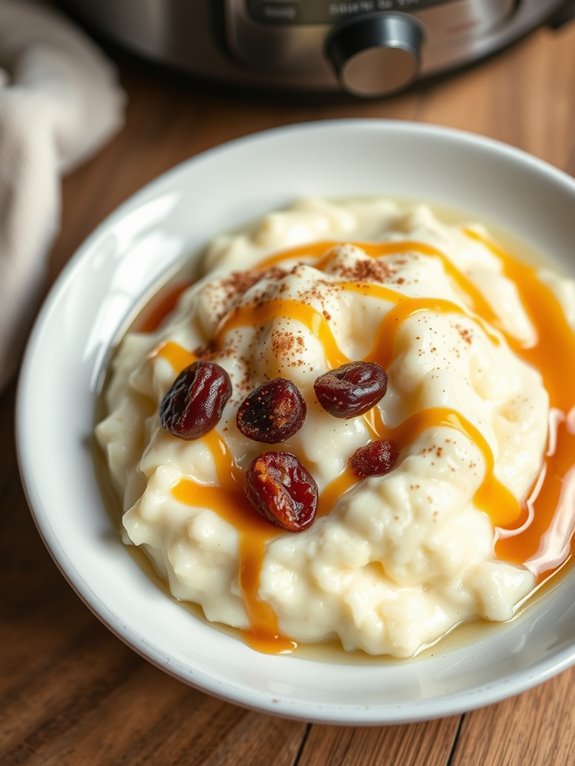
Fluffy Instant Pot Rice Pudding is a delightful dessert that combines creamy textures with a hint of sweetness, making it a perfect treat for any time of the day. This comforting dish isn't only easy to prepare, but the Instant Pot also guarantees that the rice is perfectly cooked, resulting in a fluffy and rich pudding.
Whether enjoyed warm or chilled, this rice pudding is sure to become a family favorite. The beauty of making rice pudding in the Instant Pot lies in its ability to cook the ingredients evenly and quickly. With just a few simple ingredients and minimal effort, you can create a luscious dessert that rivals traditional stovetop methods.
Serve it with a sprinkle of cinnamon or a drizzle of caramel for an extra touch of indulgence!
Ingredients:
- 1 cup Arborio rice
- 4 cups whole milk
- 1/2 cup granulated sugar
- 1/2 teaspoon salt
- 1 teaspoon vanilla extract
- 1/2 teaspoon ground cinnamon
- 1/2 cup raisins (optional)
- 2 tablespoons butter
Cooking Instructions:
- Start by rinsing the Arborio rice under cold water until the water runs clear. This step helps remove excess starch and will guarantee a fluffy texture in your pudding.
- Add the rinsed rice, whole milk, granulated sugar, salt, vanilla extract, and ground cinnamon to the Instant Pot. If you're using raisins, add them in as well. Stir the mixture to combine all the ingredients evenly.
- Close the lid of the Instant Pot and set the valve to the sealing position. Select the "Pressure Cook" or "Manual" setting and cook on high pressure for 10 minutes. Once the cooking time is complete, allow the pressure to release naturally for about 10 minutes before performing a quick release for any remaining pressure.
- Open the lid carefully, and stir in the butter until melted and well incorporated. You can adjust the consistency by adding more milk if desired. Let the pudding sit for a few minutes to thicken up before serving.
Extra Tips:
For a creamier texture, you can substitute part of the whole milk with heavy cream. Additionally, feel free to experiment with flavors by adding a splash of almond extract or a handful of toasted nuts for extra crunch.
Store any leftovers in an airtight container in the refrigerator for up to 3 days, and reheat gently on the stove or in the microwave before serving. Enjoy your delicious Fluffy Instant Pot Rice Pudding!
Delightful Lemon Blueberry Cake
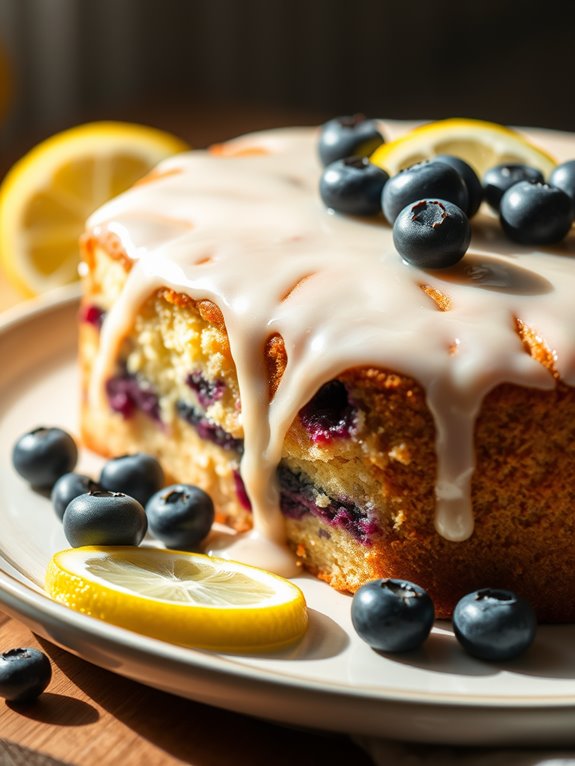
Lemon blueberry cake is a delightful treat that combines the tartness of fresh lemons with the sweetness of juicy blueberries. This cake is perfect for any occasion, whether it's a family gathering, a summer picnic, or simply indulging in a sweet dessert after dinner.
Using an Instant Pot to make this cake guarantees it's moist and flavorful while also saving time and effort compared to traditional baking methods. The unique steaming process of the Instant Pot creates an incredibly tender cake that's bursting with flavor.
With the right balance of ingredients, this lemon blueberry cake will quickly become a favorite in your dessert repertoire. Get ready to impress your family and friends with this delectable treat that's both easy to make and incredibly satisfying.
Ingredients:
- 1 ½ cups all-purpose flour
- 1 tsp baking powder
- ½ tsp baking soda
- ½ tsp salt
- ½ cup unsalted butter, softened
- 1 cup granulated sugar
- 2 large eggs
- 1 tsp vanilla extract
- 1 tbsp lemon zest
- ½ cup sour cream
- ½ cup fresh blueberries (plus extra for garnish)
- 2 tbsp lemon juice
Cooking Instructions:
Begin by greasing a 7-inch round cake pan that fits into your Instant Pot. In a medium bowl, whisk together the flour, baking powder, baking soda, and salt.
In a large mixing bowl, cream the softened butter and sugar together until light and fluffy. Add the eggs one at a time, mixing well after each addition. Stir in the vanilla extract, lemon zest, sour cream, and lemon juice until well combined.
Gradually add the dry ingredients to the wet ingredients, mixing until just combined. Gently fold in the fresh blueberries.
Pour the batter into the prepared cake pan and cover it with aluminum foil. Add 1 cup of water to the Instant Pot and place the trivet inside. Carefully lower the cake pan onto the trivet.
Close the lid, set the valve to sealing, and cook on high pressure for 35 minutes. Once the cooking time is up, allow for a natural pressure release for 10 minutes before manually releasing any remaining pressure.
Carefully remove the cake from the Instant Pot and let it cool for a few minutes before transferring it to a wire rack to cool completely.
Extra Tips:
For an added burst of flavor, consider drizzling a lemon glaze over the cooled cake made from powdered sugar and lemon juice.
If you prefer a more intense lemon flavor, feel free to increase the zest or juice to your liking. Additionally, using frozen blueberries is an option if fresh ones aren't available—just be sure to fold them into the batter gently to prevent them from breaking apart.
Enjoy your lemon blueberry cake as a delightful dessert or even as a sweet breakfast treat!
Irresistible Caramel Flan
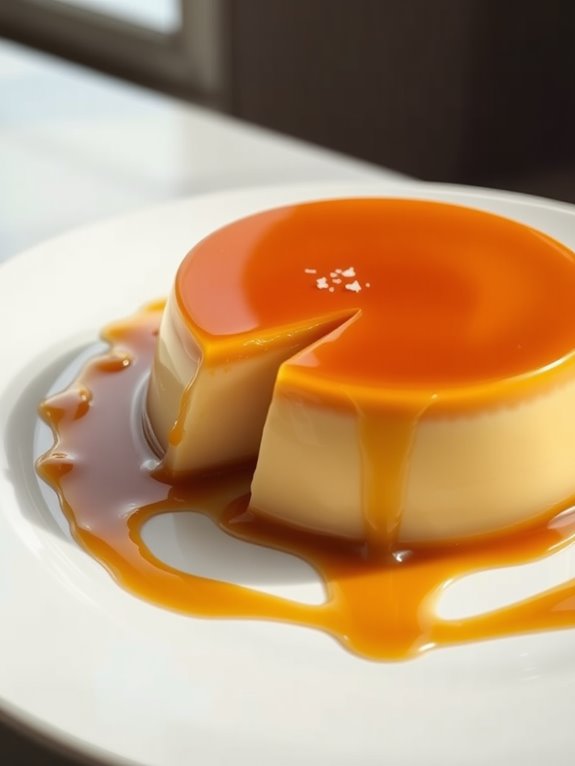
Caramel flan is a classic dessert that never fails to impress. Its silky texture and rich flavor make it a delightful treat for any occasion. The Instant Pot takes the guesswork out of the cooking process, guaranteeing that your flan is perfectly cooked and infused with the sweet, buttery flavor of caramel.
This recipe will guide you through creating an irresistible caramel flan that will become a favorite among friends and family.
The beauty of making flan in the Instant Pot is the steam cooking method, which results in a creamy and smooth dessert. With just a few simple ingredients and the push of a button, you can achieve a restaurant-quality flan right in your own kitchen. Serve it chilled, and watch as your guests savor each spoonful of this delectable treat.
Ingredients:
- 1 cup granulated sugar
- 6 large eggs
- 1 can (14 oz) sweetened condensed milk
- 1 can (12 oz) evaporated milk
- 1 tablespoon vanilla extract
- Pinch of salt
Cooking Instructions:
- Start by making the caramel. In a medium saucepan over medium heat, melt the sugar until it becomes a golden brown liquid. Carefully swirl the pan to guarantee even melting, but don't stir. Once it reaches the desired color, quickly pour the caramel into a round 7-inch cake pan, tilting to coat the bottom evenly. Allow it to cool and harden while you prepare the flan mixture.
- In a large mixing bowl, whisk together the eggs, sweetened condensed milk, evaporated milk, vanilla extract, and salt until smooth. Pour the mixture over the hardened caramel in the cake pan. Cover the pan tightly with aluminum foil.
- Pour 1 cup of water into the Instant Pot, place the trivet inside, and carefully set the cake pan on top of the trivet. Close the lid and set the valve to sealing. Cook on high pressure for 30 minutes, then allow for a natural release for 10 minutes before opening the valve to release any remaining pressure.
- Carefully remove the cake pan from the Instant Pot and let it cool to room temperature, then refrigerate for at least 4 hours or overnight before serving.
Extra Tips:
To guarantee the best results, make sure the sugar is fully melted and caramelized to a rich golden color before pouring it into the pan; this will enhance the flavor of your flan.
Additionally, for an extra touch of flavor, you can add a splash of citrus zest to the flan mixture. When serving, gently run a knife around the edges of the flan to loosen it before inverting onto a plate. Enjoy your delicious homemade caramel flan!
Heavenly Instant Pot Tiramisu

Indulging in a luscious tiramisu has never been easier than with the Instant Pot! This rich and creamy dessert combines layers of coffee-soaked ladyfingers, a velvety mascarpone filling, and a dusting of cocoa powder, all prepared in a fraction of the time it would take using traditional methods.
The Instant Pot not only speeds up the cooking process but also guarantees a beautifully moist and flavorful result, making it the perfect choice for a dinner party or a special treat at home.
This heavenly Instant Pot tiramisu isn't only delicious but also customizable. You can easily adjust the coffee strength, add a splash of your favorite liqueur, or even incorporate different flavors such as hazelnut or chocolate. With just a few simple ingredients, you can create a dessert that rivals any restaurant's offering.
Ready to impress your guests or satisfy your sweet tooth? Let's plunge into the recipe!
Ingredients:
- 1 cup strong brewed coffee, cooled
- 2 tablespoons coffee liqueur (optional)
- 8 ounces mascarpone cheese
- 1 cup heavy whipping cream
- 1/2 cup granulated sugar
- 1 teaspoon vanilla extract
- 24 ladyfinger cookies
- Unsweetened cocoa powder, for dusting
Cooking Instructions:
- In a mixing bowl, combine the cooled coffee and coffee liqueur (if using) and set aside. In another bowl, whisk together the mascarpone cheese, heavy whipping cream, sugar, and vanilla extract until smooth and creamy. Be careful not to overwhip the cream; it should be thick but still spreadable.
- Quickly dip each ladyfinger into the coffee mixture for about 1 second, making sure they're soaked but not soggy. Layer half of the soaked ladyfingers in the bottom of a greased 7-inch round cake pan or a silicone mold. Spread half of the mascarpone mixture over the ladyfingers. Repeat with the remaining ladyfingers and mascarpone mixture, smoothing the top with a spatula. Cover the pan tightly with foil.
- Pour 1 cup of water into the Instant Pot and place the trivet inside. Carefully lower the cake pan onto the trivet. Close the lid and set the valve to sealing. Cook on high pressure for 30 minutes, then allow for a natural release for 10 minutes before releasing any remaining pressure. Carefully remove the cake pan from the Instant Pot and let it cool to room temperature, then refrigerate for at least 4 hours or overnight. Before serving, dust the top with cocoa powder.
Extra Tips:
For the best results, allow the tiramisu to chill overnight. This will enhance the flavors and guarantee that the dessert is properly set.
If you can, use high-quality mascarpone cheese for a richer taste. You can also add a layer of chocolate shavings or grated chocolate on top for a delightful twist. Enjoy your homemade Instant Pot tiramisu!
Mouthwatering Chocolate Chip Cookie Cake

Indulge in the delightful decadence of a Mouthwatering Chocolate Chip Cookie Cake, effortlessly prepared in your Instant Pot. This recipe combines the rich flavors of classic chocolate chip cookies into a moist, cake-like treat that will satisfy your sweet tooth.
Perfect for celebrations, gatherings, or simply a cozy night at home, this dessert is sure to impress friends and family alike. The Instant Pot makes baking a breeze, allowing you to create this sumptuous cake with minimal fuss.
The steam from the pot keeps the cake incredibly moist, while the chocolate chips melt beautifully, creating a gooey, delightful texture. Serve it warm with a scoop of vanilla ice cream or a drizzle of chocolate sauce for an extra special touch.
Ingredients:
- 1 cup unsalted butter, softened
- 1 cup brown sugar, packed
- 1/2 cup granulated sugar
- 2 large eggs
- 2 teaspoons vanilla extract
- 3 cups all-purpose flour
- 1 teaspoon baking soda
- 1/2 teaspoon salt
- 2 cups chocolate chips
Cooking Instructions:
In a large mixing bowl, cream together the softened butter, brown sugar, and granulated sugar until smooth and fluffy.
Add the eggs one at a time, mixing well after each addition, and then stir in the vanilla extract. In another bowl, whisk together the flour, baking soda, and salt. Gradually add the dry ingredients to the wet mixture, mixing until just combined.
Fold in the chocolate chips.
Grease a 7-inch round cake pan that fits inside your Instant Pot. Pour the batter into the prepared pan, smoothing the top. Add 1 cup of water to the Instant Pot's inner pot and place the trivet inside.
Carefully set the cake pan on the trivet. Close the lid and set the valve to sealing. Cook on high pressure for 40 minutes, then allow for a natural release for 10 minutes before opening the valve to release any remaining pressure.
Once done, carefully remove the cake from the pot and let it cool for a few minutes before serving.
Extra Tips:
To enhance the flavor of your Chocolate Chip Cookie Cake, consider adding a pinch of cinnamon or a sprinkle of sea salt on top before cooking.
If you want to mix things up, you can substitute half of the chocolate chips with nuts or dried fruits for added texture and flavor. Additionally, ensuring that your ingredients are at room temperature will help create a smoother batter and a more evenly baked cake.
Enjoy your delicious creation!
Frequently Asked Questions
Can I Use Gluten-Free Flour in These Dessert Recipes?
Did you know that about 1 in 100 people have celiac disease? You can definitely use gluten-free flour in these dessert recipes. Just make certain it's a blend suitable for baking, and you'll be set!
How Do I Adjust Cooking Times for High Altitude?
To adjust cooking times for high altitude, you'll need to increase the cooking time by about 5 to 10 percent. Keep an eye on your dish, as different recipes may require slight adjustments.
Are These Recipes Suitable for Vegan Diets?
You'll find these recipes are as versatile as a magician's hat! While some ingredients aren't vegan, you can easily swap them for plant-based alternatives, making delicious desserts that fit your vegan diet perfectly.
What Can I Substitute for Dairy in These Desserts?
You can substitute dairy with almond milk, coconut cream, or cashew yogurt. For butter, try coconut oil or vegan margarine. Experimenting with these alternatives will help you create delicious desserts without compromising flavor or texture.
How Should I Store Leftovers From These Desserts?
You should store leftover desserts in airtight containers to keep them fresh. Refrigerate them for up to a week, or freeze for longer storage. Just remember to label and date each container for easy access!