As an affiliate, we may earn a commission from qualifying purchases. We get commissions for purchases made through links on this website from Amazon and other third parties.
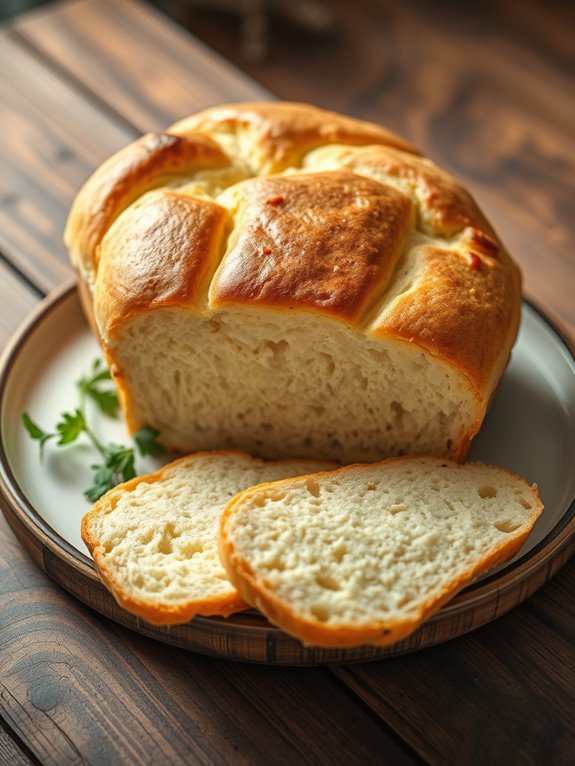
If you've ever wanted to bake bread without the fuss of kneading, you're in luck. These 10 easy no-knead bread recipes are perfect for your cast iron baking needs. With minimal effort, you can create a variety of delicious loaves, each boasting a crispy crust and a soft interior. Whether you prefer classic flavors or something adventurous, there's a recipe here that'll pique your interest and inspire your next baking session.
Key Takeaways
- Classic No-Knead Artisan Bread is perfect for cast iron baking, yielding a crusty loaf with minimal effort.
- Use a preheated Dutch oven for best results in achieving a golden crust and soft interior.
- Experiment with savory flavors like Herbed Garlic or Cheddar and Chive for variety in your cast iron baking.
- Sweet options like Cinnamon Raisin or Lemon and Thyme offer delightful twists for breakfast or snacks.
- Follow general baking instructions, ensuring proper rising time for optimal texture and flavor in cast iron.
Classic No-Knead Artisan Bread
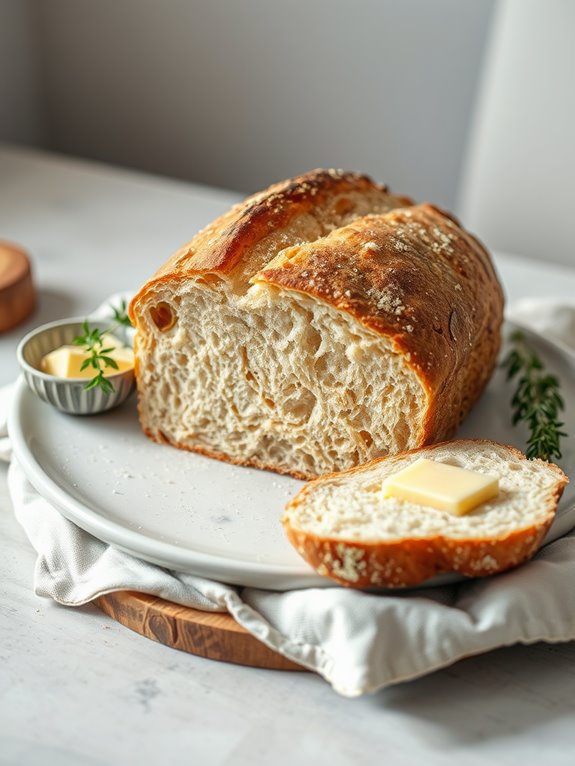
Classic No-Knead Artisan Bread is a simple yet rewarding recipe that yields a deliciously crusty loaf with a soft interior. This method requires minimal hands-on time, relying on a long fermentation process to develop flavor and texture. You can enjoy this bread fresh out of the oven or use it for sandwiches, toasts, or simply with a smear of butter.
The beauty of this no-knead recipe lies in its simplicity and the few ingredients used. With just a bit of planning, you can have homemade artisan bread that rivals those found in bakeries. The dough is incredibly versatile, allowing you to experiment with different add-ins like herbs, cheese, or dried fruit for added flavor.
Ingredients:
- 3 cups all-purpose flour
- 1 ½ teaspoons salt
- ½ teaspoon instant yeast
- 1 ½ cups warm water
To begin, in a large mixing bowl, combine the flour, salt, and instant yeast. Stir the dry ingredients together until well mixed. Gradually add the warm water, mixing until no dry flour remains and a shaggy dough forms.
Cover the bowl with plastic wrap or a clean kitchen towel and let it sit at room temperature for 12 to 18 hours, or until the surface is bubbly and the dough has doubled in size.
After the fermentation period, generously flour your work surface and turn the dough out onto it. Sprinkle a bit of flour on top of the dough and gently fold it over itself a couple of times to shape it into a ball.
Let it rest for about 15 minutes while you prepare your baking vessel. Place a Dutch oven (with the lid) in the oven and preheat it to 450°F (232°C).
Once heated, carefully remove the Dutch oven, place the dough inside (you can line it with parchment paper for easy removal), cover with the lid, and bake for 30 minutes.
After 30 minutes, remove the lid and bake for an additional 15-20 minutes, or until the bread is golden brown and crusty. Let cool on a wire rack before slicing.
Extra Tips: For the best texture and flavor, use a high-quality flour and confirm your water is at the right temperature (around 110°F or 43°C).
If you want to add flavor, consider incorporating herbs or spices into the dry ingredients. Additionally, allow your bread to cool completely before slicing to maintain its structure and prevent it from becoming gummy.
Enjoy your homemade artisan bread!
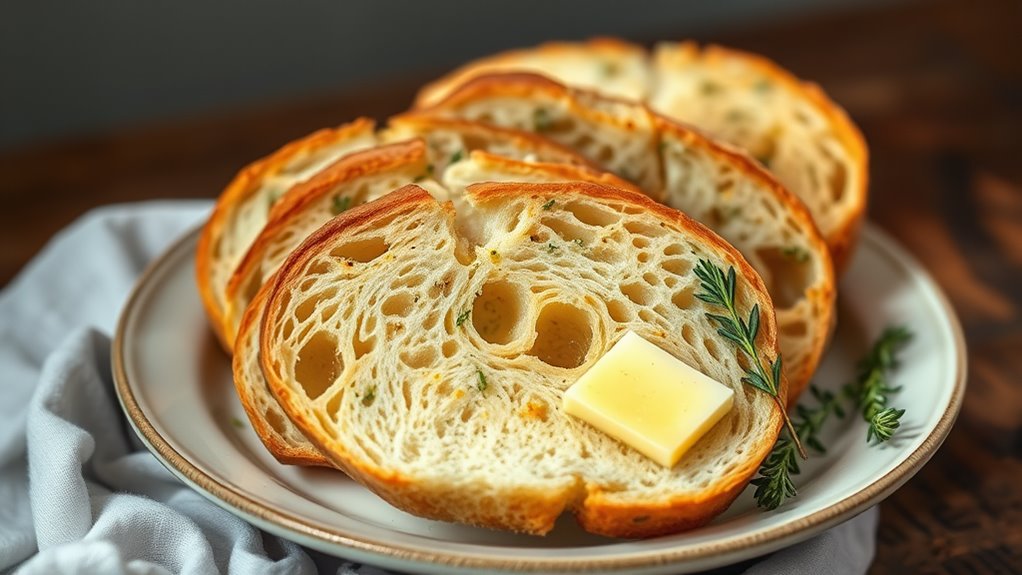
Herbed Garlic No-Knead Bread
Herbed Garlic No-Knead Bread is a delightful and aromatic addition to any meal. This bread is perfect for those who enjoy the rich flavors of garlic and herbs, making it an ideal side dish for pasta, soups, or simply enjoyed with butter. The beauty of this recipe lies in its simplicity; with minimal effort and time, you can create a crusty loaf with a soft, flavorful interior.
The no-knead method allows the dough to develop flavor as it rises slowly, resulting in a bread that's both easy to make and delicious. By infusing the dough with garlic and herbs, you elevate the traditional no-knead bread to a new level. Get ready to impress your family and friends with this homemade bread that will fill your kitchen with a wonderful aroma.
Ingredients:
- 3 cups all-purpose flour
- 1 1/2 teaspoons salt
- 1/2 teaspoon instant yeast
- 1 1/4 cups warm water (about 110°F)
- 4 cloves garlic, minced
- 2 tablespoons fresh parsley, chopped
- 1 tablespoon fresh rosemary, chopped
- 1 tablespoon fresh thyme, chopped
- Extra flour for dusting
Cooking Instructions:
In a large mixing bowl, combine the flour, salt, and instant yeast. Whisk together until well combined. Add the warm water, minced garlic, and chopped herbs to the dry ingredients, stirring with a wooden spoon or spatula until a shaggy dough forms. The dough should be wet and sticky.
Cover the bowl with plastic wrap or a kitchen towel and let it rise at room temperature for 12 to 18 hours, or until the surface is dotted with bubbles and the dough has doubled in size.
Once the dough has risen, generously flour a clean surface and turn the dough out onto it. With floured hands, shape the dough into a ball, folding it over itself a few times. Place the dough onto a sheet of parchment paper and cover with a kitchen towel.
Let it rest for another 1 to 2 hours while you preheat your oven to 450°F (230°C). Place a Dutch oven (or heavy pot with a lid) in the oven while it preheats. When the oven is ready, carefully remove the hot pot, lift the parchment paper with the dough, and place it inside the pot.
Cover with the lid and bake for 30 minutes. Remove the lid and bake for an additional 15-20 minutes, or until the bread is golden brown and sounds hollow when tapped on the bottom. Let cool on a wire rack before slicing.
Extra Tips:
For the best flavor, consider using fresh herbs as dried herbs may not provide the same vibrant taste. Additionally, feel free to experiment with different herb combinations or add grated cheese for an extra layer of flavor.
Confirm your dough is wet enough to create a soft crumb, and don't skip the long fermentation time, as it's essential for developing the bread's unique taste and texture. Enjoy your Herbed Garlic No-Knead Bread fresh out of the oven for the best experience!
Cheddar and Chive No-Knead Bread

Cheddar and Chive No-Knead Bread is a delightful twist on the classic no-knead bread recipe, adding a savory flavor that makes it perfect for any meal or as a snack on its own. The combination of sharp cheddar cheese and fresh chives creates a rich, aromatic bread that's sure to impress your family and friends.
Plus, this recipe is incredibly simple, requiring just a few ingredients and minimal effort, making it an excellent choice for both novice and experienced bakers alike. This bread is ideal for serving alongside soups, salads, or as a base for sandwiches. Its crispy crust and soft interior make it a wonderful addition to your homemade bread repertoire.
With a little patience for the dough to rise and develop flavor, you'll be rewarded with a delicious loaf that fills your kitchen with an irresistible aroma. Let's get started!
Ingredients:
- 3 cups all-purpose flour
- 1 1/2 teaspoons salt
- 1/2 teaspoon instant yeast
- 1 1/2 cups room temperature water
- 1 cup shredded sharp cheddar cheese
- 1/4 cup chopped fresh chives
Instructions:
In a large mixing bowl, combine the flour, salt, and instant yeast. Stir in the water until a shaggy dough forms.
Next, fold in the shredded cheddar cheese and chopped chives until evenly distributed. Cover the bowl with plastic wrap or a damp kitchen towel and let the dough rise at room temperature for 12 to 18 hours, or until it has doubled in size and is bubbly on the surface.
Once the dough has risen, preheat your oven to 450°F (230°C). Place a Dutch oven (with its lid) inside the oven to heat for about 30 minutes.
While the Dutch oven is heating, turn the dough out onto a well-floured surface and shape it into a ball. Let it rest for about 30 minutes.
Carefully remove the hot Dutch oven from the oven, place the dough inside, and cover with the lid. Bake for 30 minutes, then remove the lid and bake for an additional 15-20 minutes, or until the bread is golden brown and sounds hollow when tapped on the bottom.
Allow the bread to cool on a wire rack before slicing.
Extra Tips:
To enhance the flavor of your Cheddar and Chive No-Knead Bread even further, consider adding a pinch of garlic powder or some crushed red pepper flakes to the dough.
This bread can also be stored in an airtight container for a couple of days at room temperature, or you can freeze it for longer storage. Just make sure to wrap it tightly in plastic wrap before freezing. Enjoy your baking!
Whole Wheat No-Knead Bread
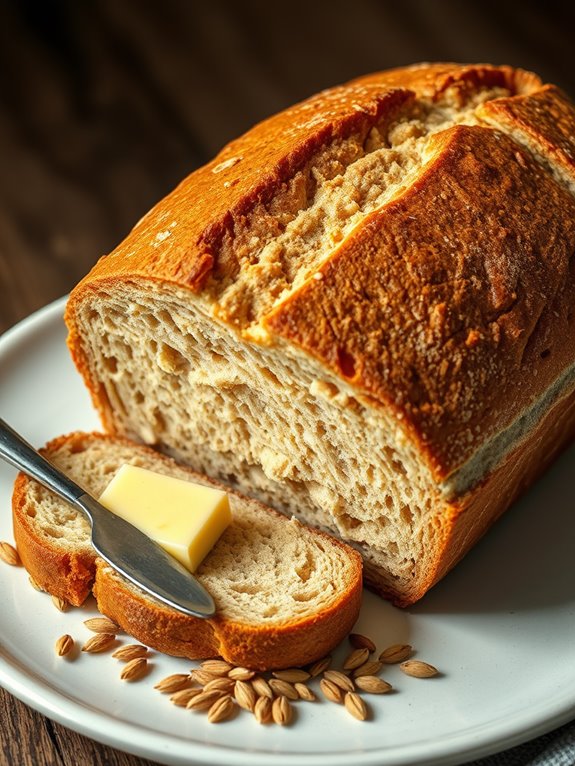
Whole Wheat No-Knead Bread is a wonderfully simple and rewarding recipe for those who want to enjoy the wholesome flavor of whole grain bread without the hassle of kneading. This method relies on a long fermentation process, allowing the dough to develop flavor and texture naturally. The result is a crusty, artisan-style bread that's perfect for sandwiches, toasting, or simply enjoying with a pat of butter.
The beauty of no-knead bread lies in its simplicity. You can prepare the dough in just a few minutes, and the long rise time does all the hard work for you. With a few basic ingredients and some patience, you'll have a delicious loaf of whole wheat bread that's sure to impress your family and friends.
Ingredients:
- 3 cups whole wheat flour
- 1 ½ teaspoons salt
- ½ teaspoon instant yeast
- 1 ½ cups warm water (about 110°F)
Instructions:
In a large mixing bowl, combine the whole wheat flour, salt, and instant yeast. Stir the dry ingredients together until well mixed. Gradually add the warm water, stirring with a wooden spoon or spatula until a shaggy dough forms. The dough will be sticky and wet, which is normal.
Cover the bowl with plastic wrap or a clean kitchen towel and let it sit at room temperature for 12 to 18 hours, or until the surface is dotted with bubbles and the dough has doubled in size.
After the initial rise, lightly flour a clean surface and turn the dough out onto it. Fold the dough over itself a few times to shape it into a ball, then let it rest for about 15 minutes.
Meanwhile, preheat your oven to 450°F (230°C) and place a Dutch oven (with lid) inside to heat up for about 30 minutes. Once heated, carefully remove the Dutch oven, and transfer the dough into it. Cover with the lid and bake for 30 minutes.
After 30 minutes, remove the lid and bake for an additional 15-20 minutes, or until the bread is golden brown and sounds hollow when tapped. Let cool on a wire rack before slicing.
Extra Tips:
For the best results, make certain that your dough is adequately hydrated and that you give it plenty of time to rise. A longer fermentation will enhance the flavor of the bread, so don't rush the process.
Additionally, if you prefer a lighter texture, you can mix in some all-purpose flour with the whole wheat flour, or experiment with adding seeds or nuts for extra flavor and nutrition. Enjoy your baking!
Olive and Rosemary No-Knead Bread
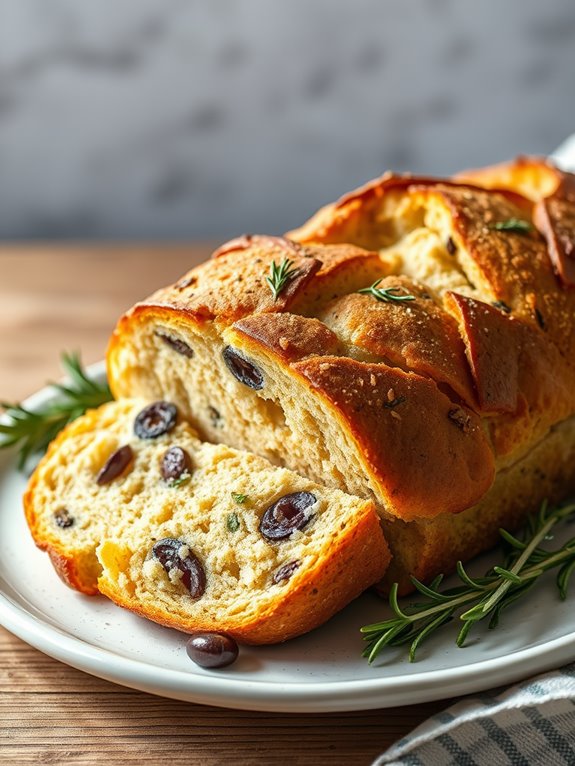
Olive and Rosemary No-Knead Bread is a delightful artisan loaf that infuses the rich flavors of savory olives and aromatic rosemary into a simple, rustic bread. The beauty of this recipe lies in its minimal hands-on time; the dough requires no kneading and relies on a long fermentation process to develop flavor and texture.
Perfect for accompanying meals or enjoying as a snack, this bread can easily become a staple in your baking repertoire. This bread isn't only delicious but also versatile. You can customize it by using different types of olives or adding other herbs and spices to suit your taste.
Whether served warm with olive oil for dipping or toasted for breakfast, Olive and Rosemary No-Knead Bread is sure to impress your family and friends while keeping your kitchen process simple and enjoyable.
Ingredients:
- 3 cups all-purpose flour
- 1 ½ teaspoons salt
- ½ teaspoon instant yeast
- 1 ½ cups warm water
- 1 cup pitted olives, chopped (green or black)
- 2 tablespoons fresh rosemary, chopped (or 1 tablespoon dried rosemary)
Cooking Instructions:
In a large mixing bowl, combine the flour, salt, and instant yeast. Stir in the warm water until the mixture forms a shaggy dough. Gently fold in the chopped olives and rosemary, making sure they're evenly distributed throughout the dough.
Cover the bowl with plastic wrap or a clean kitchen towel and let it sit at room temperature for 12 to 18 hours, until the surface is bubbly and the dough has risen considerably.
After the resting period, generously flour a clean work surface and turn the dough out onto it. With floured hands, shape the dough into a ball, tucking the edges underneath. Place the dough seam-side down on a piece of parchment paper. Cover with a clean towel and let it rise for another 1 to 2 hours.
Meanwhile, preheat your oven to 450°F (230°C) and place a Dutch oven (with the lid) inside to heat up. Once the dough has risen, carefully remove the hot Dutch oven, lift the parchment paper with the dough, and transfer it into the pot. Cover with the lid and bake for 30 minutes.
Remove the lid and bake for an additional 15-20 minutes, until the bread is golden brown and crusty. Let it cool on a wire rack before slicing.
Extra Tips:
For best results, make sure that you measure your flour accurately and resist the urge to add more flour during the mixing process; the dough should be sticky.
If you want to enhance the flavor further, consider brushing the top of the loaf with olive oil before baking or sprinkling some sea salt on top. This no-knead bread can be stored in a paper bag at room temperature for up to three days, or you can freeze it for longer storage.
Enjoy your homemade Olive and Rosemary No-Knead Bread!
Sweet Cinnamon Raisin No-Knead Bread

Sweet Cinnamon Raisin No-Knead Bread is a delightful twist on traditional no-knead bread, infused with the warm flavors of cinnamon and the sweetness of plump raisins. This easy-to-make bread requires minimal effort, allowing you to enjoy freshly baked bread without the need for extensive kneading or complicated techniques. Perfect for breakfast, snacks, or as a dessert, this flavorful loaf is sure to become a favorite in your household.
With a crusty exterior and a soft, chewy interior, this Sweet Cinnamon Raisin No-Knead Bread will fill your kitchen with an irresistible aroma as it bakes. The simplicity of the method means you can prepare the dough and let it rise while you go about your day, making it a wonderful option for busy schedules. So grab your mixing bowl and let's get started on this delicious, comforting bread!
Ingredients:
- 3 cups all-purpose flour
- 1 ½ teaspoons salt
- ½ teaspoon instant yeast
- 1 ½ teaspoons ground cinnamon
- 1 cup raisins
- 1 ½ cups water (room temperature)
Cooking Instructions:
In a large mixing bowl, combine the all-purpose flour, salt, instant yeast, ground cinnamon, and raisins. Stir until the dry ingredients are well mixed.
Next, add the room temperature water and mix until a shaggy dough forms. Cover the bowl with plastic wrap or a clean kitchen towel and let it rise at room temperature for 12 to 18 hours, or until the surface is dotted with bubbles and the dough has doubled in size.
Once the dough has risen, generously flour a clean work surface and turn the dough out onto it. With floured hands, shape the dough into a ball, being careful not to deflate it too much. Let it rest for about 15 minutes.
Meanwhile, preheat your oven to 450°F (230°C) and place a Dutch oven (with its lid) inside to heat up for 30 minutes. After the resting period, carefully remove the hot Dutch oven from the oven, transfer the dough inside (you may need to use parchment paper for ease), cover it with the lid, and bake for 30 minutes.
Then remove the lid and bake for an additional 15-20 minutes, or until the bread is golden brown and sounds hollow when tapped.
Extra Tips:
For the best flavor and texture, allow the bread to cool completely on a wire rack before slicing. This will help the interior set properly and prevent it from becoming gummy.
Additionally, feel free to personalize the recipe by adding nuts or other dried fruits along with the raisins for an extra layer of flavor and texture. Enjoy your homemade Sweet Cinnamon Raisin No-Knead Bread!
Beer Bread With No-Knead Method
The beauty of no-knead bread lies in the simplicity of the process. With just a few basic ingredients and some patience as the dough rises, you can create a delicious loaf that will impress your family and friends. The carbonation in the beer helps the bread rise, resulting in a light and airy texture. Let's explore the recipe!
Ingredients:
- 3 cups all-purpose flour
- 1 tablespoon sugar
- 1 teaspoon salt
- 1 tablespoon baking powder
- 1 bottle (12 oz) beer (your choice)
- 1/4 cup melted butter (optional for brushing)
Instructions:
In a large mixing bowl, whisk together the flour, sugar, salt, and baking powder until well combined. Pour in the beer and stir with a wooden spoon or spatula until a sticky dough forms. The dough will be shaggy and may seem wet, but that's perfectly fine.
Cover the bowl with plastic wrap or a clean kitchen towel and let it rise at room temperature for 1 to 2 hours, or until the dough has doubled in size.
Once the dough has risen, preheat your oven to 375°F (190°C). Lightly flour a clean surface and turn out the dough, which will be sticky, onto the floured surface. Shape it gently into a round loaf without kneading it.
Transfer the loaf to a greased or parchment-lined baking sheet. Optionally, brush the top with melted butter for added flavor and a golden crust. Bake for 30-35 minutes or until the bread is golden brown and sounds hollow when tapped on the bottom. Allow the bread to cool on a wire rack before slicing.
Extra Tips:
To enhance the flavor of your beer bread, experiment with different types of beer—lagers, ales, and stouts all impart unique tastes to the final product.
Additionally, feel free to mix in herbs, cheese, or spices to customize the loaf to your liking. If you want to prepare the dough in advance, it can be refrigerated after mixing for up to 12 hours; just allow it to come to room temperature and rise before baking.
Enjoy your homemade beer bread fresh for the best flavor, but it can also be stored in an airtight container for a few days.
Rustic Rye No-Knead Bread

Baking rustic rye no-knead bread is a delightful way to enjoy the deep, earthy flavors of rye flour combined with the simplicity of a no-knead method. This bread has a hearty texture and a slightly tangy taste that pairs wonderfully with soups, stews, or cheese platters.
The long fermentation process allows the flavors to develop without the need for extensive labor, making it perfect for both novice and experienced bakers. This recipe requires some patience, as the dough will need to rise for an extended period, but the result is well worth the wait.
You'll be rewarded with a crusty exterior and a soft, flavorful interior. With minimal hands-on time, you can enjoy the smell of freshly baked bread wafting through your home while you attend to other tasks.
Ingredients:
- 1 ½ cups all-purpose flour
- 1 ½ cups rye flour
- 1 ½ teaspoons salt
- ½ teaspoon instant yeast
- 2 cups warm water (about 110°F)
Instructions:
In a large mixing bowl, combine the all-purpose flour, rye flour, salt, and instant yeast. Gradually add the warm water, mixing with a wooden spoon or your hands until the mixture is well combined and forms a sticky dough.
The dough will be quite wet; this is normal for no-knead bread. Cover the bowl with plastic wrap or a clean kitchen towel and let it rise at room temperature for 12 to 18 hours, or until the surface is bubbly and the dough has doubled in size.
After the dough has risen, generously flour a clean work surface and turn the dough out onto it. With floured hands, gently shape the dough into a ball, being careful not to deflate it too much.
Place the dough seam side down on a piece of parchment paper. Cover it with a kitchen towel and let it rest for about 30 minutes while you preheat your oven to 450°F (232°C). Place a Dutch oven (with the lid) in the oven to heat up as well.
Once preheated, carefully remove the hot Dutch oven, remove the lid, and lift the parchment paper with the dough into the pot. Cover with the lid and bake for 30 minutes. Then, remove the lid and bake for an additional 15-20 minutes, or until the bread is golden brown and sounds hollow when tapped on the bottom.
Allow the bread to cool on a wire rack before slicing.
Extra Tips:
For added depth of flavor, consider incorporating seeds such as caraway or fennel into the dough. If you prefer a tangier flavor, you can also add a tablespoon of sourdough starter to the mixture during the initial mixing.
It's important to let the bread cool completely before slicing; this allows the texture to set properly. Enjoy your homemade rustic rye no-knead bread with butter, jam, or your favorite spreads!
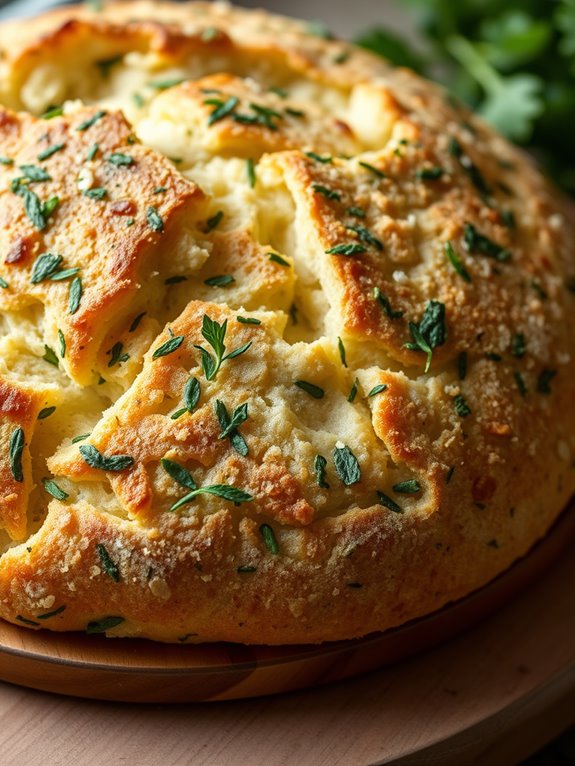
Sun-Dried Tomato and Basil No-Knead Bread

Sun-Dried Tomato and Basil No-Knead Bread is a delightful twist on the classic no-knead recipe, perfect for those looking to enhance their homemade bread with rich flavors. This bread isn't only simple to make but also requires minimal effort, allowing the ingredients to come together beautifully as they rest.
The combination of sun-dried tomatoes and fresh basil creates a fragrant and savory loaf that pairs well with soups, salads, or simply enjoyed on its own with a drizzle of olive oil. This bread relies on a long fermentation process to develop its flavor and texture, resulting in a crusty exterior and a soft, airy interior.
The best part is that there's no need for extensive kneading or special equipment—just a bowl, a spoon, and a bit of patience. With a little planning, you can have a delicious loaf of sun-dried tomato and basil no-knead bread ready to impress your family or guests.
Ingredients:
- 3 cups all-purpose flour
- 1 ½ teaspoons salt
- ½ teaspoon active dry yeast
- 1 ½ cups water (room temperature)
- 1 cup sun-dried tomatoes (packed in oil, drained and chopped)
- ¼ cup fresh basil leaves (chopped)
- Extra flour for dusting
Cooking Instructions:
In a large mixing bowl, combine the flour, salt, and active dry yeast. Stir in the room temperature water until just mixed, ensuring there are no dry patches of flour.
Add the chopped sun-dried tomatoes and basil to the dough, mixing gently to distribute them evenly. Cover the bowl with plastic wrap or a damp kitchen towel and let it rest at room temperature for 12 to 18 hours, or until the surface is bubbly and the dough has doubled in size.
After the resting period, generously flour a clean surface and turn the dough out onto it. With floured hands, shape the dough into a ball, being careful not to deflate it too much.
Place the dough seam side down on a well-floured piece of parchment paper, cover it with a kitchen towel, and let it rest for another 30 minutes. Meanwhile, preheat your oven to 450°F (230°C) and place a Dutch oven (with its lid) inside to heat up.
Once preheated, carefully remove the Dutch oven, lift the parchment paper with the dough, and place it inside. Cover with the lid and bake for 30 minutes. After 30 minutes, remove the lid and bake for an additional 15-20 minutes, or until the bread is golden brown and sounds hollow when tapped on the bottom.
Let it cool on a wire rack before slicing.
Extra Tips:
To achieve the best results, be sure to use fresh basil and high-quality sun-dried tomatoes for maximum flavor. If you prefer a lighter taste, you can also experiment with reducing the amount of sun-dried tomatoes.
Additionally, this dough can be made ahead and stored in the refrigerator for up to 3 days, allowing you to enjoy fresh bread throughout the week. Just remember to bring it to room temperature before baking for ideal rise and texture!
Lemon and Thyme No-Knead Bread

Lemon and thyme no-knead bread is a delightful twist on traditional no-knead bread, infusing your loaf with bright citrusy notes and the earthy aroma of fresh thyme. This easy-to-make bread requires minimal effort, allowing the flavors to develop overnight. Perfect for serving alongside soups, salads, or simply with a pat of butter, this bread will impress your family and friends with its rustic charm and delicious taste.
The beauty of no-knead bread lies in its simplicity. With just a bit of planning, you can create a crusty, flavorful loaf that looks like it came straight from a gourmet bakery. The addition of lemon and thyme elevates the bread, making it a versatile option for any meal or occasion. Gather your ingredients and get ready to enjoy the fragrant aroma of freshly baked bread wafting through your kitchen.
Ingredients:
- 3 cups all-purpose flour
- 1 1/2 teaspoons salt
- 1/2 teaspoon instant yeast
- 1 1/4 cups warm water (about 110°F)
- Zest of 1 lemon
- 2 tablespoons fresh thyme leaves (or 1 tablespoon dried thyme)
- Additional flour for dusting
Cooking Instructions:
In a large mixing bowl, combine the flour, salt, yeast, lemon zest, and thyme. Stir until all the dry ingredients are well incorporated.
Pour in the warm water and mix with a wooden spoon or your hand until a shaggy dough forms. The dough will be sticky and shaggy, which is perfectly fine. Cover the bowl with plastic wrap or a clean kitchen towel and let it rest at room temperature for 12 to 18 hours, until the surface is bubbly and the dough has doubled in size.
Once the dough has risen, generously flour a clean surface and turn the dough out onto it. Sprinkle the top with a little more flour and fold the dough over itself a couple of times to shape it into a rough ball.
Let it rest for about 30 minutes while you preheat your oven to 450°F (230°C). Place a Dutch oven (or another heavy pot with a lid) in the oven as it preheats. When ready, carefully remove the pot, place the dough inside (you can add parchment paper for easier removal), cover it with the lid, and bake for 30 minutes.
Remove the lid and bake for an additional 15-20 minutes, or until the bread is golden brown and crusty. Let it cool on a wire rack before slicing.
Extra Tips:
For an extra burst of flavor, try adding a sprinkle of sea salt on top of the dough before baking.
If you don't have fresh thyme, dried thyme works well, though the flavor will be slightly different. This bread can be stored in an airtight container for a few days, but it's best enjoyed fresh on the day it's baked.
If you want to make it ahead of time, you can shape it and refrigerate it for up to 3 days before baking. Happy baking!
Frequently Asked Questions
Can I Use a Different Type of Flour?
Absolutely, you can use different types of flour! Each flour brings unique flavors and textures, but some might surprise you. Experiment a little, and you'll discover the perfect blend that suits your taste just right!
How Long Can I Store No-Knead Bread?
You can store no-knead bread at room temperature for up to three days in a paper bag. If you want it fresh longer, freeze it for up to three months, wrapped tightly to prevent freezer burn.
Can I Freeze No-Knead Bread?
Yes, you can freeze no-knead bread! Just let it cool completely, wrap it tightly in plastic wrap, and then place it in an airtight container or freezer bag. It'll stay fresh for up to three months.
What Size Cast Iron Pot Is Best?
For ideal results, you'll want a cast iron pot between 5 to 7 quarts. This size guarantees enough space for the dough to rise while maintaining even heat distribution during baking. Enjoy your bread-making adventure!
How Can I Make Gluten-Free No-Knead Bread?
You can make gluten-free no-knead bread by using a blend of gluten-free flours, adding xanthan gum for texture, and mixing with water and yeast. Let it rise, then bake in a preheated pot for a crusty loaf.