As an affiliate, we may earn a commission from qualifying purchases. We get commissions for purchases made through links on this website from Amazon and other third parties.
If you're looking to create healthy meals with minimal cleanup, cast iron skillets are your best friend. These nine Weight Watchers-friendly recipes not only highlight nutritious ingredients but also promise great flavor. Whether you want a hearty frittata for breakfast or a savory shrimp and zucchini dinner, there's something here for everyone. Let's explore these simple yet satisfying dishes that can help you stay on track with your goals while enjoying delicious food.
Key Takeaways
- Skillet Veggie Frittata offers a versatile, low-calorie option packed with protein, making it ideal for Weight Watchers meal plans.
- Quinoa and Black Bean Stir-Fry is rich in fiber and protein, perfect for meal prep and maintaining a healthy diet.
- Shrimp and Zucchini Noodles provide a quick, low-calorie meal with customizable flavors to fit within Weight Watchers guidelines.
- Mediterranean Chickpea Salad is high in protein and fiber, making it a nutritious side or meal prep option for Weight Watchers.
- Sweet Potato Hash with Eggs combines nutritious ingredients in one skillet, supporting a balanced diet within Weight Watchers-friendly recipes.
Skillet Veggie Frittata
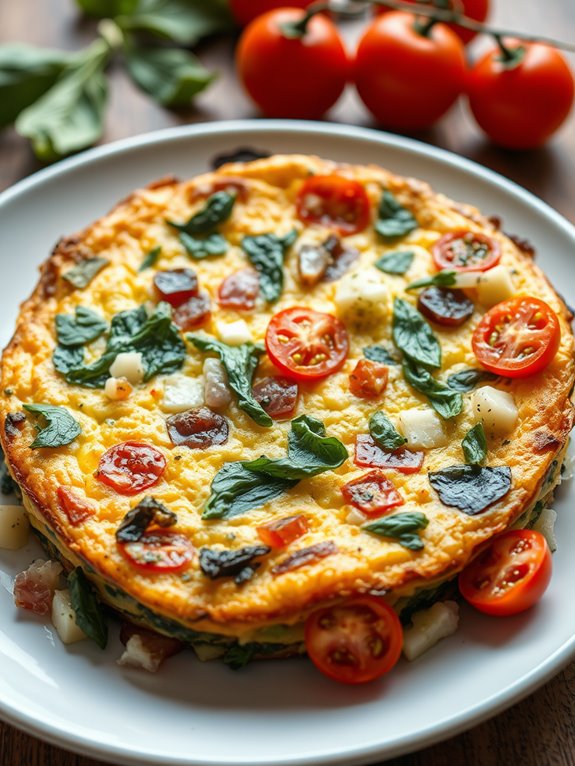
This recipe is versatile, allowing you to use any vegetables you have on hand. Spinach, bell peppers, tomatoes, and onions work wonderfully, but feel free to get creative with your seasonal favorites.
Serve it warm or at room temperature, and watch as it becomes a family favorite.
Ingredients:
- 6 large eggs
- 1 cup spinach, chopped
- 1 medium bell pepper, diced
- 1 small onion, diced
- 1 cup cherry tomatoes, halved
- 1/2 cup low-fat cheese, shredded (e.g., mozzarella or cheddar)
- Salt and pepper, to taste
- 1 tablespoon olive oil
- Fresh herbs (e.g., basil or parsley) for garnish (optional)
Cooking Instructions:
- Preheat your oven to 375°F (190°C). In a large bowl, whisk together the eggs, salt, and pepper until well combined.
- Stir in the chopped spinach, diced bell pepper, onion, cherry tomatoes, and shredded cheese.
- Heat the olive oil in a cast iron skillet over medium heat. Once the oil is hot, pour in the egg and vegetable mixture.
- Cook for about 5-7 minutes, gently stirring the edges with a spatula to prevent sticking.
- Once the edges are set, transfer the skillet to the preheated oven and bake for an additional 15-20 minutes, or until the frittata is puffed and golden.
Extra Tips:
To enhance the flavor of your frittata, consider sautéing the onions and bell peppers in the skillet for a few minutes before adding the egg mixture.
This will bring out their sweetness and guarantee a well-rounded taste.
Additionally, feel free to experiment with different vegetables or herbs according to your preference.
Leftovers can be stored in the refrigerator and reheated for a quick meal throughout the week.
Enjoy your healthy and delicious Skillet Veggie Frittata!
One-Pan Chicken and Asparagus
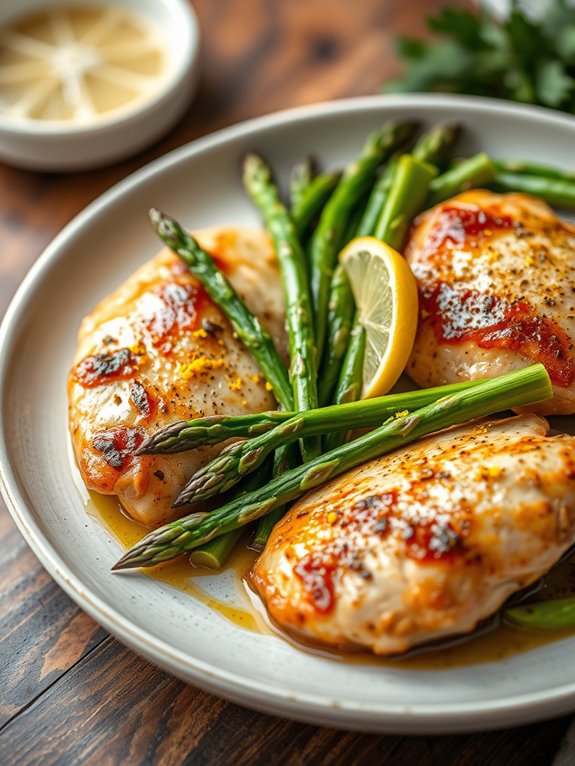
One-Pan Chicken and Asparagus is a simple yet delicious dish that brings together juicy chicken breasts and tender asparagus in a single skillet, making it an ideal option for busy weeknight dinners.
This recipe not only minimizes cleanup but also maximizes flavor, allowing the ingredients to meld beautifully as they cook together. With a few basic seasonings and healthy ingredients, you can whip up a satisfying meal that fits perfectly within a Weight Watchers-friendly plan.
The combination of chicken and asparagus isn't only nutritious but also visually appealing, making it perfect for serving guests or enjoying a cozy meal at home.
With minimal prep time and a cooking duration of just 30 minutes, this recipe is designed to help you get dinner on the table quickly without sacrificing taste or health. Enjoy the delightful flavors that come together in this easy one-pan wonder!
Ingredients:
- 1 pound boneless, skinless chicken breasts
- 1 bunch asparagus, trimmed and cut into 2-inch pieces
- 2 tablespoons olive oil
- 3 cloves garlic, minced
- 1 teaspoon lemon zest
- 1 teaspoon dried thyme
- Salt and pepper to taste
- Lemon wedges for serving (optional)
Cooking Instructions:
Start by heating the olive oil in a large cast iron skillet over medium heat.
Season the chicken breasts with salt, pepper, lemon zest, and thyme on both sides, then place them in the hot skillet. Cook for about 6-7 minutes on each side or until the chicken is golden brown and cooked through.
Once the chicken is done, remove it from the skillet and set it aside on a plate.
In the same skillet, add the minced garlic and asparagus pieces. Sauté for about 4-5 minutes until the asparagus is bright green and tender-crisp.
Return the chicken to the skillet, tossing everything together to combine, and heat for an additional minute. Serve with lemon wedges, if desired.
Extra Tips:
For added flavor, consider marinating the chicken in a mixture of olive oil, lemon juice, and herbs a few hours before cooking. This will enhance the taste and tenderness of the chicken.
Additionally, you can customize this recipe by adding other vegetables like bell peppers or cherry tomatoes for extra color and nutrients. Enjoy your healthy one-pan meal!
Quinoa and Black Bean Stir-Fry
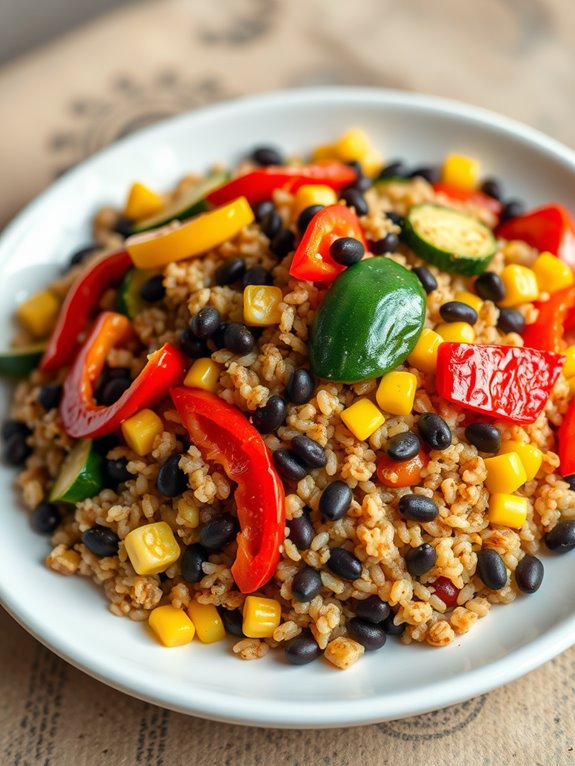
Quinoa and Black Bean Stir-Fry is a nutritious and flavorful dish that's perfect for a quick weeknight dinner or meal prep. Packed with protein, fiber, and a variety of colorful vegetables, this stir-fry isn't only satisfying but also complies with Weight Watchers-friendly guidelines. The combination of quinoa and black beans creates a hearty base, while the addition of fresh veggies and spices elevates the dish to a whole new level.
Cooking this stir-fry in a cast iron skillet enhances the flavor and guarantees even cooking. The skillet retains heat well, allowing the ingredients to sauté perfectly without losing their nutritional value. This recipe is versatile; you can easily substitute your favorite vegetables or add extra spices to cater to your taste preferences.
Ingredients:
- 1 cup quinoa, rinsed
- 2 cups vegetable broth or water
- 1 can (15 oz) black beans, drained and rinsed
- 1 medium bell pepper, diced
- 1 medium zucchini, diced
- 1 cup corn (fresh or frozen)
- 1 small onion, diced
- 2 cloves garlic, minced
- 1 tablespoon olive oil
- 1 teaspoon cumin
- 1 teaspoon chili powder
- Salt and pepper to taste
- Fresh cilantro for garnish (optional)
Cooking Instructions:
- In a medium saucepan, combine the rinsed quinoa and vegetable broth (or water). Bring to a boil, then reduce the heat to low and cover. Let it simmer for about 15 minutes, or until the quinoa is fluffy and liquid is absorbed. Remove from heat and set aside.
- In a cast iron skillet, heat olive oil over medium heat. Add the diced onion and garlic, sautéing until the onion becomes translucent. Then, add the bell pepper, zucchini, and corn, cooking for about 5-7 minutes until the vegetables are tender.
- Stir in the black beans, cooked quinoa, cumin, chili powder, salt, and pepper. Mix everything thoroughly and heat through for another 3-5 minutes.
Extra Tips:
Feel free to customize your stir-fry by adding other vegetables such as spinach, carrots, or broccoli. If you prefer a bit of heat, consider adding jalapeños or red pepper flakes.
This dish stores well in the fridge for up to 4 days, making it an excellent option for meal prep. For added flavor, top with avocado slices or a squeeze of lime juice before serving. Enjoy your delicious and healthy quinoa and black bean stir-fry!
Shrimp and Zucchini Noodles
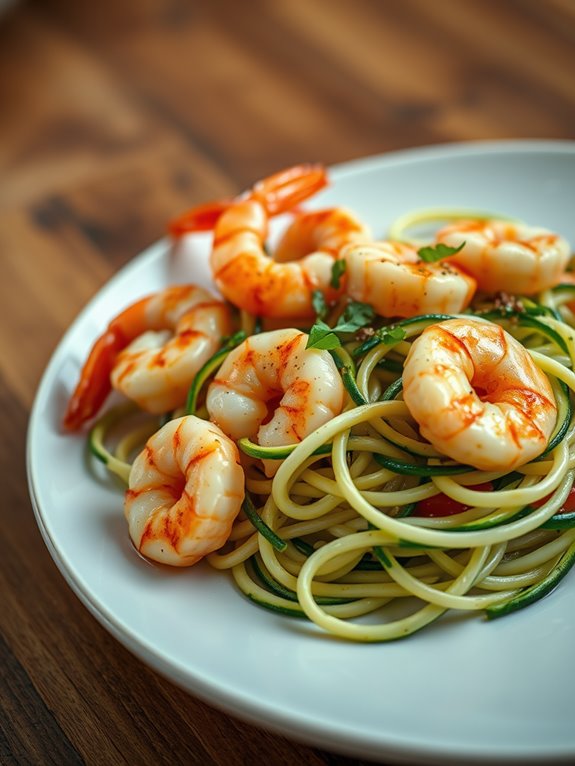
Shrimp and zucchini noodles make for a delicious and healthy dish that's perfect for a Weight Watchers-friendly meal. The combination of fresh shrimp and tender zucchini noodles not only provides a satisfying texture but also packs in a lot of flavor without adding excess calories.
This dish is quick to prepare, making it an excellent choice for busy weeknights or when you want something light and invigorating. Using a cast iron skillet guarantees even cooking and adds a beautiful sear to the shrimp. You can easily customize this recipe by adding your favorite herbs or spices, allowing you to make it your own.
Plus, it's a great way to incorporate more vegetables into your diet while enjoying a filling meal that won't derail your healthy eating goals.
Ingredients:
- 1 pound of shrimp, peeled and deveined
- 2 medium zucchini, spiralized into noodles
- 2 tablespoons olive oil
- 3 cloves garlic, minced
- 1 teaspoon red pepper flakes (optional)
- Salt and pepper, to taste
- 1 tablespoon lemon juice
- Fresh parsley, chopped for garnish
Cooking Instructions:
- Heat the olive oil in a cast iron skillet over medium heat. Add the minced garlic and red pepper flakes (if using), and sauté for about 1 minute until fragrant. Be careful not to burn the garlic.
- Add the shrimp to the skillet, seasoning with salt and pepper. Cook for about 2-3 minutes on each side until the shrimp turn pink and opaque. Remove the shrimp from the skillet and set aside.
- In the same skillet, add the spiralized zucchini noodles. Cook for about 2-3 minutes, or until tender but still slightly crisp. Return the shrimp to the pan, drizzle with lemon juice, and toss everything together until well combined. Remove from heat and garnish with fresh parsley before serving.
Extra Tips:
For added flavor, consider marinating the shrimp in a mixture of lemon juice, garlic, and herbs for 15-30 minutes before cooking. This will enhance the overall taste of the dish.
Additionally, if you prefer a heartier meal, you can serve the shrimp and zucchini noodles over a bed of cooked whole grain pasta or quinoa. Enjoy your healthy and delicious meal!
Garlic Lemon Herb Chicken Thighs
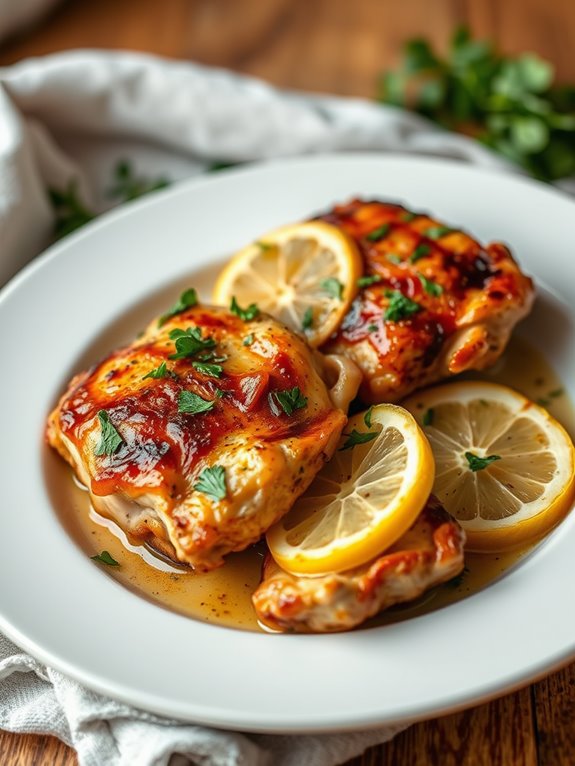
Garlic Lemon Herb Chicken Thighs are a delicious and healthy option for those following Weight Watchers. This dish combines the savory flavors of garlic and fresh herbs with the bright and zesty notes of lemon, making it a perfect weeknight meal. Cooking the chicken thighs in a cast iron skillet not only enhances the flavor but also gives the skin a crispy texture that's sure to please.
This recipe is easy to prepare and can be served with a variety of sides, such as steamed vegetables or a fresh salad. To make this dish even more appealing, it's packed with protein and essential nutrients, making it a smart choice for anyone looking to maintain a balanced diet. The use of fresh ingredients elevates the dish, and the simplicity of the recipe means you can whip it up in no time.
Whether you're cooking for yourself or a group, these Garlic Lemon Herb Chicken Thighs are sure to impress.
Ingredients:
- 4 bone-in, skin-on chicken thighs
- 3 tablespoons olive oil
- 4 cloves garlic, minced
- Juice of 1 large lemon
- Zest of 1 lemon
- 1 tablespoon fresh thyme leaves (or 1 teaspoon dried thyme)
- 1 tablespoon fresh rosemary, chopped (or 1 teaspoon dried rosemary)
- Salt and black pepper to taste
- Lemon slices for garnish (optional)
Cooking Instructions:
- Preheat your oven to 400°F (200°C). In a small bowl, mix together the olive oil, minced garlic, lemon juice, lemon zest, thyme, rosemary, salt, and pepper to create a marinade.
- Place the chicken thighs in a large bowl or zip-top bag and pour the marinade over the chicken, ensuring all pieces are well-coated. Let the chicken marinate for at least 30 minutes at room temperature or up to 2 hours in the refrigerator for deeper flavor.
- Heat a cast iron skillet over medium-high heat. Once hot, add the marinated chicken thighs skin-side down and sear for about 5-7 minutes until the skin is golden and crispy. Flip the chicken thighs and transfer the skillet to the preheated oven. Bake for an additional 20-25 minutes or until the internal temperature reaches 165°F (75°C).
Extra Tips:
For an extra layer of flavor, consider adding a splash of white wine or chicken broth to the skillet before placing it in the oven, which will create a flavorful sauce as the chicken cooks. Additionally, you can substitute the herbs based on your preference—basil, parsley, or oregano work wonderfully as well.
Always let the chicken rest for a few minutes after cooking to retain its juices before serving. Enjoy your flavorful and healthy Garlic Lemon Herb Chicken Thighs!
Spinach and Feta Stuffed Peppers
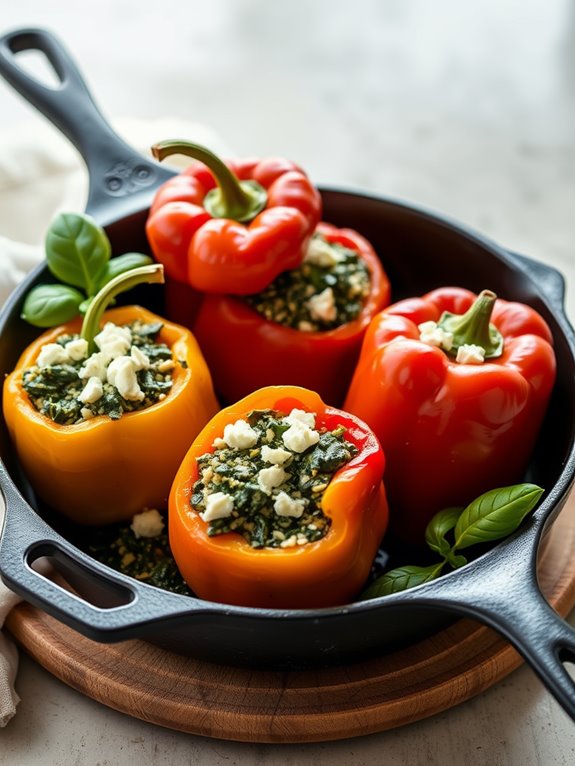
Cooking these Spinach and Feta Stuffed Peppers in a cast iron skillet allows for even heat distribution and excellent browning, giving the peppers a delightful texture. You can customize the filling by adding other vegetables or spices that you enjoy, making this dish versatile and adaptable to your taste preferences.
Whether you're serving them for dinner or meal prepping for the week, these stuffed peppers are sure to be a hit!
Ingredients:
- 4 large bell peppers (any color)
- 2 cups fresh spinach, chopped
- 1 cup feta cheese, crumbled
- 1/2 cup cooked quinoa or brown rice
- 1/4 cup onion, finely chopped
- 2 cloves garlic, minced
- 1 teaspoon dried oregano
- 1 teaspoon olive oil
- Salt and pepper to taste
- Fresh parsley, for garnish (optional)
Cooking Instructions:
Preheat your oven to 375°F (190°C). Begin by cutting the tops off the bell peppers and removing the seeds and membranes.
In a cast iron skillet, heat the olive oil over medium heat. Add the chopped onion and minced garlic, sautéing until the onion becomes translucent. Stir in the chopped spinach and cook until wilted, about 2-3 minutes.
Remove the skillet from heat and mix in the cooked quinoa (or brown rice), crumbled feta, dried oregano, salt, and pepper until well combined.
Stuff each bell pepper with the spinach and feta mixture, pressing down gently to guarantee the filling is packed in. Place the stuffed peppers upright in the cast iron skillet and cover with foil.
Bake in the preheated oven for 25-30 minutes, or until the peppers are tender. If desired, remove the foil in the last 5 minutes of baking to allow the tops to brown slightly. Garnish with fresh parsley before serving.
Extra Tips:
When selecting bell peppers, look for ones that are firm and have smooth skin, as these will hold up better during cooking.
For an extra flavor boost, consider adding spices like crushed red pepper flakes or fresh herbs such as basil or thyme to the filling. Additionally, you can prepare the filling ahead of time and store it in the fridge, making it even easier to assemble and bake the stuffed peppers on a busy weeknight.
Beef and Broccoli Skillet
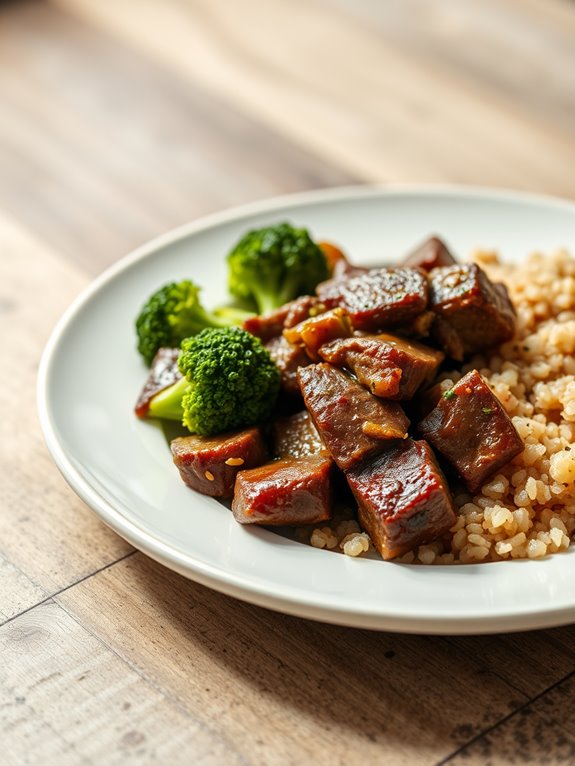
Cooking this dish in a cast iron skillet enhances the flavors as the beef caramelizes and the broccoli retains its crunch. It's perfect for a quick weeknight dinner or a meal prep option for the week ahead. With just a few simple ingredients, you can whip up a delicious and wholesome dish that the whole family will enjoy.
Ingredients:
- 1 pound flank steak, thinly sliced against the grain
- 2 cups broccoli florets
- 2 tablespoons low-sodium soy sauce
- 1 tablespoon oyster sauce
- 1 tablespoon cornstarch
- 1 tablespoon vegetable oil
- 2 cloves garlic, minced
- 1 teaspoon ginger, minced
- Salt and pepper to taste
- Cooked brown rice or quinoa for serving (optional)
Cooking Instructions:
Begin by marinating the sliced flank steak in a mixture of soy sauce, oyster sauce, and cornstarch for about 15-20 minutes. This will help tenderize the meat and infuse it with flavor.
While the beef is marinating, prepare your broccoli by steaming or blanching it until just tender, then set aside.
Heat the vegetable oil in a cast iron skillet over medium-high heat. Add the marinated beef to the skillet and cook for 3-4 minutes until browned and cooked through.
Push the beef to one side of the skillet, add the minced garlic and ginger, and sauté for about 30 seconds until fragrant.
Then, add the broccoli to the skillet, tossing everything together and cooking for an additional 2-3 minutes. Season with salt and pepper to taste before serving over a bed of brown rice or quinoa if desired.
Extra Tips:
For an extra layer of flavor, consider adding a splash of sesame oil or a sprinkle of sesame seeds before serving.
This dish is highly customizable, so feel free to incorporate other vegetables like bell peppers or snap peas to suit your taste.
Remember to keep the skillet hot to achieve a nice sear on the beef, and enjoy your healthy, delicious meal!
Mediterranean Chickpea Salad
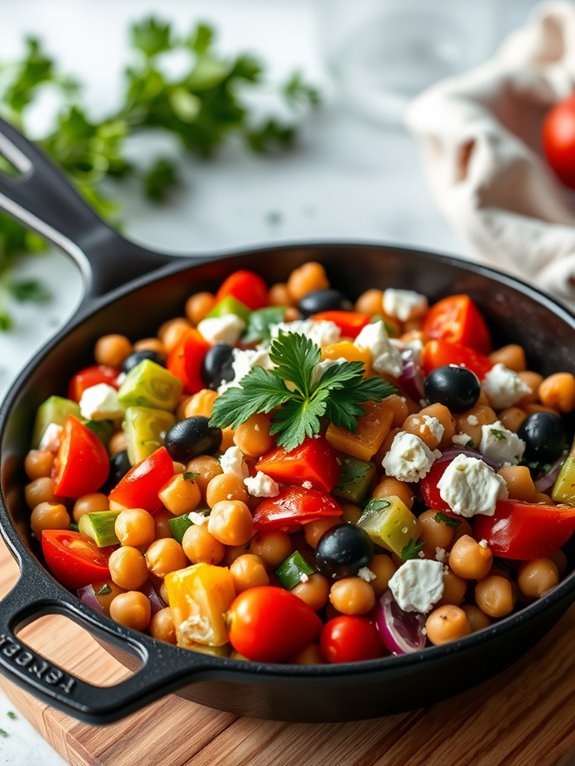
Using a cast iron skillet to prepare this salad allows you to take advantage of the skillet's ability to heat evenly and retain warmth, giving a nice roasted flavor to the vegetables if you choose to sauté them lightly.
The result is a revitalizing yet hearty salad that can be enjoyed warm or cold, making it a versatile addition to your meal prep.
Ingredients:
- 1 can (15 oz) chickpeas, drained and rinsed
- 1 cup cherry tomatoes, halved
- 1 cucumber, diced
- 1 bell pepper (red or yellow), diced
- 1 small red onion, finely chopped
- 1/4 cup Kalamata olives, pitted and sliced
- 1/4 cup feta cheese, crumbled (optional)
- 2 tablespoons olive oil
- 2 tablespoons red wine vinegar
- 1 teaspoon dried oregano
- Salt and pepper to taste
- Fresh parsley, chopped for garnish
Instructions:
In a cast iron skillet over medium heat, add a tablespoon of olive oil and the chopped red onion. Sauté for about 3-4 minutes until the onion becomes translucent.
Then, add the chickpeas and cook for an additional 2-3 minutes to warm them slightly and enhance their flavor. Remove the skillet from heat and let it cool for a few minutes.
In a large bowl, combine the sautéed chickpeas and onions with the cherry tomatoes, cucumber, bell pepper, olives, and feta cheese.
In a separate small bowl, whisk together the remaining olive oil, red wine vinegar, oregano, salt, and pepper. Pour the dressing over the salad and toss everything together gently.
Garnish with fresh parsley and serve immediately, or let it chill in the refrigerator for about 30 minutes for the flavors to meld.
Extra Tips:
Feel free to customize this salad by adding other ingredients such as avocado, arugula, or grilled chicken for an extra protein boost.
To maximize the flavors, consider letting the salad sit for a bit after tossing with the dressing so the chickpeas can absorb the vinaigrette.
Additionally, if you prefer a warm salad, you can toss in more sautéed vegetables like zucchini or spinach for added nutrition.
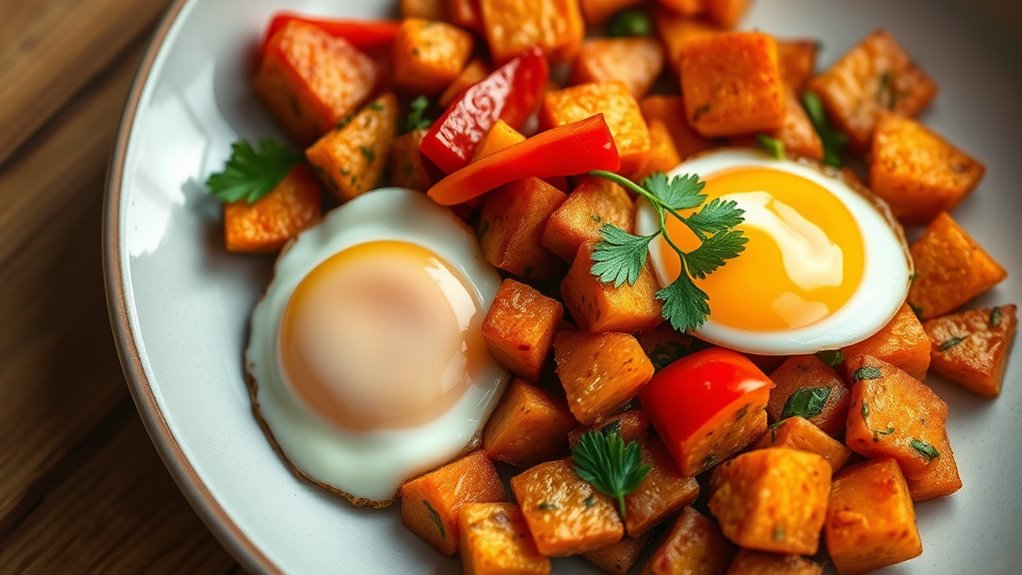
Sweet Potato Hash With Eggs
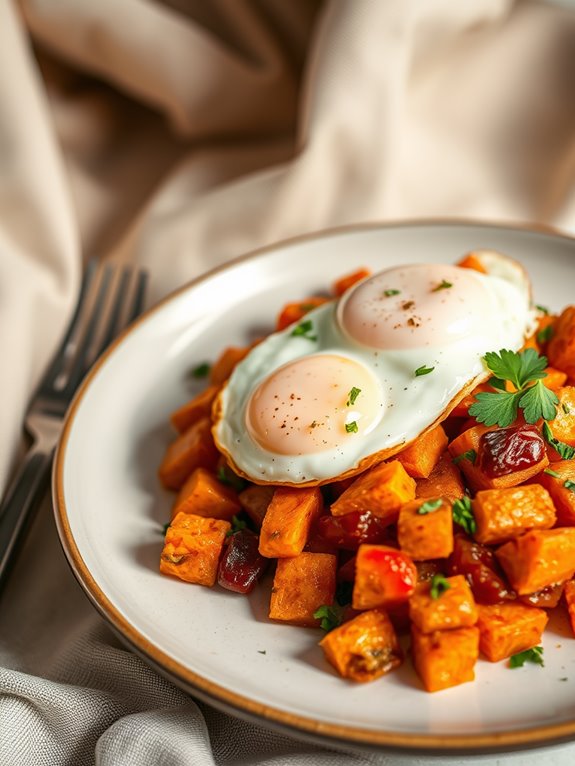
Sweet Potato Hash with Eggs is a nutritious and hearty dish that makes for a perfect breakfast or brunch option. The combination of sweet potatoes, vibrant vegetables, and eggs creates a filling yet healthy meal that fits well within the Weight Watchers framework. Not only is this dish delicious, but it's also packed with vitamins and minerals, making it an excellent choice for anyone looking to maintain a balanced diet.
Cooking this Sweet Potato Hash is simple and can be done in just one cast iron skillet, minimizing cleanup time. The sweet potatoes caramelize beautifully, providing a natural sweetness that pairs wonderfully with savory vegetables and perfectly cooked eggs. This recipe is versatile, allowing you to customize it with your favorite vegetables or spices for added flavor.
Ingredients:
- 2 medium sweet potatoes, peeled and diced
- 1 red bell pepper, diced
- 1 small onion, diced
- 2 cloves garlic, minced
- 1 teaspoon olive oil
- 1 teaspoon smoked paprika
- Salt and pepper to taste
- 4 large eggs
- Fresh parsley or cilantro for garnish (optional)
Cooking Instructions:
Begin by heating the olive oil in a cast iron skillet over medium heat. Once the oil is hot, add the diced sweet potatoes and cook for about 8-10 minutes, stirring occasionally, until they start to soften and turn golden brown.
Add the diced onion, bell pepper, and minced garlic to the skillet. Season with smoked paprika, salt, and pepper, and continue cooking for another 5-7 minutes until the vegetables are tender and well combined.
Once the sweet potato mixture is cooked, create four small wells in the hash and crack an egg into each well. Cover the skillet with a lid and reduce the heat to low, cooking until the eggs reach your desired doneness, typically about 5-7 minutes for runny yolks.
Once cooked, remove from heat, garnish with fresh parsley or cilantro if desired, and serve warm.
Extra Tips:
For added flavor, feel free to experiment with different spices or add in ingredients like spinach, kale, or black beans for more nutrition.
If you prefer your eggs cooked differently, you can also scramble them in a separate bowl and mix them into the hash before serving. Leftovers can be stored in an airtight container in the refrigerator for up to three days, making this a great option for meal prep!
Frequently Asked Questions
Can I Use Non-Stick Pans Instead of Cast Iron Skillets?
You can definitely use non-stick pans instead of cast iron skillets! They're convenient and easy to clean, but remember they may not provide the same heat retention and flavor development that cast iron offers.
How Do I Properly Season My Cast Iron Skillet?
Seasoning your cast iron skillet is like nurturing a good relationship; you need patience. Clean it, apply a thin layer of oil, and bake it upside down at a high temperature to create a non-stick surface.
Are These Recipes Suitable for Meal Prepping?
Yes, these recipes are perfect for meal prepping! You can easily cook in batches, store portions in the fridge, and enjoy delicious, healthy meals throughout the week without sacrificing flavor or nutrition. You'll love it!
What Are the Best Substitutions for High-Calorie Ingredients?
When you're looking to lower calorie counts, swap full-fat dairy for low-fat versions, use vegetable broth instead of oil, and replace sugar with natural sweeteners like stevia or mashed bananas. You'll maintain flavor while cutting calories!
How Do I Clean My Cast Iron Skillet After Cooking?
To clean your cast iron skillet after cooking, rinse it with warm water, scrub gently with a brush, and avoid soap. Dry it thoroughly and apply a thin layer of oil to prevent rust.