As an affiliate, we may earn a commission from qualifying purchases. We get commissions for purchases made through links on this website from Amazon and other third parties.
When it comes to sandwich making, a cast iron sandwich maker can elevate your creations to a whole new level. You'll appreciate the even heat distribution that results in perfectly crispy exteriors and gooey interiors. From classic grilled cheese to hearty BBQ pulled pork, there's a recipe for everyone. Curious about how to maximize your sandwich-making skills? Let's explore some delicious options that might just inspire your next meal.
Key Takeaways
- Use a sandwich maker with cast iron plates for even heat distribution and crispy finishes on sandwiches.
- Try classic grilled cheese or breakfast sandwiches for quick and delicious meals.
- Experiment with hearty options like BBQ pulled pork or Reuben sandwiches for a satisfying meal.
- Incorporate vegetarian recipes like spinach and feta quesadillas or roasted vegetable wraps for healthy choices.
- Customize your sandwiches with various breads, cheeses, and additional toppings for unique flavor profiles.
Classic Grilled Cheese Sandwich

Grilled cheese sandwiches are a timeless favorite, cherished for their gooey cheese and crispy exterior. This simple yet satisfying meal is perfect for any time of the day, whether enjoyed as a quick lunch or paired with a warm bowl of tomato soup for dinner.
With just a few ingredients, you can whip up a classic grilled cheese that will delight your taste buds and bring back fond memories of childhood meals.
To achieve the perfect grilled cheese, it's all about the balance of heat and timing. The bread should be golden brown and crisp, while the cheese melts to a delicious, gooey consistency. Experiment with different types of bread and cheese to find your ideal combination.
This recipe will guide you through making a classic grilled cheese sandwich that's sure to please everyone at the table.
Ingredients:
- 2 slices of bread (white, whole wheat, or sourdough)
- 2 slices of cheese (cheddar, American, or your favorite)
- 1-2 tablespoons of butter
Cooking Instructions:
Begin by heating a non-stick skillet over medium heat. While the skillet is warming up, spread butter evenly on one side of each slice of bread.
Place one slice of bread, butter-side down, onto the skillet. Layer the cheese slices on top of the bread, then cover with the second slice of bread, butter-side up.
Cook for about 3-4 minutes, or until the bottom slice is golden brown and the cheese begins to melt. Carefully flip the sandwich using a spatula and cook the other side for an additional 3-4 minutes, until it's also golden brown and the cheese is fully melted.
Once both sides are cooked to your liking, remove the grilled cheese sandwich from the skillet and let it cool for a minute before slicing it in half. This brief cooling period helps prevent the molten cheese from spilling out when you cut into it.
Extra Tips:
For an extra flavor boost, consider adding a slice of tomato, a few slices of crispy bacon, or even a sprinkle of garlic powder inside the sandwich before grilling.
Additionally, using a mix of cheeses can enhance the flavor profile remarkably. Experiment with different breads and toppings to find your favorite combination!
Caprese Panini
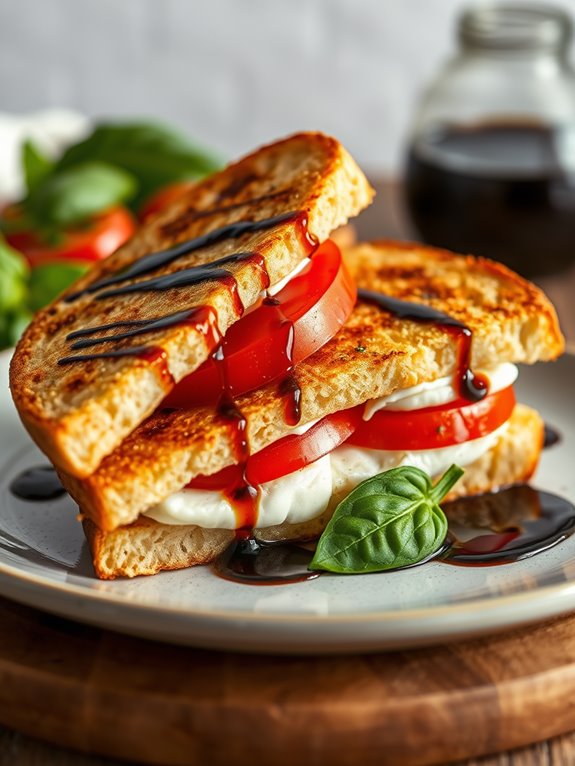
Caprese panini is a delightful Italian sandwich that combines fresh ingredients to create a burst of flavor in every bite. This sandwich features the classic combination of ripe tomatoes, fresh mozzarella, and fragrant basil, all drizzled with a touch of balsamic glaze. The panini is grilled to perfection, resulting in a crispy exterior and a gooey, melty center that's simply irresistible.
Whether you're preparing a quick lunch or a satisfying dinner, this dish is sure to impress. Making a Caprese panini isn't only easy but also allows for customization. You can add extra ingredients like pesto or avocado for a unique twist. This recipe is perfect for those who appreciate fresh and vibrant flavors, and it pairs wonderfully with a side salad or a bowl of soup.
Let's explore the ingredients and cooking instructions to create this delicious sandwich.
Ingredients:
- 2 slices of ciabatta bread
- 1 medium ripe tomato, sliced
- 4 ounces fresh mozzarella cheese, sliced
- Fresh basil leaves
- Balsamic glaze
- Olive oil
- Salt and pepper to taste
To prepare your Caprese panini, start by drizzling a little olive oil on the outside of each slice of ciabatta bread. Lay one slice of bread on a clean surface and layer the sliced tomatoes, mozzarella, and fresh basil leaves. Drizzle a small amount of balsamic glaze over the top and sprinkle with salt and pepper.
Place the second slice of bread on top to complete the sandwich. Preheat your sandwich maker or panini press, then place the sandwich inside and cook until the bread is golden brown and the cheese is melted, usually about 3-5 minutes.
Once your Caprese panini is done cooking, remove it from the sandwich maker and let it cool for a minute before slicing it in half. This will help the cheese set slightly and make it easier to eat. Serve your panini warm with extra balsamic glaze on the side for dipping if desired.
Extra Tips: For an extra layer of flavor, consider adding a spread of pesto on the inside of the bread before layering the ingredients. Additionally, if you don't have a sandwich maker, you can easily cook your panini in a skillet by placing a heavy pan on top of it to press it down and achieve that crispy texture.
Enjoy your delicious Caprese panini fresh and warm!
Turkey and Avocado Melt
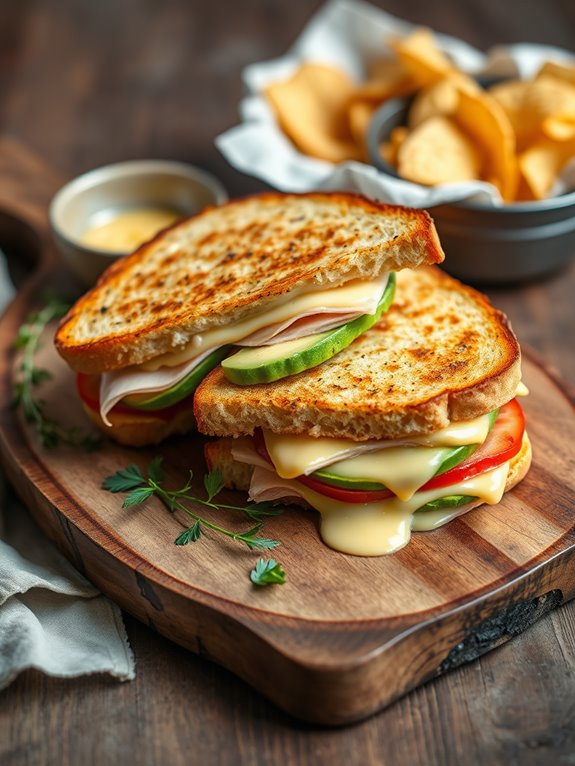
This recipe isn't only easy to prepare but also allows for some customization based on your preferences. You can add other toppings like fresh tomatoes or spicy jalapeños for an extra kick. Whether you're using a sandwich maker or a skillet, this Turkey and Avocado Melt will quickly become a favorite in your household.
Ingredients:
- 2 slices of whole grain or sourdough bread
- 4-6 slices of deli turkey
- 1 ripe avocado, sliced
- 2 slices of cheddar or mozzarella cheese
- 1 tablespoon of mayonnaise (optional)
- Salt and pepper, to taste
- Butter or olive oil for grilling
Cooking Instructions:
Begin by preheating your sandwich maker according to the manufacturer's instructions. If using a skillet, heat it over medium heat.
While it heats up, spread a thin layer of mayonnaise on one side of each slice of bread for added flavor and moisture. Layer the turkey slices evenly on one slice of bread, followed by the avocado slices. Sprinkle a little salt and pepper over the avocado for enhanced taste.
Next, place the cheese slices on top of the turkey and avocado, and then cover with the second slice of bread, mayonnaise side down.
If using a sandwich maker, place the sandwich inside and close the lid, cooking until the bread is golden brown and the cheese has melted, usually about 3-5 minutes.
For a skillet, melt a little butter or drizzle olive oil in the pan before adding the sandwich. Cook for about 3-4 minutes on one side until golden brown, then carefully flip and cook for an additional 3-4 minutes on the other side.
Once done, remove the sandwich, let it cool slightly, then slice and serve hot.
Extra Tips:
For a crispy crust, make sure to use enough butter or oil in your sandwich maker or skillet.
You can also experiment with different types of cheese or add fresh spinach and tomatoes for more flavor and nutrition. If you want to make this dish even heartier, consider adding a fried egg on top before serving.
Enjoy your Turkey and Avocado Melt with a side of chips or a fresh salad for a complete meal!
BBQ Pulled Pork Sandwich

BBQ Pulled Pork Sandwiches are a delicious and hearty meal that can be enjoyed any day of the week. The tender, slow-cooked pork, combined with a tangy barbecue sauce, makes for a flavorful filling that's perfect for a sandwich. Whether you're hosting a backyard barbecue or simply craving comfort food, this recipe is sure to please. Serve it with coleslaw on the side or even add some on top for an extra crunch!
To make the most out of your BBQ Pulled Pork Sandwiches, it's important to choose the right cut of meat. Pork shoulder, also known as pork butt, is the ideal choice for this recipe due to its marbling and fat content, which results in tender and juicy pork when cooked low and slow. Paired with your favorite barbecue sauce and some fresh sandwich rolls, these sandwiches are a crowd-pleaser that everyone will love.
Ingredients:
- 2-3 lbs pork shoulder (pork butt)
- 1 tablespoon olive oil
- 1 onion, diced
- 4 cloves garlic, minced
- 1 cup barbecue sauce (store-bought or homemade)
- 1 tablespoon apple cider vinegar
- 1 teaspoon smoked paprika
- 1 teaspoon salt
- 1 teaspoon black pepper
- Sandwich rolls or buns
- Coleslaw (optional, for serving)
To prepare the BBQ Pulled Pork, start by seasoning the pork shoulder with salt, black pepper, and smoked paprika. In a large skillet, heat olive oil over medium heat and add the diced onions. Sauté the onions until they become translucent, then stir in the minced garlic and cook for an additional minute.
Transfer the pork shoulder to a slow cooker and add the sautéed onions and garlic, barbecue sauce, and apple cider vinegar. Cover and cook on low for 8 hours or until the pork is fork-tender.
Once the pork is cooked, remove it from the slow cooker and shred it using two forks. Return the shredded pork to the slow cooker and mix it with the remaining barbecue sauce. Serve the pulled pork on sandwich rolls or buns, and top with coleslaw if desired.
For extra tips, make sure to let the pork shoulder rest for a few minutes after cooking before shredding to allow the juices to redistribute. If you prefer a smoky flavor, consider adding a dash of liquid smoke to the barbecue sauce. Additionally, you can prepare the pulled pork a day in advance; it actually tastes better the next day as the flavors meld together. Enjoy your BBQ Pulled Pork Sandwiches!
Spinach and Feta Quesadilla
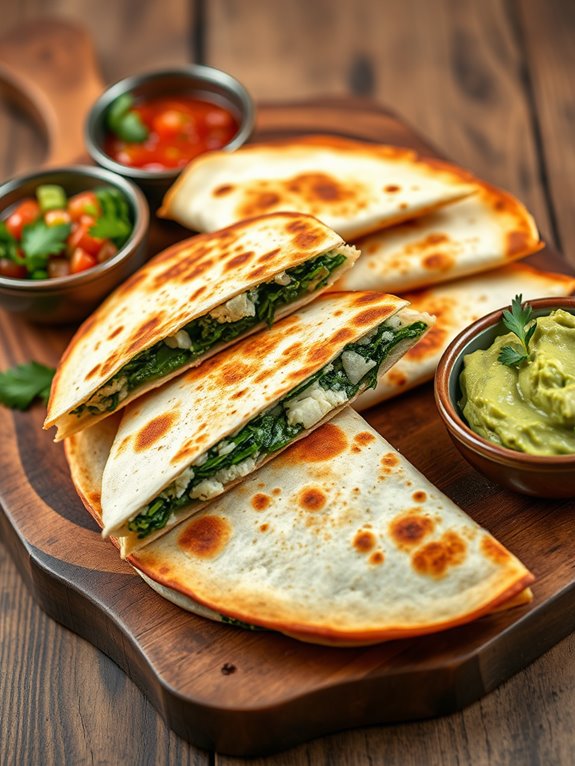
Using a sandwich maker to prepare these quesadillas guarantees a perfectly crispy exterior while keeping the filling warm and gooey.
This method saves time and effort compared to using a skillet, making it an ideal choice for busy weeknights or a simple snack. Pair them with a side of salsa or guacamole for added flavor and enjoyment.
Ingredients:
- 2 large tortillas
- 1 cup fresh spinach, chopped
- 1/2 cup feta cheese, crumbled
- 1/2 cup shredded mozzarella cheese
- 1 tablespoon olive oil
- Salt and pepper to taste
Cooking Instructions:
- Preheat your sandwich maker while you prepare the filling. In a mixing bowl, combine the chopped spinach, crumbled feta cheese, shredded mozzarella, and olive oil.
- Season with salt and pepper to taste, and mix well until all ingredients are evenly distributed.
- Place one tortilla on a clean surface. Spread the spinach and feta mixture evenly over the tortilla, leaving a small border around the edges.
- Top with the second tortilla. Carefully place the quesadilla into the preheated sandwich maker and close the lid. Cook for about 3-5 minutes, or until the tortillas are golden brown and the cheese has melted.
Extra Tips:
For an added flavor boost, consider incorporating other ingredients such as sun-dried tomatoes, olives, or even cooked chicken.
You can also experiment with different types of cheese to suit your taste. Always verify your sandwich maker is well-greased to prevent sticking, and let the quesadilla cool for a minute before slicing to avoid burning yourself on the hot filling. Enjoy!
Ham and Cheese Croque Monsieur

The Ham and Cheese Croque Monsieur is a classic French sandwich that combines the rich flavors of ham and melted cheese, all enveloped in crispy, buttery bread. This delightful dish is perfect for a quick lunch or a cozy dinner, and it can be easily prepared using a sandwich maker for that perfectly golden finish.
With its origins in Parisian cafés, this sandwich is beloved for its simplicity and satisfying taste. Elevate your sandwich game with this easy-to-follow recipe that brings a taste of France right to your kitchen.
The key to a perfect Croque Monsieur lies in the quality of the ingredients and the technique used to create that irresistible crunch. Use a good quality ham and cheese, such as Gruyère or Emmental, and don't skip on the butter for a rich, decadent flavor. This recipe will guide you through making this indulgent treat that's sure to impress your family and friends.
Ingredients:
- 4 slices of bread (preferably sourdough or country-style)
- 4 slices of ham
- 4 slices of Gruyère or Emmental cheese
- 2 tablespoons unsalted butter (softened)
- 2 tablespoons Dijon mustard (optional)
- Salt and pepper to taste
To prepare the Croque Monsieur, start by spreading a layer of softened butter on one side of each slice of bread. If desired, spread a thin layer of Dijon mustard on the unbuttered side of two slices.
Layer one slice of ham and one slice of cheese on top of the mustard-spread bread, then place the other slice of bread on top, buttered side facing out. Repeat with the remaining ingredients to create a second sandwich.
Preheat the sandwich maker according to the manufacturer's instructions, and then place the sandwiches inside. Cook until the bread is golden brown and the cheese is melted, typically about 3-5 minutes.
For an extra touch, consider adding a sprinkle of nutmeg to the cheese before sandwiching it, or even a fried egg on top once cooked for a Croque Madame twist.
Be sure to watch the sandwiches closely while they cook, as sandwich makers can vary in heat intensity. For a crispier result, you can also press down slightly on the sandwiches while they cook.
Enjoy your homemade Croque Monsieur with a side of salad or crispy fries for a complete meal!
Roasted Vegetable and Hummus Wrap
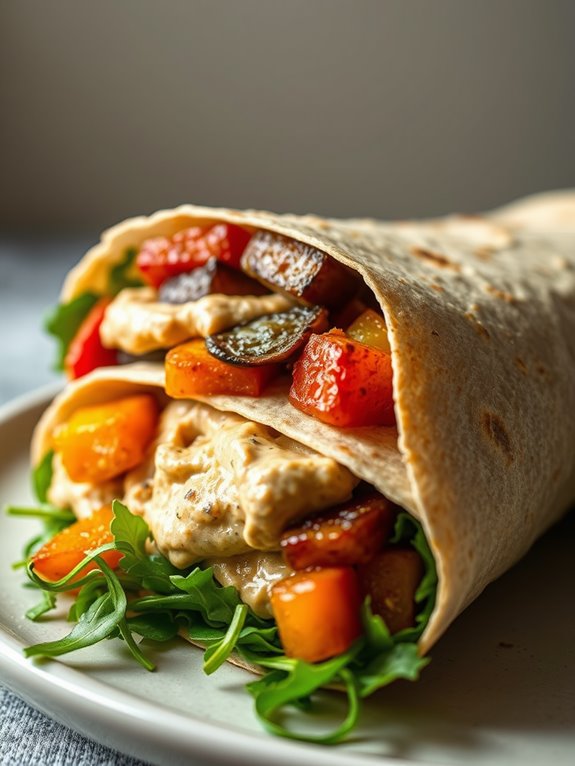
Roasted Vegetable and Hummus Wraps are a delicious and healthy option for lunch or a quick dinner. Packed with vibrant veggies and creamy hummus, these wraps aren't only satisfying but also easy to prepare. The combination of roasted vegetables brings out their natural sweetness and flavors, making each bite delightful.
Whether you're a vegetarian or just looking to incorporate more plant-based meals into your diet, this recipe is a fantastic choice. These wraps are versatile, allowing you to customize the ingredients based on your preferences or what you have on hand.
Perfect for meal prep, you can roast a batch of vegetables in advance and assemble the wraps when you're ready to eat. Serve them with a side of fresh fruit or a light salad for a complete meal that's both nourishing and fulfilling.
Ingredients:
- 1 zucchini, sliced
- 1 bell pepper, sliced (any color)
- 1 red onion, sliced
- 1 cup cherry tomatoes, halved
- 2 tablespoons olive oil
- Salt and pepper to taste
- 4 large whole wheat tortillas or wraps
- 1 cup hummus
- Fresh spinach or arugula
- Optional: feta cheese or olives for topping
Cooking Instructions:
Preheat your oven to 425°F (220°C). In a large bowl, combine the sliced zucchini, bell pepper, red onion, and cherry tomatoes. Drizzle with olive oil, and season with salt and pepper. Toss until the vegetables are evenly coated, then spread them out on a baking sheet in a single layer.
Roast in the oven for about 20-25 minutes, or until the vegetables are tender and slightly caramelized. Once the vegetables are roasted, remove them from the oven and let them cool slightly.
To assemble your wraps, spread a generous layer of hummus over each tortilla, followed by a handful of fresh spinach or arugula. Top with the roasted vegetables, and if desired, sprinkle some feta cheese or olives for added flavor. Roll up the tortillas tightly, slice in half, and enjoy!
Extra Tips:
Feel free to experiment with different vegetables based on what's in season or available. Other great options include eggplant, mushrooms, or carrots. You can also add herbs like basil or cilantro to enhance the flavor.
If you want to make these wraps even more filling, consider adding some cooked quinoa or chickpeas. These wraps can be stored in the fridge for up to two days, making them an excellent choice for meal prepping!
Reuben Sandwich

The Reuben sandwich is a classic American delight that combines savory corned beef, tangy sauerkraut, and creamy Swiss cheese, all nestled between two slices of crisp rye bread.
This sandwich, often grilled to perfection, is a favorite for lunch or dinner, offering a satisfying crunch with each bite. The harmony of flavors from the ingredients makes the Reuben a beloved choice at delis across the country.
Making a Reuben sandwich at home in your sandwich maker isn't only simple but also a fun way to enjoy this iconic dish. With just a few ingredients and minimal prep time, you can whip up a delicious sandwich that rivals any restaurant's version.
Gather your ingredients, and let's get started on this mouthwatering creation.
Ingredients:
- 2 slices of rye bread
- 4 ounces of corned beef, sliced
- 2 ounces of Swiss cheese, sliced
- 2 tablespoons of sauerkraut, drained
- 1 tablespoon of Russian or Thousand Island dressing
- 1 tablespoon of butter
Instructions:
Begin by preheating your sandwich maker according to the manufacturer's instructions.
While it heats, take one slice of rye bread and spread a thin layer of butter on one side. Place the buttered side down on a clean surface.
Layer the corned beef evenly over the bread, followed by the sauerkraut, Swiss cheese, and a drizzle of dressing.
Top with the second slice of rye bread, ensuring the unbuttered side is facing up. Spread butter on the top slice as well.
Carefully place the sandwich into the preheated sandwich maker and close the lid. Cook for about 3-5 minutes, or until the bread is golden brown and the cheese has melted.
Once done, remove the sandwich from the maker, let it cool for a minute, and then slice it in half. Serve warm and enjoy!
Extra Tips:
For added flavor, consider using marble rye bread for a slightly sweet twist on the classic Reuben.
Additionally, feel free to adjust the amount of sauerkraut and dressing according to your taste preferences.
If you prefer a crunchier texture, you can also toast the bread slightly before assembling the sandwich. Enjoy your homemade Reuben!
Breakfast Sandwich With Egg and Bacon

Start your day off right with a delicious breakfast sandwich featuring the classic combination of egg and bacon. This quick and easy recipe is perfect for busy mornings or relaxed weekends alike. With just a few simple ingredients and a sandwich maker, you can whip up a satisfying meal that will keep you energized throughout the day.
The beauty of this breakfast sandwich lies in its simplicity, yet it offers a delightful balance of flavors and textures. The crispy bacon pairs perfectly with the fluffy egg, all nestled between warm, toasted bread. Whether you prefer it with cheese, avocado, or your favorite condiments, this sandwich is a versatile choice that can be customized to your taste.
Ingredients:
- 2 slices of bread (your choice)
- 2 large eggs
- 2 slices of bacon
- Salt and pepper, to taste
- Optional: cheese slices, avocado, or hot sauce
To begin, preheat your sandwich maker according to the manufacturer's instructions. While it heats up, cook the bacon in a skillet over medium heat until crispy. Once cooked, remove the bacon and drain on paper towels.
In the same skillet, crack the eggs and season them with salt and pepper. Cook the eggs to your desired doneness, either sunny-side up or scrambled.
Assemble your sandwich by placing one slice of bread on the bottom plate of the sandwich maker. Layer on the cooked bacon, followed by the egg, and add any optional ingredients like cheese or avocado. Top with the second slice of bread and close the sandwich maker.
Cook for about 3-5 minutes, or until the bread is golden brown and crispy. Carefully remove the sandwich and let it cool for a minute before slicing in half.
When making this breakfast sandwich, feel free to experiment with different types of bread or add extra ingredients like sautéed vegetables or herbs. For additional flavor, you can also spread a thin layer of butter or mayonnaise on the outside of the bread before cooking to achieve a rich, golden crust. Enjoy your homemade breakfast sandwich!
Frequently Asked Questions
Can I Use a Non-Stick Spray on My Cast Iron Sandwich Maker?
You can use a non-stick spray on your cast iron sandwich maker, but it's generally unnecessary. Properly seasoned cast iron usually provides enough non-stick properties, ensuring your sandwiches won't stick while cooking.
How Do I Properly Clean My Cast Iron Sandwich Maker?
When it comes to cleaning your cast iron sandwich maker, don't throw in the towel! Scrub it gently with warm water, avoid soap, and dry it thoroughly to keep it in tip-top shape.
What Is the Best Way to Season a Cast Iron Sandwich Maker?
To season your cast iron sandwich maker, start by thoroughly cleaning it. Apply a thin layer of vegetable oil, then bake it upside down in the oven at 350°F for an hour to create a non-stick surface.
Are There Any Sandwich Recipes Suitable for Vegetarians?
Imagine biting into a warm, gooey grilled cheese, or savoring a fresh veggie and hummus sandwich. You've got plenty of vegetarian options, like spinach and feta or roasted peppers with mozzarella. Let your creativity flow!
How Can I Prevent My Sandwiches From Sticking?
To prevent your sandwiches from sticking, lightly grease the cooking surface with oil or butter. Use non-stick spray or parchment paper. Keep the heat at a medium level, ensuring even cooking without burning. Enjoy!